RedDirt
Gold Member
- Joined
- Dec 4, 2007
- Messages
- 469
- Location
- Northern Idaho
- Tractor
- Kubota BX23, Wards 16HP HST Garden Tractor, (previous) D2 Logging Cat
This post could go into one of several forums. It is about modifications and upgrades I've done to my 5ft KK Rear Blade.
The used bx23 I bought last fall came with a rear blade instead of the box blade I'd have preferred. In the long run the RB will likely get more use than the BB yet I still have the need for the rippers and side plates of a BB for a Spring project so I built removable ones for the RB.
The title is labeled upgrades x4. These upgrades are:
1. Rotate lower 3PH lift arm pin tabs downward to increase lift height.
2. Add Gauge wheels - I posted this separately, see
http://www.tractorbynet.com/forums/build-yourself/113281-another-gauge-wheel-build-post.html , my work begins at post #15.
3. Add removable ripper bar.
4. Add removable side plates
I've used the gauge wheels for back-plowing driveway snow and they work great.
The lift work raised my blade lift from 8" to 17" and I know that will be handy. We had quite a discussion trying to figure out the best fix here:
http://www.tractorbynet.com/forums/attachments/114764-how-do-i-raise-3-a.html
I apologize for the following photo quality. It was a very bright day and I've had to lighten many pictures to see into the shadows.
You'll see only two ripper shanks. I'm still not sure what the tractor will pull so I am postponing buying the other pair until I get a chance to test it. I purchased the rippers from Agri Supply for $16 ea + shipping.
The bx23 is rated for a 4ft box blade and a 5ft rear blade. With my attachments I have the equivalent of a 5 ft box blade so I'll likely need to take lighter cuts.
Completed Project:
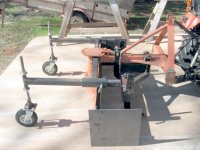
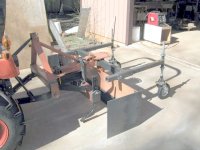
Now here's something a BB can't do: Rip and angle blade. It was this feature that led to the maximum length of the ripper bar. It is as long as I could make it and still engage the first pin of the angle adjustment.
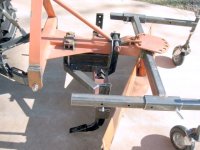
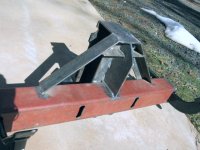
Here are some details of the ripper attachment. It pivots from the rear pin then bolts to welded-on nuts below the attachment. All the load is on the pull bar of the blade and the two 3/4" dia bolts that wrap the pull tube. I'll watch the pull tube for warp under load (at the bolts) and add a gusset to the top if needed. The heart of the system is a 5" "H" pile below the pull bar and a 4x4x3/16 tube to mount the rippers. The rest is hangers, gussets and ripper shank mounts. I'd have preferred a larger tube wall thickness but I had only this piece along with a 3/8 tube in the scrap pile. I started the use the 3/8" piece but it was way heavy making installation a chore. If the slots in the 3/16" tube for the rippers start to stress I plan to put some back-up plates at the stress points.
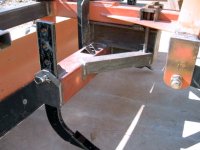
Note the tabs welded on the top of the H pile that bear against the sides of the pull tube. These these are to prevent rotationl twisting of the ripper arm.
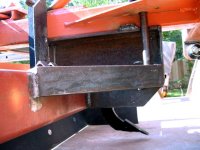
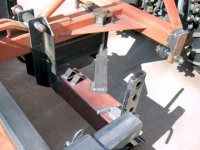
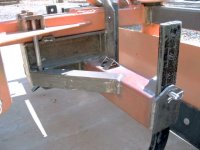
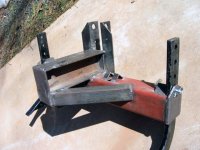
The captured nuts are welded to an "L" angle that is welded to the bottom of the H pile. This is to strengthen the attachment point by moving the load from the edge of the flange to the pile center and angle brace.
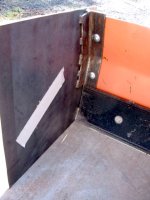
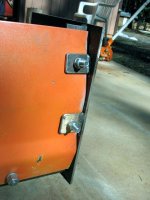
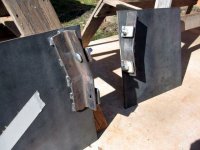
And here are the side plates. For now I decided not to angle or cross brace them. This based on mjcad use of similar side plates on a frontier blade. He has had good luck without additional bracing. I'll take it easy at first and beef them up as needed if they start to tweak.
The used bx23 I bought last fall came with a rear blade instead of the box blade I'd have preferred. In the long run the RB will likely get more use than the BB yet I still have the need for the rippers and side plates of a BB for a Spring project so I built removable ones for the RB.
The title is labeled upgrades x4. These upgrades are:
1. Rotate lower 3PH lift arm pin tabs downward to increase lift height.
2. Add Gauge wheels - I posted this separately, see
http://www.tractorbynet.com/forums/build-yourself/113281-another-gauge-wheel-build-post.html , my work begins at post #15.
3. Add removable ripper bar.
4. Add removable side plates
I've used the gauge wheels for back-plowing driveway snow and they work great.
The lift work raised my blade lift from 8" to 17" and I know that will be handy. We had quite a discussion trying to figure out the best fix here:
http://www.tractorbynet.com/forums/attachments/114764-how-do-i-raise-3-a.html
I apologize for the following photo quality. It was a very bright day and I've had to lighten many pictures to see into the shadows.
You'll see only two ripper shanks. I'm still not sure what the tractor will pull so I am postponing buying the other pair until I get a chance to test it. I purchased the rippers from Agri Supply for $16 ea + shipping.
The bx23 is rated for a 4ft box blade and a 5ft rear blade. With my attachments I have the equivalent of a 5 ft box blade so I'll likely need to take lighter cuts.
Completed Project:


Now here's something a BB can't do: Rip and angle blade. It was this feature that led to the maximum length of the ripper bar. It is as long as I could make it and still engage the first pin of the angle adjustment.

Here are some details of the ripper attachment. It pivots from the rear pin then bolts to welded-on nuts below the attachment. All the load is on the pull bar of the blade and the two 3/4" dia bolts that wrap the pull tube. I'll watch the pull tube for warp under load (at the bolts) and add a gusset to the top if needed. The heart of the system is a 5" "H" pile below the pull bar and a 4x4x3/16 tube to mount the rippers. The rest is hangers, gussets and ripper shank mounts. I'd have preferred a larger tube wall thickness but I had only this piece along with a 3/8 tube in the scrap pile. I started the use the 3/8" piece but it was way heavy making installation a chore. If the slots in the 3/16" tube for the rippers start to stress I plan to put some back-up plates at the stress points.

Note the tabs welded on the top of the H pile that bear against the sides of the pull tube. These these are to prevent rotationl twisting of the ripper arm.


The captured nuts are welded to an "L" angle that is welded to the bottom of the H pile. This is to strengthen the attachment point by moving the load from the edge of the flange to the pile center and angle brace.

And here are the side plates. For now I decided not to angle or cross brace them. This based on mjcad use of similar side plates on a frontier blade. He has had good luck without additional bracing. I'll take it easy at first and beef them up as needed if they start to tweak.


Last edited:
