Box Scraper Beginners guide to using a box blade

   / Beginners guide to using a box blade
  • Thread Starter
#41  
I tried a few different things today.

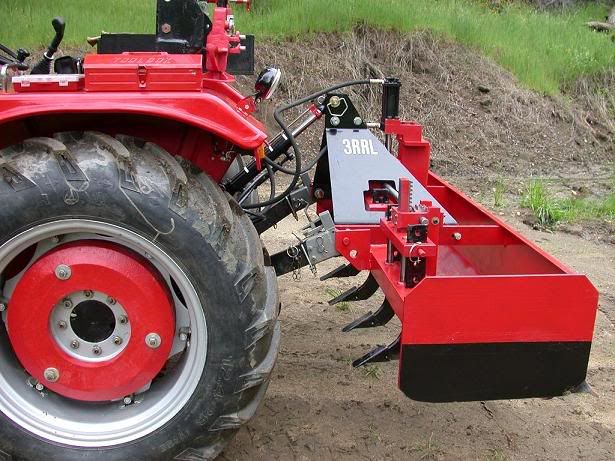
If I lenghten the top link to the maximum my front blade will definately dig in and fill the box as I drag. I can imagine that if the top link was even longer I might reach an angle where the front blade does not cut any more. Not sure if this is what johnk is able to do.

OTOH, if I follow the manuals recommendation of shortening the top link so that the front blade is just off the ground, it DOES leave a smoothed surface. One problem I see with this is that the side plates do dig in the ground and I can leave a gouge on both sides. Operating like this is a tad odd. When I start moving, the box fills about half way and then stays at that level. Seems like new material is added to the box and old material leaves out the back with the hinged rear blade putting weight on it and smoothing it out. I'll have to have my wife video this so I can see exactly what is happenning.

It seems incorrect to have the side plates gouging the surface. I think I'll drop a note to Woods to see what they are talking about in the manual.

In the meanwhile, if someone else has a hinged box blade, please let me know how you manage to do the finish grade / smoothing. I know that FarmWithJunk has the same blade I do but longer. I might PM him and point him to this thread.
 
   / Beginners guide to using a box blade #42  
Couple things

When you have a box with a dedicated swinging rear blade (5.59% of boxes sold), the only way to smooth is to shorten the top link as listed above. This is not super effective when compared to the fixed blade solution (below), it also wears the side plates down.

94.27% of the boxes sold have fixed rear blades. With them, you lengthen the top link to put the weight on the rear blade and raise the front blade. This is the best way for finish grading. It has the added benefit of snipping off the odd high spot as you go and puts the box weight on the blade giving good smoothing action.

0.14% of the boxes have bolts to allow the rear blade to either swing or be fixed. You can probably rig up a strap to hold it down if you have some scrap metal, drill and bolts. With out a welder, you will have to use a wrap around to hold it down and it will have to be strong or it will get bent up like a pretzel.


Note - 83.4% of all statistics quoted are made up.

jb
 
   / Beginners guide to using a box blade #43  
Here is 100% what will happen to those side plates over the years if they engage hard ground a lot.
First pic is when the boxblade was fairly new after my hydraulic rebuild.
Notice the side plates are fairly parallel top and bottom. Look at them now after hundreds of hours.

 
   / Beginners guide to using a box blade #44  
Practice, Practice, Practice. NOTHING teaches like experience.

I've owned a couple boxes with fixed rear blades. Currently I own a Woods HB84 and an HB72. After buying the first (HB84) I'd never consider buying a fixed rear blade style box again. You can do anything with a hinged blade that you can with a fixed blade. It just takes "technique".

Several years ago, I took advantage of a state grant to allow me to re-work several waterways, filter strips, and drainage issues on my farm. During that project, I had the opportunity to grade what amounted to 15 to 20 acres. That's more'n enough practice to develope that technique. I used the HB84 on the rear of a 60 HP tractor with a hydraulic top link. During the entire operation, I made MAYBE 4 or 5 adjustments to the top link. I found 99% of what I was trying to achieve was "do-able" with the box set level front to rear. That is probably more true with the hinged blade than would be the case with a fixed blade. With the fixed blade, box "angle of attack" would need to be changed to get the box to cut deep in many instances. Not the case with a hinged blade from my experience.

Finish grading with a hinged blade is simple and very much the same as with a fixed rear blade. Just use the 3-point hitch to "gauge" the box to the desired height, holding some (most) of the weight off the cutting edge. If you encounter a high spot, a combination of the pre-set height and the weight of the box will maintain a consistant finish, skimming the top off the high spot. ONLY when attempting to make a deep cut would I ever drop ALL the weight of the box onto the ground. When grading, I "carry" the box at the height/depth I'm shooting for.

The biggest mistake I see most people making when attempting to grade with a box blade is trying to take too large of a bite or too deep of a cut on the first pass. They work more consistantly when you "scrape" rather than "dig". This issue is magnified with a too small tractor and/or too big of a box blade. Like so many things we do with a tractor, having adaquate power/traction and an implement balanced with the tractor is key to success. Box blades are NOT generally a "single pass" finishing tool.

Tractors with longer wheel base, enough weight, and good traction excell at grading. Short tractors tend to let rear mounted implements "bob" up and down with undulations as they roll over those irregularities.

Even the best operators can only get a finish "so good" with a box blade. There are tools that make the final finish with less effort. (I use a Leinbach pulverizer myself)

Again, technique is important. Hit irregularities from various angles until they're leveled. Learn to have a "touch" with the 3-point controls. Grading is like icing a cake. You have to know when to press on the knife, when to lighten up on the touch, and when to leave well enough alone.
 
   / Beginners guide to using a box blade
  • Thread Starter
#45  
john_bud, FWJ:

I appreciate your posts very much. You've both helped clarify the the situation for me substantially.

FWJ, I think that I suffer a bit from the problem of too large a box blade that might exxagerate some of the bobbing effect. A 65" box would have been perfect for my 34HP L3400. I went with a 72" so that I would not have to swap implements when I eventually trade up to another tractor.

In addition to that the 3PT controls on the L3400 are no where near as smooth or granular as on some other tractors. This makes making making minute adjustments with the 3PT lever a bit harder. This will make it a tad more difficult to do as you describe FWJ but I imagine practise will help substantially.

Here is a summary of what I have learned from this thread that I hope will be of use to others in their box blading and box blade purchases. Do feel free to update / correct as you see fit if you think I got it wrong:

- There are two types of box blades: One with a fixed rear blade and one with a hinged rear blade.

- Hydraulic TnT is definately useful for both but more so for the one with the fixed rear blade. The hinged rear blade models are more sensitive to 3PT adjustment.

- For a beginner with little to no grading experience, a box blade with a fixed rear blade is easier to use because the weight of the whole implement can be placed on the surface to allow the implement to float. The top link angle is then the only thing that needs to be adjusted in order to switch between the three common tasks:
  • Scarifying: Shorten top link to minimum length.
  • Cutting: Lengthen top link so that front blade engages.
  • Finish grading: Lengthen top link so that weight is just off front blade and on rear blade instead.
For all of the above actions, on a box blade with a fixed rear blade, the implement can just be floated with its full weight on the surface - 3pt all the way down. Nice and easy for a beginner - set it and forget it.

- A hinged rear blade model allows a deeper cut when cutting as the top link can be lengthened for its whole range and the rear blade just moves out of the way. Scarifying is no different than the fixed rear blade model. Finish grading is the only big difference.

-Finish grading with a hinged rear blade requires either:
  • The top link to be shorted so that the weight is mostly off the front blade and carried on the side plates. The down side of this is that the side plates can wear and will also leave gouge marks on the surface, OR
  • Keeping the box level (front to back) - so top link in neutral position to achieve this, but adjusting 3PT such that most of the weight of the box is off the surface but some weight is placed on the front blade. This will require a bit of finesse in adjusting the 3PT as necessary.
- The best of both worlds is of course a hinged rear blade that can be fixed if the operator desires with some bolting mechanism. Few hinged rear blade models come from the factory with this.

- I would generally recommend that a beginner either get one of the cheaper fixed rear blade box blades or get a hinged one with the ability to fix it.

What I plan to do:
  • I'll write a note to Woods and suggest that their hinged back models ought to allow the operator to fix the rear blade in position. I really see no reason for not having this capability.
  • I'm going to practise as I get my driveway project done and if I can't get it just 'right' as a result of my lack of 3PT finesse, I'll just live with the results temporarily. I might use my landscape rake to do a final grade as I can float that on the surface much easier without it dragging too much material with it.
  • Since I have now acquired a welder, I will work to acquire some welding skills and when they are adequate, I will make what appears to be a simple modification to allow me to optionally fix the rear blade in place.
I'll post some pictures of the box blade and the hinge mechanism to solicit some ideas and bounce my own around on the mod I plan to make for this.
 
   / Beginners guide to using a box blade #46  
I have found that keeping the boxblade down and going up and down the drive fills in the low spots and levels the drive all by its self. I start with the scarifiers digging in then pull them up and pull a box full of material around. It will leak material out of the box when it rides up on a high spot making the surface level. Keep doing this and you end up with a really nice drive way. You will at some point have to let go of the box full of material but smoothing out one pile is better than trying to constantly adjust the height of the boxblade.
 
   / Beginners guide to using a box blade #47  
Canoetrpr,

You wrote "Cutting: Lengthen top link so that front blade engages"

I think you meant to Shorten it to engage front blade..
 
   / Beginners guide to using a box blade #48  
I have a hinged back and I lengthen it so the front blade isn't cutting and the hinged flap is sort of working the soil. I'd say the flap weighs over 100#'s so it does some smoothing depending on the surface. The advantage to a hinge back is the dirt doesn't get caught between the front and back blade which would keep it from digging when digging is needed. I actually bought the hinged back mainly for the increased weight of the Box scraper in general. Hope this helps..
 
   / Beginners guide to using a box blade
  • Thread Starter
#49  
Johnk: I also ended up with the hinged back for the same sort of reason. Dealer ordered the wrong one but it ended up being the heavier duty model so I decided to keep it (about 100lb heavier).

It may be that my top link is not long enough to get to the point where the front blade does not cut.

How much weight is on your blade when you are doing this? Is your 3PT all the way down or are you adjusting it to only keep some weight on the surface but not all.
 
   / Beginners guide to using a box blade #50  
The one thing you didn't list as a learning is that the heavier a box is the easier it is to get good results with it. That far outweighs (no pun intended) the hinge / no hinge aspects. The only time that isn't true is when the tractor can't pull the box!

Now get off the 'puter and start tractoring!


Top