Blading a road and making divots

   / Blading a road and making divots
  • Thread Starter
#11  
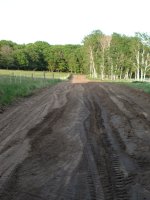
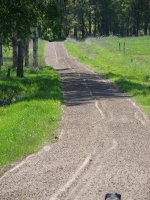
I just walked the road again, and it is still pretty rough. Looks like I need to work on the ditch more and get that looking better (I'll try the bucket as suggested).

I don't have down-force on my 3ph, so I think it just floats all the time. One thing I'm not sure on yet is where to adjust the angle of the blade. If I set it to cut shallow, I can't even lift it off the ground- not enough clearance with this big blade. So I mostly leave it so the support arm is horizontal to the ground.

From what you guys say, it looks like I need to make a few more passes to drag material to the center, then a pass to spread it back out again with the blade backwards. I'll give that a try too.

Getting the material loose is a little tough- I take it that there is where I really need rippers?

Teg- The blade is new, so I guess that means sharp?

My 3PH goes up pretty fast- full down to full up in not much more than a second. I've got it set to float down slow, but it makes it hard to fine tune- I usually bump it up then have to float it back down to move it a little. I can tell that TNT with dual link cylinders is in my future...

Thanks for all the tips- I've read them at least five times. :) I'll get some time tomorrow to try them out, and will report back again.
 
   / Blading a road and making divots #12  
My grandpa has a 2210. I pull my little blade behind it and I learned to put the ajuster in the 3 point (located on right side and twists to angle or level implement) at a angle downwards, put 2 suitcase weights+ in the opposite side so they wont slide off the blade. andle your blade to where the blade is closer to the right tire than the left tire and try it out. That should pull the materials out of the ditch your making and create a level ditch for rain water to stay off the road. Try it out.:)
 
   / Blading a road and making divots #13  
I built my 3/8 mile driveway with only a rear blade. I have a larger tractor though (MF 180 60HP Diesel). The blade was only rated for 45HP and I did have to bring it to the machine shop for repairs a couple times when I would catch large rocks that I ended up diging out by had and dragging away. My situation was a bit differnet though. I had no established road. I rotated the blade so it would push the material from the ditch area to build up the area the road would be on. I would use the 3 point arm adjustment to dip the tip down into the ground a bit so it would dig up some material and push it to the raod. It was a pretty long process and I got a lot of seat time. Most the material is sand with some patches of rock. I created a 12 foot wide ditch on one side which was an easement for the underground electric line to be run to where our house was going to be. The other side the ditch is maybe 5 feet wide. The photo is showing the 12 foot wide ditch on the which is on the left side of where the road woad be.
 

Attachments

  • #1 looking east down the north ditch 05-27-2006.jpg
    #1 looking east down the north ditch 05-27-2006.jpg
    183.1 KB · Views: 183
   / Blading a road and making divots #14  
If you want to maintain a gravel driveway with a rear blade you need to take the same approach as the counties do with the big road graders. It is best to wait until after a rain. The gravel and fines will mix together better. They angle the blade so it moved the material to the center of the road where it leaves a windrow. Then they make another run with the blade angled so it will smooth that material out as it pushes it back out were it came from. They will repeat this process for both sides. They will also re-establish the crown down the center of the road.
Here is a picture of my driveway now. I planted some pature mix grasses in the ditches and on the slopes. I had just gone over the driveway with my Land Pride grading scraper. This impelement makes maintaining a gravel driveway a piece of cake. It even works best if the driveway is dry so I don't have to wait until after a rain. I just drop the implement down on the driveway and drag it along, no need to keep adjusting the 3 point. It helps maintain the center crown and it brings all the gravel back to the surface. I just drive down and back on the driveway. I just stay on the right side of the driveway and it build the crown back up. It's a huge time saver and is pretty much fool proof.
 

Attachments

  • DSC00541.jpg
    DSC00541.jpg
    1 MB · Views: 168
   / Blading a road and making divots #15  
If your tractor has draft control you can smooth dirt and gravel like a pro! Just take a few min to play with the draft settings and you won't even have to look behind you while grading! The blade will be relatively unaffected by the tractor going through dips, before you know it all those dips will dissapear!
A good starting point is to lower the blade to the ground, then raise the draft lever slowly until the lift arms just start to take the slack out of the pins and go from there.
If you don't have draft control, then disregard this post. LOL
 
   / Blading a road and making divots #16  
I believe on most CUTs draft is not available or may just be an option. If the blade is set perendicular to the the road and the direction the tractor is traveling in will begin to accent the humps and dips the tractor travels over as you are blading. You'll end up with rolling bumps. Running with the blade angled (like the big road graders do) will better shave the high spots and fill the holes. If you create a windrow in the center of the drive you can go back as spread it out. The loose material from the windrow will spread out much more smooth and even. The Land Pride grading scraper I use does this all without leaving windrows to clean up. It shaves the high spots, fills the low spots, re-establishes the center crown, and brings the gravel to the surface without having to worry about the 3 pt adjustment as you are blading.


Top