Backhoe Added a ripper to my Woods BH90x: Trees beware

   / Added a ripper to my Woods BH90x: Trees beware #321  
Too bad you don't have a Woods BH or I could have loaned you my ripper to try out!

After three seasons or so I am still very happy with my ripper. It does what it was designed to do. My only complaint is not about the ripper but rather the hassle factor in changing out the bucket/thumb. Last season I just didn't mount the thumb to make it easier to line things up. I've talked to MIE about having them build a quick attach mount but haven't gotten around to doing that yet. I am also in perpetual search mode for a taped pin that could be used to force the holes into alignment. If anyone finds a source please post!

I've wanted a quick attach for the buckets on my BH77 since before I even got the thing. I had a BX23 before this - and I had a 24" bucket for it that was extremely handy for certain jobs - but the hassle of swapping it over made me avoid using it if I thought I could get away with it. When I bought the BH77 I did a decent amount of research on what the available alternatives were out there - and even went as far as buying the bucket quick attach for a B26 to try and see if it might be made to work (the BT820 hoe and the BH77 hoe are VERY similar in size) - but I haven't made much progress on it. I have found out recently that the old BT751 hoe from the B21 and the BH77 hoe - use the same buckets. And I have seen a few B21's with quick attaches on their backhoes. Just recently I saw an Ebay auction with a BT751 with a quick attach from CE Attachments - so it's likely there's somebody out there that either already makes one - or could make one. I'd love to design and build my own - but I'm sort of behind the 8-ball on that one. Too many other projects stacked up - a shop in dis-array - and I need a new welder. So for the short run anyway - I'm just going to have to suck it up and manually mount the thing once I get it.
 
   / Added a ripper to my Woods BH90x: Trees beware #322  
For a lot of things - the proper way to bury them is to clear the trench - and rebury the piping or whatever you're putting in the trench - in sand. I remember reading this somewhere a number of years ago. Supposedly the sand allows whatever is buried in the trench some movement - and it keeps the surrounding soil from intruding into what is buried in the trench. Around here at least the soil is extremely rocky - so just throwing the soil that was dug out back in around the pipe or line or whatever you buried - means you're going to be dumping rocks right up against your pipe/line whatever. Eventually I can see how that might lead to breakage of that thing you buried.

Actually we used to specify squeegee (1/4" and smaller pea gravel) in our designs; but regular pea gravel (3/8" and smaller) works just fine and I've put all my underground stuff I've installed in a bed of pea gravel. Sand can have a tendency to pack; but is easier to dig out for repairs than clay.

I am also in perpetual search mode for a taped pin that could be used to force the holes into alignment. If anyone finds a source please post!

Have you tried McMaster-Carr? McMaster-Carr
 
   / Added a ripper to my Woods BH90x: Trees beware
  • Thread Starter
#323  
Have you tried McMaster-Carr? McMaster-Carr

They sell tapered pins but only in small sizes. I need one with a wide side of 1.5". Probably will end up getting a replacement main pin from Woods and then just have at the old one with a grinder to put a taper into it.
 
   / Added a ripper to my Woods BH90x: Trees beware #324  
Make two short pins, one for each side, with the flat just long enough to catch all the pieces your
lining up, then start a taper. The longer taper you can put on the better.
Then drive the tapered pins out with the original pin. it will save the bushings if everything is lined up.

Hope this helps.
Rich
 
   / Added a ripper to my Woods BH90x: Trees beware
  • Thread Starter
#325  
Make two short pins, one for each side, with the flat just long enough to catch all the pieces your
lining up, then start a taper. The longer taper you can put on the better.
Then drive the tapered pins out with the original pin. it will save the bushings if everything is lined up.

Hope this helps.
Rich

I have fabricated one longer full length tapered temporary starter pin this summer which I haven't tested yet but is intended to work just as you describe. I will see how it does and report back.
 
   / Added a ripper to my Woods BH90x: Trees beware #326  
Make two short pins, one for each side, with the flat just long enough to catch all the pieces your
lining up, then start a taper. The longer taper you can put on the better.
Then drive the tapered pins out with the original pin. it will save the bushings if everything is lined up.

Hope this helps.
Rich

Help me understand what you are recommending here... I'm a bit slow this morning! :confused3:

I am in the design process for fabricating a ripper for my Woods BH9000, so I will need a method of aiding in the install from bucket>ripper>bucket as I will need to swap back and forth for a couple projects. Thanks in advance.
 
   / Added a ripper to my Woods BH90x: Trees beware
  • Thread Starter
#327  
Help me understand what you are recommending here... I'm a bit slow this morning! :confused3:

I am in the design process for fabricating a ripper for my Woods BH9000, so I will need a method of aiding in the install from bucket>ripper>bucket as I will need to swap back and forth for a couple projects. Thanks in advance.

Kenord has the same basic idea that I did. As it is difficult to line up the pin holes precisely when connecting thumb, bucket and dipstick, if you can start the process with a tapered pin then the initial position only needs to be within about half an inch of perfect rather than a millimeter or so. The tapered pin, when driven in, will force the holes into proper alignment. Then, the stock pin can be used to drive the tapered pin out the other side. Same basic principle as what iron workers do when positioning beams to be riveted or bolted. Use a tapered pin to get things lined up. In my case the stock pin is 1.5" x 10" so I just had a 1.5" x12" piece of round stock tapered like a pencil. Put the pointy end in and hammer it to force the thumb and bucket or ripper into alignment with the dipper stuck bushings.
 
   / Added a ripper to my Woods BH90x: Trees beware #328  
two short pins, one from each side, tapers facing each other , when main pin is pushed in both sides are lined up, long pin will do same thing. hope that makes it more clear.
If there is any twist in things the second pin lines everything up,
Rich
 
   / Added a ripper to my Woods BH90x: Trees beware #329  
Kenord & IslandTractor ~
Thanks for the replies. I got the tapered pin use but did not understand the twin pin approach. Makes more sense understanding that both short pins are tapered & installed from opposite sides for alignment. Then using the stock pin to drive both out. :thumbsup: Thanks.
 
   / Added a ripper to my Woods BH90x: Trees beware #330  
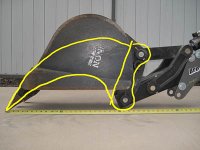
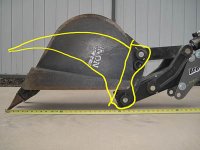
Looking for input. I have good access to equipment to fabricate a ripper for my Woods BH900. In reviewing what has been posted here and the pics that are provided, I have noticed that the relationship of the point to the locator pins seems to be different than that of the actual digging bucket.

See the photos attached to see what I am describing. I have extended my backhoe to it's fullest reach and placed the dipperstick against the ground, also the bucket is in full open position. The front teeth of the bucket do not touch the ground <1/8" above. What are the advantages or disadvantages of maintaining the point location to actual bucket design?

Pic 1 shows duplicating bucket location
ripper_view.jpg


Pic 2 shows what MEI style point to locators
ripper_view-2.jpg


Top