Rotary Cutter Finally got a rotary cutter, now a few questions:

   / Finally got a rotary cutter, now a few questions: #1  

cchoate

Gold Member
Joined
May 12, 2002
Messages
381
Location
Near Buffalo, NY
Tractor
Kubota GL3430 HST
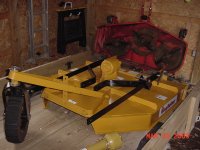
Just purchashed a KK 48" rotary cutter from TSC. Reading through the instructions has raised some questions:
1 - It says use 80w/90 for the gearbox, can I use Kubota super UDT?
2 - I've read where people have modified the lower links to get more clearence, how is this done exactly?
3 - There is a "u" shaped piece of steel with it but no mention in the instructions for it's purpose. (top link?)
4 - Anybody have to cut the PTO shaft to make it fit?
5 - Is it ok to mow in reverse so not to damage the underside of my tractor?
Thanks for any response.
Kubota B7500hst
 

Attachments

  • 249971-rotcutlr033003.JPG
    249971-rotcutlr033003.JPG
    61 KB · Views: 278
   / Finally got a rotary cutter, now a few questions: #2  
Hi there,

Nice cutter. I have the 5' version for my B2410. I'll try to give my $0.02 on each of your questions.

1) I wouldn't use Kubota UDT. You can get gear oil at just about any store for a lot cheaper than UDT. It is designed for the gear mechanism.
2)I didn't have to modify the lower links but I know BX series folks have both lowered the bottom link pins on the implement and turned the pins inward instead of the typical outward installation.
3) The U shaped piece of metal is the swivelling top link for the cutter. There should be a pic in the instruction manual, but if you can't find one, let us know and I'm sure someone can post a picture.
4)I didn't have to cut the PTO shaft on my KK cutter, but I did on my tiller. It is not difficult as long as you have a vise and a hacksaw. Measure twice...cut once!!!
5) Originally I mowed a fair bit in reverse when doing the first crack at the bushes etc. Just be careful to ensure there aren't hidden rocks etc.

Enjoy.

Kevin
 
   / Finally got a rotary cutter, now a few questions: #3  
I think Kevin (Knight9) answered all your questions quite well; I agree.
 
   / Finally got a rotary cutter, now a few questions: #4  
CChoate, Only addition is when you cut the PTO shaft cut the same off both halfs. If you need to shorten the shaft by 4" you would cut 2" off of each half.
 
   / Finally got a rotary cutter, now a few questions: #5  
The U bracket is not shown in the instruction manusl, I called KK and they told me to 'just throw it away'. I of couse did not do that. On the uprights there are 2 holes, each of those holes gets a bolt with a spacer. The spacer keeps the uprights apart. The bracket that you have goes on the LOWER of the 2 bolt spacer holes. the U will be pointing down toward the cutter deck. The problem comes when you hook up the toplink to that U bracket. With the pin inserted through the U and the toplink, the ends of the pin will smack into the uprights /forums/images/graemlins/mad.gif What you have to do is hammer the U bracket so that there is less space between the U brackets legs. That way the pin will clear the uprights, it does not take alot of hammering to get them to clear the uprights.

When I assembled my 60" KK last year, I discovered the U bracket problem, as well as this little gem, when you attach them long brace links from the tailwheel to the holes in the top of the uprights, you MUST make sure that the bolts where the brace bolts to the tailwheel bracket remain Very loose, but not so loose that the nuts can pop off. They have to be a few threads on, but very loose. This is because you are going to have a hell of a time getting the links to both twist slightly and line up with the front upright holes. Take you time, you are going to need a set of good clamps to get every thing lined up so that you can put in the bolts and spacers and the U bracket. Be very careful, these parts are under alot of force as you get the bolts in, and do sping out at you if you are not careful. /forums/images/graemlins/shocked.gif

As far as the lower pins are concerned, I moved mine from the shipped location. Mine are installed inplace of the bolt and nut where the uprights are bolted to the deck. You will have to get a large drill bit because the existing deck bolt is smaller the lift pin diameter.

I found it easier to leave the bolts OUT where the uprights connect to the cutter deck and put all the bolts loosely in place at the top of the uprights. This allowed for getting the U bracket and the spacers with bolts in place and the nuts started. Then you can move the lower part of the uprights into position with clamps and a large drift or screwdriver.

Hope this helps, take your time and think it out, it does require some force to get everything lined up, but once it is on the tractor you will be suprised what the KK will go through, at least I was. /forums/images/graemlins/grin.gif
 
   / Finally got a rotary cutter, now a few questions: #6  
Crayfishin\'?

Speaking of mowing in reverse, is "crayfishing" a safe practice? IE raising the mower, backing it over a bush, engaging the PTO and then lowering the mower onto the bush? Probably not safe as far as throwing debris everywhere, but what about wear and tear on the tractor/mower components, etc? Just curious. Farmer friend of mine always talks about it...

- Gerald
 
   / Finally got a rotary cutter, now a few questions:
  • Thread Starter
#7  
Thanks for the info and tips. It will be interesting putting this thing together. One thing I am happy with so far is the way the KK is made. Side rails are "I" beam instead of sheet metal, spider bracing accross the top and the welding looks professional. Very solid machine and USA made. The paint job isn't so great, but for the $300+ I saved over other brands, I can touch it up myself.
I also have been using a KK dirt scoop for a year and it's had no trouble.
 
   / Finally got a rotary cutter, now a few questions: #8  
I assembled my 5' KK rotary cutter this weekend, without too much trouble. I had to call KK about 2 issues:

1 - How in the heck to get the cover off of the implement end of the pto driveline, so that I could hook it up to the gearbox? Answer - You have to turn the little black locking tab so that the flat end is toward the shaft, then push it out toward the tractor end of the shaft. (I hope that makes sense). Then you can rotate the cover and slip it down the shaft. (Note - the 4' pto driveshaft might be different.)

2 - How to hook up the U bracket? Answer - It is optional, but it goes in the TOP set of holes (this week's answer), with the open end of the U pointed toward the tractor and attached to the top link.

I did not lower the hitch pins (yet), and you can see in the attached picture how high it gets off the ground at full lift (not very). If and when I move the pins down, I will probably need to move the U bracket to the lower set of holes, and raise the arm attachment points to the upper holes.

It worked just fine on the brush that I "hogged" /forums/images/graemlins/grin.gif, but I'll have to wait on the wildflowers to go to seed before mowing any real tall stuff.
 

Attachments

  • 250361-MF wildflowers 004.jpg
    250361-MF wildflowers 004.jpg
    94.3 KB · Views: 228
   / Finally got a rotary cutter, now a few questions: #9  
</font><font color="blue" class="small">( have a hell of a time getting the links to both twist slightly and line up with the front upright holes. Take you )</font>

I had to do the same.. used a couple large c-clamps as extra hands.. Did like you did and just threaded the nuts on a little to provide room.

And I agree.. he needs to use a real gear lube.. not a tractor transdraulic oil... on the cutter gear box.

Soundguy
 
   / Finally got a rotary cutter, now a few questions: #10  
I believe if you cut 2" off each piece of the driveshaft, you will only shorten it by 2".


Top