GFB
Member
My rotary cutter arrived after a 4 week wait. Bought it at Orchslen - Ordered it at their regular price of $549. When it didn't arrive as expected the manager gave me 15% off it I would wait another week or two. I did and I am pleased at about 2 hours of use.
I have a BX1800 and I have read/heard many things about the suitability of various cuttersand ordered the XB model because it was made for subcompacts. I never saw one until mine arrived. Hope to provide someone else with first hand information to help them in their decision making process.
Color is definitely <font color="orange"> </font> /forums/images/graemlins/smile.gif with black lettering - paint job is good, not great but doesn't matter for the use its gets. Overall fit is good, better than what I had expected based upon what I have heard about KK.
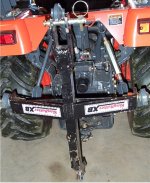
Assembling the arms and braces was no problem, neither was connecting the yoke to the tractor PTO. Attaching the yoke to the gearbox shaft was more of a chore, probably due to my inexperience. First of all, there are no detailed instructsion other than to "assemble". So after about 5 minutes of puzzlement I determined that the snap ring must be removed before the yoke would slide on the shaft. This snap ring in not mentioned in the assemble instructions but I presume it is to be reinstalled after the yoke in slid onto the shaft. My presumption is that the snap ring will somehow limit the damage if the shear pin is sheared. /forums/images/graemlins/confused.gif The next problem (minor) was to get the paint removed from the gearbox shaft. Sandpaper took care of that. Oh, forgot to mention that there isno hacksaw needed - the length is correct /forums/images/graemlins/laugh.gif /forums/images/graemlins/laugh.gif!
The real hassle was with the plastic shield that covered the yoke on the gearbox end. While I thought there must be a way to slide it back and out of the way I never could figure our the combination to get that done. So with great difficulty I was able to get the yoke slid on, the hole lined up and the shear pin inserted. Greased everthing and put oil in the gearbox (doesn't come with oil). How you ever "change" the oil is somewhat of a mystery, maybe you just pour new in forcing the old out - not worried about that right now. Anyway, I would estimate that I spent 3hours in the assembly and attaching process - only tools needed would be an adjustable wrench.
Attaching to the 3PH was ralatively easy. The distance from one end of the lift pins to the other is one inch less than my other attachments, meaning that the 3PH lift arms on the BX will spread wide enough. No need to reverse the pins. However after attaching and driving around the yard just raising and lowering the cutter, I decided to reverse both lift pins and reattach. I didn't like the way the 3 point arms were "binding" when raised all the way. Works much smoother for now. I might add that long ago I drilled new holes in the lift arms on the BX to get the implements higher off the ground. Also adjusted and readjusted the top link several times to suite my satisfaction.
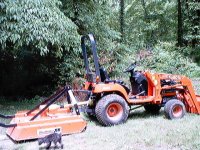
Okay, now I am ready for the smoke test. All went well. I now have used it a couple of hours. Mostly on briars, weeds, and saplings of 3/4" or less. I have my FEL on for counter balance, (I've only taken it off once in two years just to see how easy/difficult the job would be).
The rear of the kutter looks like a finish mower, two tail wheels and there is no opening for discharge. The front of the kutter has a rubber guard. Probably won't last long but easily replaced. Easy to adjust the tail wheels for mowing height (2" - 6"). Position control on the BX would be nice.
So far I would say I am satisfied. This is my first rotary cutter so I have nothing to compare it to. I will post a few pictures next week, need to reload the software on my computer. I will be happy to answer questions. This forum has provided me with a great deal of extremely valuable information. Thanks to all of you.
Gerry
I have a BX1800 and I have read/heard many things about the suitability of various cuttersand ordered the XB model because it was made for subcompacts. I never saw one until mine arrived. Hope to provide someone else with first hand information to help them in their decision making process.
Color is definitely <font color="orange"> </font> /forums/images/graemlins/smile.gif with black lettering - paint job is good, not great but doesn't matter for the use its gets. Overall fit is good, better than what I had expected based upon what I have heard about KK.
Assembling the arms and braces was no problem, neither was connecting the yoke to the tractor PTO. Attaching the yoke to the gearbox shaft was more of a chore, probably due to my inexperience. First of all, there are no detailed instructsion other than to "assemble". So after about 5 minutes of puzzlement I determined that the snap ring must be removed before the yoke would slide on the shaft. This snap ring in not mentioned in the assemble instructions but I presume it is to be reinstalled after the yoke in slid onto the shaft. My presumption is that the snap ring will somehow limit the damage if the shear pin is sheared. /forums/images/graemlins/confused.gif The next problem (minor) was to get the paint removed from the gearbox shaft. Sandpaper took care of that. Oh, forgot to mention that there isno hacksaw needed - the length is correct /forums/images/graemlins/laugh.gif /forums/images/graemlins/laugh.gif!
The real hassle was with the plastic shield that covered the yoke on the gearbox end. While I thought there must be a way to slide it back and out of the way I never could figure our the combination to get that done. So with great difficulty I was able to get the yoke slid on, the hole lined up and the shear pin inserted. Greased everthing and put oil in the gearbox (doesn't come with oil). How you ever "change" the oil is somewhat of a mystery, maybe you just pour new in forcing the old out - not worried about that right now. Anyway, I would estimate that I spent 3hours in the assembly and attaching process - only tools needed would be an adjustable wrench.
Attaching to the 3PH was ralatively easy. The distance from one end of the lift pins to the other is one inch less than my other attachments, meaning that the 3PH lift arms on the BX will spread wide enough. No need to reverse the pins. However after attaching and driving around the yard just raising and lowering the cutter, I decided to reverse both lift pins and reattach. I didn't like the way the 3 point arms were "binding" when raised all the way. Works much smoother for now. I might add that long ago I drilled new holes in the lift arms on the BX to get the implements higher off the ground. Also adjusted and readjusted the top link several times to suite my satisfaction.
Okay, now I am ready for the smoke test. All went well. I now have used it a couple of hours. Mostly on briars, weeds, and saplings of 3/4" or less. I have my FEL on for counter balance, (I've only taken it off once in two years just to see how easy/difficult the job would be).
The rear of the kutter looks like a finish mower, two tail wheels and there is no opening for discharge. The front of the kutter has a rubber guard. Probably won't last long but easily replaced. Easy to adjust the tail wheels for mowing height (2" - 6"). Position control on the BX would be nice.
So far I would say I am satisfied. This is my first rotary cutter so I have nothing to compare it to. I will post a few pictures next week, need to reload the software on my computer. I will be happy to answer questions. This forum has provided me with a great deal of extremely valuable information. Thanks to all of you.
Gerry