Rotary Cutter I-Match w/Woods BB60 setup

   / I-Match w/Woods BB60 setup #1  

nittanyjd

Member
Joined
Aug 3, 2011
Messages
32
Location
PA
Tractor
JD 4320 JD X748
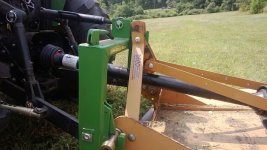
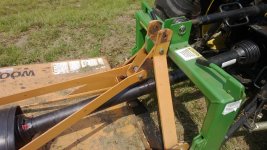
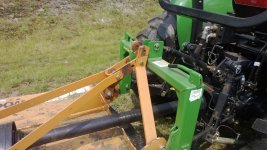
Another I-match question and problem with my Woods BB60 mower setup. I've converted the setup to be quick hitch ready as per the manual. Everything works as it should and double checked it prior to hooking it up. Once hooked up I tested it without running the mower to make sure I had clearance. Obviously not a good enough job by me. If I知 on flat ground no issues, but when going up or down a hill and then onto a level area the drive shaft and quick link come into contact and if I continue to use like this the cover will wear through. I called Woods, but tech support had no answer or help.

Has anyone else had the same problem?

I think if I had an adjustable top hook on my I-match it would work and have the clearance it needs by moving it to the top hole. Otherwise I think I need to modify my quick link by shortening it. Any thoughts or suggestions or similar issues?

My other attachments all work with the setup as is.

Thanks
 

Attachments

  • Imatch-woods.jpg
    Imatch-woods.jpg
    224.2 KB · Views: 332
   / I-Match w/Woods BB60 setup #2  
I would change it so that if folds upwards instead, might be accomplished by turning the whole assembly over or a little welding/fabricating. My MX6 would fold down and made it more difficult to catch the top link hook on the IMatch as the hitch would tilt backwards. I have seen others which will hold the top plumb at rest and then fold the short piece upwards when it needs to collapse the length for crossing a ditch as you mention. Understand there is a stop to prevent this flat bar assembly from being straight as it needs to be over center enough to allow it to flex upward easily.
 
Last edited:
   / I-Match w/Woods BB60 setup #3  
The two shorter links (ones hitting the shaft) - could you shorten them a couple of inches and redrill the bolt holes?
You don't need much, you may even be able to grind off the corners that are hitting the shaft.
 
   / I-Match w/Woods BB60 setup #4  
I would change it so that if folds upwards instead, might be accomplished by turning the whole assembly over or a little welding/fabricating. My MX6 would fold down and made it more difficult to catch the top link hook on the IMatch as the hitch would tilt backwards. I have seen others which will hold the top plumb at rest and then fold the short piece upwards when it needs to collapse the length for crossing a ditch as you mention. Understand there is a stop to prevent this flat bar assembly from being straight as it needs to be over center enough to allow it to flex upward easily.

I ran this same setup, but with a Land Pride Quick Hitch, with no issues.

It looks as if your top link could be shortened quite a bit, but I would do what jenkins said. Make it fold upward. Look on Woods' site and the way the BB60X works. You need to weld a short bar across the top of the folding links, and make it slightly "over center" at rest. It will then fold upward under compression.

http://www.woodsequipment.com/files/Products/Manuals/MAN0632.pdf

see figure 4 and figure 10
 
Last edited:
   / I-Match w/Woods BB60 setup #5  
Could you make it so it still pivots from the top hole, but your imatch hooks from the bolt in the bottom hole?
Or would that limit the travel too much?
 
   / I-Match w/Woods BB60 setup
  • Thread Starter
#6  
I ran this same setup, but with a Land Pride Quick Hitch, with no issues.

It looks as if your top link could be shortened quite a bit, but I would do what jenkins said. Make it fold upward. Look on Woods' site and the way the BB60X works. You need to weld a short bar across the top of the folding links, and make it slightly "over center" at rest. It will then fold upward under compression.

http://www.woodsequipment.com/files/Products/Manuals/MAN0632.pdf

see figure 4 and figure 10

I agree too with what you and jenkins are saying about trying to make it fold upward. I was also considering making a link that is shorter too. The current one is 9 in. so if I shorten it 2 or 3 in. and run the same way it should clear. I noticed the same manual you reference and considered getting different parts to run on mine, but $150+ in parts and no guarantee they'll fit correctly. I think the cheap and quick fix is a little welding to make it all work.

Thanks for the responses. You all have hit different thoughts I had.

I looked at a MX6 at my local JD and it looks like if it was folded down when mowing and going through a ditch the same problem would happen. Folding upwards or cutting some off I think are my best options.
 
   / I-Match w/Woods BB60 setup
  • Thread Starter
#7  
I would change it so that if folds upwards instead, might be accomplished by turning the whole assembly over or a little welding/fabricating. My MX6 would fold down and made it more difficult to catch the top link hook on the IMatch as the hitch would tilt backwards. I have seen others which will hold the top plumb at rest and then fold the short piece upwards when it needs to collapse the length for crossing a ditch as you mention. Understand there is a stop to prevent this flat bar assembly from being straight as it needs to be over center enough to allow it to flex upward easily.

Here are a few other shots of it when on flatter ground and extended. The newer mowers have a better setup and are doing what you say. I think I can modify the link or weld a piece in there to force it upwards when it needs to collapse.
 

Attachments

  • WP_20140808_003.jpg
    WP_20140808_003.jpg
    841.9 KB · Views: 295
  • WP_20140808_001.jpg
    WP_20140808_001.jpg
    786 KB · Views: 282
   / I-Match w/Woods BB60 setup #8  
Very hard to explain in writing, but here's what you need to do..

Get a piece of 1/4" flat stock, and make it the same width as the U shaped link. Weld it on to the top of that link, so stock extends off the rear part of the U by a couple of inches. Be sure the stock is flush with the sides of the U shaped link for free movement. Weld a 3/4 bar under the flat stock at the end of the flat bar, to the rear of the U link, and leave it wider that the two bars that extend to the rear of the cutter from the U link. Now, the U link cannot go below the two bars going to the rear of the cutter, and the link should remain above center (not straight as in the second photo) and ready to flex upward as necessary. Simple fix, but hard to explain..
 
Last edited:
 
 
Top