Chipper Chipper maintenance. Wanna hear some good news.

   / Chipper maintenance. Wanna hear some good news. #1  

RalphVa

Super Member
Joined
Dec 19, 2003
Messages
7,873
Location
Charlottesville, VA, USA
Tractor
JD 2025R, previously Gravely 5650 & JD 4010 & JD 1025R
The chipper on my MacKissic wouldn't do about 2" locust branches this morning. Thought it was getting dull from doing so many persimmon and other big branches. So, I did the little stuff and took it up to remove the chipper blade.

The blade is non-reversable, unlike the one on my Troy Bilt Tomahawk, and is held in place via 3@3/16" allen screws. Instructions were to heat them to break the Loctite bond and then loosen. No instructions as to how long to heat, etc. They're not through-bolted like on the Troy Bilt. Have removed them many times on it, most times moving the nut to loosen them.

Well, two came out, but one smeared inside. Have sent a note to the dealer as to what to do.

Who of you have done this on your chippers? How big a job is it and what kind of chipper do you have?

Would also like to hear about those who have turned their hammers (those on the MacKissic seem to be like those on the Troy Bilt: can be turned 3 times before replacing, after all 4 corners get rounded) or replaced them. How big a job was this? The MacKissic (I thought) had the hammer rods secured by cotter pins. Not sure what they are. They're called "grooved pins". There's a hole for the rods to go through the housing on the PTO side. However, there's no hole to drive them from on the other side. The ones on the Troy Bilt have to be driven out, because the spacers get bent a little and bind them up.

I want to know what shredder/chipper is as easy to maintain as my Troy Bilt. Wish I could mount it on my 3 pt and drive it from the PTO. Think I've figured out how to mount it on the 3 pt, but it has to run from its small 8 hp engine. The chipper chute takes up to about 2", but the engine really will only chip up to 1 to 1 1/2" without bogging.

Ralph
 
   / Chipper maintenance. Wanna hear some good news. #2  
I have the same chipper as you do, I believe.

I have removed and sharpened the blade 3 or perhaps 4 times this summer, I don't remember exactly. I have also completely removed and rotated the shredder hammers once.

The first roll pin was hard because I didn't really have the right tool, but then I went and got my long punch and drove the pins out fairly easily with a few whacks of a hammer.

They use red loc-tite on the threads of the chipper blade bolts. They had to get pretty hot to remove. Make sure you heat the bolt head mostly and not much of the blade.

Even though they suggest red, I used just a tiny bit of blue when I put them back in. It makes them a bit easier to get off the next time. If they come up to the right temprature (for the red version), the bolts come out easily. If it's hard to turn, forcing it would just ruin the bolt. I asked about this on TBN when I was having trouble and the folks here explaing it to me. I hadn't used loc-tite before. It's meant to be hard. You don't want them moving when the chipper is running.

All in all, I haven't found the chipper hard to maintain or access.

By the way, if you want to remove the hammers, take the whole top off. It's easy to do and the extra access makes the roll-pins easy to get out.

Hope this helps. Let me know if you have any other questions, but I think you'll find the people at Mackissic are very helpful and friendly especially if you thank them for the help.

Cliff
 
   / Chipper maintenance. Wanna hear some good news.
  • Thread Starter
#3  
Cliff,

Thanks for the response. Mine's the TPH-122. Can't see where there's a hole on the back side (opposite the PTO side) to drive the rods out that hold the hammers. The flywheel that carries the chipper blade covers all that side. Found the hole on the PTO side.

Those pins holding the rods in initially appeared to be cotter pins when I first looked at them. They don't appear to be roll pins, as these were what the Troy Bilt Tomahawk uses. They're pins that make a "T" on the back side, away from the PTO. The owner's manual doesn't tell how to remove them.

I heated the middle allen screw until the goo around it was glowing red for a while. It wouldn't budge and stripped out inside. The outer 2 came out fine, without any further heating. Never used Loctite on the Tomahawk ever. Never have had any come loose in 11 years of my using it.

Ralph
 
   / Chipper maintenance. Wanna hear some good news. #4  
</font><font color="blue" class="small">( Can't see where there's a hole on the back side (opposite the PTO side) to drive the rods out that hold the hammers. The flywheel that carries the chipper blade covers all that side. Found the hole on the PTO side.)</font>

You only need one. Once the roll pins are out, the rods slide out the front.

</font><font color="blue" class="small">( They're pins that make a "T" on the back side, away from the PTO. The owner's manual doesn't tell how to remove them.)</font>

Drive the roll pins out with a hammer and a punch. The only hard part is figuring out which end is the small end so you drive them in the right direction. Like I said, don't try to remove them just by taking off the screen. Take off the whole top. This will make things much easier to work on.

</font><font color="blue" class="small">( I heated the middle allen screw until the goo around it was glowing red for a while. It wouldn't budge and stripped out inside. )</font>

Don't know what to tell you about that. Can you turn the blade on the bolt to help losen it?

Do send them some e-mail explaining your problem. It sounds like someone got overzelous with the loctite at the factory.

Cliff
 
   / Chipper maintenance. Wanna hear some good news. #5  
I dont care what they say,i use never seize on them bolts.My SALSCO also says use locktite,i ignore this because they do that to cover their butt.I have worked in mills all my life and this is what is done.Ill de darned if i get dulled up in my woodlot,and cant get them out easy for a change. I Tighten them up,keep MY knifes BALANCED,and i have had no problem,probably got 50 hours on it now.Knifes are just as tight as when i put em in.I am not trying to tell anyone else what to do,but i believe,this locktite thing is because of lawyers,and manufacterers covering their butt.
ALAN
 
   / Chipper maintenance. Wanna hear some good news.
  • Thread Starter
#6  
Thanks, Cliff. Hadn't thought of trying to rotate the blade. Just might work.

Removed the screen this morning. Yes, they are roll pins. The ones on the Troy Bilt fit flush with the spacers and were through one of the spacers. Looks as though one finds the non-slit ends and hammer those out. Another way might be to collapse the slit with some vice grips. This is how I used to put them in on the Troy Bilt. Collapse, and they almost slip in by hand. Had to drive them out with a punch of just the right size.

Hey, another problem I have is I dropped one of the screws into the housing around the flywheel. Either need a very strong magnet to move it up or drill about a 1/2" hole down there to drop it through. They really ought to have a drain hole for that housing anyway.

Spend this afternoon cutting up and collecting some stuff I'd cut down with the chain saw. Got a pile to do.

Ralph
 
   / Chipper maintenance. Wanna hear some good news. #7  
</font><font color="blue" class="small">( .Hey, another problem I have is I dropped one of the screws into the housing around the flywheel. Either need a very strong magnet to move it up or drill about a 1/2" hole down there to drop it through. They really ought to have a drain hole for that housing anyway. )</font>

They do. Look at the bottom center of the housing for the flywheel (below the shute). I lost a roll pin and looked everywhere until I realized that when it popped out, it fell through the back side of the flywheel and into the flywheel housing. I used a wood sliver to drag it back out through the little hole in the bottom.

However, the hole is not big enough to extract one of the blade bolts through. I think they want to be careful about making finger sized holes in the housing for the chipper blade flywheel.

Cliff
 
   / Chipper maintenance. Wanna hear some good news.
  • Thread Starter
#8  
Good news. Here's my note to the JD dealer who sold me the Mac. Wonder if anyone has an e-mail or web site for the Mac folks to send my idea to. Thanks again, Cliff, for the rotation idea. I'll look for that hole you mentioned to see if it's big enough for the allen screw to go through.

Here's the note:

I got the 3rd allen screw out by rotating the whole chipper blade a few times.

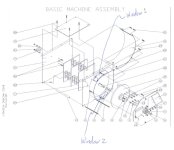
Attached is the parts drawing that shows a couple of new windows that ought to be put on the TPH-122. These are at the top and bottom of the housing around the flywheel to which the chipper blade is bolted.

These windows' purposes would be:

Window 1: To access new backer/locker nuts on longer allen screws. This way, the screws don't have to be very tight. The backer nuts would lock them in place. One would simply place a box wrench (to avoid dropping the nuts when they're loose and off) and loosen the nut. Then use something like an L-shaped allen wrench to unscrew the allen screws. This is all I ever used in 11 years of doing the blade on the Troy Bilt Tomahawk. No Loctite, heating, etc. is needed to be done. (The flywheel might have to be slightly redesigned to accommodate access to the backer nuts. Don't know. Can't tell that much about it from the little access window now provided.)

Window 2: To allow retrieval of any dropped nuts, screws or blade.

These mods would make removal of the chipper blade a whole lot easier and far more predictable than use of stuff like Loctite.

By the way, I think that I've figured out the "grooved pins" on the ends of the rods holding the hammers and spacers. They are roll pins with grooving only on one end. It appears that you drive them out by finding the non-grooved end and drive from there. Installation is probably to insert the non-grooved end and to drive it in, perhaps with the grooves held together by vice grips. I'd think they ought to provide this information in the owner's manual. Sending one out to the shop every 10 hours to do the chipper blade and maybe every 100 hours to do the hammers isn't something an owner would normally like to do.

I really don't like using Loctite on the threads of the allen screws. Think I'll put some anti-sieze on the threads and Loctite on the back side of the allen screw head. Wouldn't need all this with backer nuts.

Ralph
 

Attachments

  • 770854-MacKissic Chipper end new windows sm.jpg
    770854-MacKissic Chipper end new windows sm.jpg
    55.2 KB · Views: 238
   / Chipper maintenance. Wanna hear some good news.
  • Thread Starter
#9  
I did some research on anti-seize and loctite stuff. The outfit where I bought the allen wrench for a socket wrench sold me some "paste". It's AL-CO Pipetite, an anti-seize compound.

MacKissic's current recommendation is Loctite 243, which is the blue version of medium strength. It supposedly does not require heat to remove even though the owner's manual says to use heat (but not how long, how much, etc.).

So, my plan is to use the AL-CO stuff on the threads and put a tiny bit of Loctite 243 on the back side of the allen screw head. It supposedly sets in 1-3 hours; whereas, the AL-CO says 12 hours. So, next day use.

First, I've got to rescue that dropped allen screw and then buy 3 new ones. Gotta see if I can grind the blade on the side of my grinder wheels. This is how I've done the Troy Bilt's all the time, but it is smaller and fits in that gap. If not, I'll take to a machine shop. Might have to have the machine shop dress up the 2 outer screw bevels on the blade, as I might have damaged them a bit with the forked tool (old tie rod remover) in rotating the blade with it. Ran the one screw into the threads to make sure I hadn't slipped and buggered them.

Saw gobs of leaf bags in town that the silly town people are just giving away. First free time to go get some will be Wednesday afternoon. The Mac eats leaves pretty good, of course.

Ralph
 
   / Chipper maintenance. Wanna hear some good news.
  • Thread Starter
#10  
I put the chipper screws back with the blue (242) Loctite using a very short-handled driver. Let it sit overnight before doing another 40-50 bags of leaves and some tree prunings.

For perspective, I decided to rebuild the hammer assembly on my old Super Tomahawk by Troy Bilt. It's kinda painful for us older folks to work on because all the parts have to come out and go back in through the discharge chute, except for the chipper blade. The hammer shafts are difficult to drive out because the spacers get marshmellowed out by the hammers flopping on the shafts and get almost metal welded to the shaft in the process. At least you can drive them out, with one access on the chipper blade side and another hole on the other side.

The spacers were too mangled to reuse; so, I ordered more from MTD, who bought out Troy Bilt. First, I called the 800 #, which was still valid. Guy there tells me that only the longer spacers are available, and without the roll pin holes. So, I told him to order 3 packages (of 4) of them. Ended up getting 3 spacers, but the receipt had the URL of the site he used: www.ordertree.com. The 3 spacers came with roll pin holes.

I got onto the site and ordered 5 more of the long spacers and found the short spacers and ordered 8 of them. So, a few days more and about $75 poorer, I received my new spacers.

Then, I discovered that the spacer roll pin hole position wouldn't work. It needed to be right in the middle instead of 5/8" from the end of the 2 1/4" spacer. Went to Beckers in town to see if they could drill new holes. No, they aren't set up for that. Gary suggested I cut off one end and move it around to have the hole in the middle. He guesstimated 9/16". I did the algebra later on and got 1/2". Rented a metal pipe cutter to do this job for $3. Worked fine.

Then went to put the spacers, hammers, etc. back in. The 12 old Sears hammers that are in perfect condition that I'd gotten from my Dad's disassembly of his worthless Sears machine were perfect, but just a tad wider than the Troy Bilt ones, 4 of which had to re reused but weren't too bad on one end (having 4 cuting edges). So, I had to grind down some of the spacers to get everthing in on the shafts between the supports.

Getting the short roll pins back in with my old, wide vice grips was almost impossible. So, I bought a pair of skinny ones for $16.50. Did the job.

Finally got everything back together, going into all sorts of contortions at times in working through that discharge chute.

Fired it up and ran it through one carburetor full of gas. Fine. Advertised it for sale again, $100 higher now.

Sent a note to MacKissic asking for the procedure to rebuilt their hammer assemblies. No reply yet. Cliff says to remove the top chute, which is removable on the Mac. Should make things easier, and the roll pins are longer, a little easier to grasp and work with. Not sure how the shafts will come out once the spacers get mangled, no opposite hole. Gary at Beckers said all spacers on all machines get mangled. He's worked on many of them. Used to sell and still maintain Gravelys and chippers/shredders there.

Ralph


Top