You are using an out of date browser. It may not display this or other websites correctly.
You should upgrade or use an alternative browser.
You should upgrade or use an alternative browser.
MY FIRST PLOW
- Thread starter inveresk
- Start date
/ MY FIRST PLOW
#1

Egon
Epic Contributor
Looks good.
Just wait till you you get that moleboard and share all polished up!
Egon /forums/images/graemlins/grin.gif
Just wait till you you get that moleboard and share all polished up!
Egon /forums/images/graemlins/grin.gif
djradz
Veteran Member
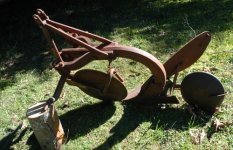
Pretty sure that's a 1940's era. If you can get a model or serial no, there's several folks here who can pin it down. Really doesn't look all that rusty to me. Good to see both the rear wheel (forget what it's called) and coulter are still in good shape. Usually the coulter bearing is first to go otherwise. Nice purchase!
HEC
Veteran Member
Looks like a good find,plowing is one of my favorite things to do with my tractor and I am sure you will get good use out of it,don't worry about the rust,once you start to plow with it the moldboard will come to a nice shine I am sure.
Investorguy
Silver Member
Nice. Where'd ya pick it up?
I got it from an old farmer near Duncan on Vancouver island, a short ferry ride and a drive from home. As it happens, he was near the Kubota dealer so I stopped in and got the filters and oil I need for the 200 hour service. Seems like only yesterday I got the tractor (31 August, 05). Sods law that I found out only today that the 3ph telescopic lower link is damaged and needs a part so it's back there early next week.
While I was removing the backhoe today I noticed that the bolts on the offside that attach the rops to the tractor chassis were loose, all four of them. The backhoe subframe is bolted to the rops frame and I guess the vibration and movement of operating the backhoe must have worked them loose. It's an item I'll check frequently in future.
While I was removing the backhoe today I noticed that the bolts on the offside that attach the rops to the tractor chassis were loose, all four of them. The backhoe subframe is bolted to the rops frame and I guess the vibration and movement of operating the backhoe must have worked them loose. It's an item I'll check frequently in future.
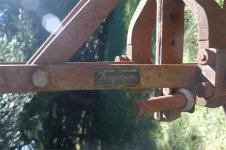
I may be able to help you. I own a couple of Ferguson plows, cultivators, dirt scoops and tractor (TO 30) Done quite a bit of research on Harry and his plows. The numbers you are reading are actually 16AO28.
The smooth rolling rear wheel was from 1939-1941 then they were held on with 4 rivets from 1942 on along with a different arm with a spring and pins for down pressure. The cast A frame for the top link was from 1939-1942. The Ford script in the right beam was from 1941 to 1942. 1939-1943 plows had the ID plate on the cross frame on the back of the plow, from 1944-1947 it was on the steel upright strap from the frame to the top link connection. For 1943 the cross shaft u bolt clamp was changed to a steel plate on the outside of the beam instead of the u bolt going through the beam.
The 1st Ferguson 14" plows were model 14A from 1939-1942, from 1943-1947 they were model 14AO-28 or 14AO-40, they are very common because almost every farmer needed a plow for with his new 9N tractor and over 300,000 tractors were made during this time.
From 1939-1942 the ID plate said FERGUSON/SHERMAN Dearborn MI, from 1943 to about 1944 the plate said FERGUSON Harry Ferguson Inc Dearborn, MI, from about 1945-1947 the plate said FERGUSON Harry Ferguson Inc Detroit, MI
If you can read the tag well enough to know what the prefixes mean after the number, the first prefix is type of share
A= general purpose, B= sod or clay, E= slat
F= blackland, H= scotch, I= chilled, K= corn belt, R= general purpose, S= stubble, and second prefix is type of metal
A= cast steel, B= forged steel, C= chilled iron, D= soft center, E= carburized
So, for a Ferguson AO moldboard plow, a 14 AD-AO-130 would be a general purpose, soft center share.
Should you ever need a part for the plow, give these people a call:
Ky-Tenn Tractor Parts #1-800-459-8366 /forums/images/graemlins/grin.gif
Here is some more info should you have a little trouble getting it to work right for ya. I copied these two posts a few years ago off some message boards but have never tried because mine pulled perfectly behind my TO 30 just the way it was.
(1) Attach the plow to the 3 point hitch. Drive the tractor"s left rear wheel up on a 6 inch block. Use the right hand leveling crank and the top link screw adjustment to level the plow share and the land slide with the ground. Do this on a good level spot or on a level slab of concrete. Pull a string from the back of the land slide to the front of the tractor or further out in front of the tractor and make a straight line beside the land slide to the front of the tractor. The line should angle slightly to the right front wheel of the tractor about 6 inches more than the left. This is to assure that the plow doesn"t try to turn the tractor right when the plow comes in contact with the earth. Think of the plow acting as a rudder would on a boat. The way to adjust the angle of the landslide to the left is to loosen the bolts that hold the drawbar that goes across the plow and attaches to the two lower links and twist it in it"s cradle until the plow is pointing in the right direction (string pointing to the right at the front of tractor). The plow will have to be raised to let it more easily be moved. Some plows have adjusting bolts that help in turning the plow and in securing it in position. This is just a preliminary adjustment and when in the field it may be necessary to tilt the plow slightly forward by shortening the top link etc.
(2) To prevent the plow from trying to turn the tractor you need to adjust the draw bar. Think of the plow as the rudder on a boat. If you want the boat to turn left you turn the rudder left. The same is true of the plow. The drawbar has an offset on the right side with the offset turned down. To turn the plow as a rudder to the left to make the tractor stop turning right when the plow is engaged loosen the bolt that secure the drawbar to the plow. Turn the drawbar counterclockwise looking at the right end (offset).in order to make the tail of the plow turn to the left. It only takes little to turn the plow tail a lot but do it so that the tail of the plow is moved about 6" to the left. Retighten the bolts that secure the drawbar to the plow.
Move the lift lever till the plow drops to the ground. Advance the tractor and gradually move the lever more down till the plow is at the depth you wish to plow and then set the lever at this point with the stop to make it stay there.
A flat bottom plow should be set so that when the plow opens the furrow the bottom of the furrow will be flat. Hence" flat bottom plow"! If the plow will not go in the ground with the plow set flat, get new plow points.
When using a 14" flat bottom plow the distance from the inside edge of the right rear wheel should be 14" from the most forward point of the first plow. Or 14" from the landside of the first plow to the inside of the RR tire.
The tires of the tractor should have fluid in them or wheel weights.
Hib, thank you for those two valuable posts. It's good to get some information on the plow itself and I appreciate the valuable guidance on setting it up which should save me a great deal of trial and error time.
Thanks for the heads up on the supplier for parts - it's good to know these are still available.
I'm kinda keen to try the beast out. . . . .
Thanks for the heads up on the supplier for parts - it's good to know these are still available.
I'm kinda keen to try the beast out. . . . .