Backhoe Installing a Bradco backhoe

   / Installing a Bradco backhoe
  • Thread Starter
#21  
Thanks for the comments radman. I talked to Bradco (before I started the installation) to make sure I had the correct kit, and they said I do. Believe it or not, I can't move the lower arms any higher than 3.5" off the ground. I'm going to post a few more pictures that illustrate the situation.

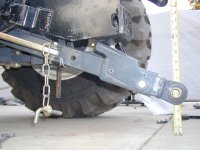
Picture #7 shows how the lower arms hit the backhoe part of the subframe. The arm will not swing any further toward the center, and it will not swing far enough out to help any either.
 

Attachments

  • 5-101938-P1180032.jpg
    5-101938-P1180032.jpg
    135 KB · Views: 385
   / Installing a Bradco backhoe
  • Thread Starter
#22  
Picture #8 shows why the lower arms have such a limited range of motion.
 

Attachments

  • 5-101939-P1180029.jpg
    5-101939-P1180029.jpg
    128.1 KB · Views: 320
   / Installing a Bradco backhoe #23  
You have problems (with your backhoe). If the swing toward the midline is enough to still attach cat 1 equipment I don't see a huge problem. The width required for cat 1 is about 26".
The other problem of limited clearance of the lift of 3.5" could be a more potential problem. I notice you have the extendable lift arms. Is this an option or standard on NH? This does reduce overall clearance a few inches. Can you swing the lift arms either to the inside or outside of the mounting plates to get more clearance? I assume you tried this.
 
   / Installing a Bradco backhoe #24  
Given the severe limit of arm motion with the backhoe mounted, I'd persue making the arm pins removeable.

In picture 5 it looks like the arm pin and the sway-limit bolt are in line. The sway bolt is smaller than the pin. One idea might be to drill out the sway bracket so, with the sway link removed, the arm pin would slide into the bracket enough to remove the arms. The hole would be oversized enough so the pin was easy to operate.

The sway pin would then need some short sleeves to act as bracket bushings so it wouldn't be too loose in the new oversize hole(s).

It all looks easy from my comfy chair 3k miles away /w3tcompact/icons/hmm.gif
 
   / Installing a Bradco backhoe #25  
Looking longer at pic 5, a really nifty idea came up. Don't know if its feasible but here goes:

How about a new, long pin that does everything - one that reaches from the differential case right out through the sway bracket. It would be arm-pin size (7/8) at the inner end, but at the outside of the subframe it would neck down to the smaller size of the sway bolt. This would give it some side-travel - enough to remove the arm, but without taking off the sway link. One well-placed hat pin hole just inside the sway bracket would trap it in position when the arms are installed. Any other time it could just float. If you needed to steal a little more travel distance, the neck-down could be half an inch inside the frame - the cotter pin sleeve is plenty of support. (provided the sleeves are welded to the plates - can't be sure from the pic, you could weld them if not)

Would probably have to loosen/shim/adjust the sway bracket to line everything up so it works well. Whattayethink? Any machine shop should be able to make the pins - type 304 stainless steel would be cheap and work well (not rust). Best not to try for too snug a fit - leave some clearance for dirt, scratches etc.
 
   / Installing a Bradco backhoe #26  
FYI I did call anthony about the 1 in bethel Ct ,I believe it was a MD-9 or something like that few weeks ago when it was advertised in the B.News.,it was used for 2 years then it has been sitting for 4 years being moved around with a excavator,so a few things were bent up,It might of been a good deal but it was used
 
   / Installing a Bradco backhoe
  • Thread Starter
#27  
Here's the last interference point.
 

Attachments

  • 5-102292-P1190009.jpg
    5-102292-P1190009.jpg
    131.2 KB · Views: 324
   / Installing a Bradco backhoe #28  
Is turning the upper pins to face the other way possible? It wouldn't be the first tractor with lift links pulling at a small angle.

This sure isn't a straight-forward installation - looks like Bradco has left out a lot of important details. Hope you can get around all the issues - try to focus on how great it will be when it's done and working. For what it's worth, we're rooting for you to win.
 
   / Installing a Bradco backhoe #29  
Looking at your original picture (#1) of parts laid out and numbered in your drive and comparing it to picture #7, it looks to me like parts #1 are mixed left to right in picture #7. I don't know if they will go on both ways and its hard to tell from the pics if they are in fact switched. Good luck.
 
   / Installing a Bradco backhoe #30  
Wow, do you have an eye for detail/w3tcompact/icons/shocked.gif I sat here an looked at it for 15 minutes before I could figure out what you were talking about. Sure looks like that's the problem. For JohnInCa's sake, I hope it is.

Jeff


Top