Hosskix
Bronze Member
I've been threatening to do this ever since I bought my tractor.
Everytime I drop a blade on my place, a new crop of rocks begins to grow and I was getting tired of getting off the tractor and picking them up!
My camera was out of juice when I was doing the actual labor, so I'll just describe what and how.
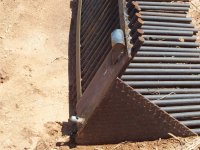
I started out with a jig and 100' of 1" oil field sucker rod.
I cut the rod down to 4' lengths with a chop saw and began bending them to shape on the jig I'd built by tracing the outline of my existing FEL bucket.
I bent about six by hand, using the cutting torch to heat them, that was enough to find out that I needed help!
I went to HF and bought a $50 dollar 12 volt winch and used it for the other 20 bends.
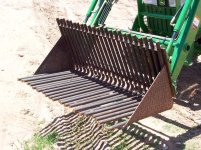
I then took 2 4' lengths of 1 1/2" x 3/16" thick angle iron and cut 1" holes 1" apart and stuck my bent bars through them and welded them up.
Keeping them straight was the hardest part; I'm still going to have to reheat and rebend a few of the bars to make them line up right.
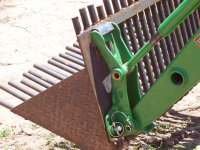
Next I built plates for the quick attach bucket mount and welded it to the rock bucket and spent an hour or so bending some 3/16" plate to form the hangers for the top of the bucket. (I wound up welding a piece of 1 1/8" OD bar to the plate and heating and beating until I got the correct hook shape.)
I also spent an hour trying to figure out how to tap the 1 1/8" bar for my pins on the bottom of the attachment; even using the drill press I couldn't get the pilot holes straight enough to tap them out larger and make it work.
Finally inspiration struck, I had a couple of implement pins from TSC in my barn, a couple of quick cuts and I welded them on!
The bucket works great in the sandy parts of my property, but it does pick up quite a bit of dirt with the rock.
Luckily the pins for the bottom attachment are not real tight so there is a bit of play and you can "shake" the loose dirt out the bottom.
You're pretty much stuck with the heavy clays though; and you don't want to try and use it when the ground is wet, but otherwise it was well worth the time and minimal cost to build!
All that's left to do is cut off the bars to even them up, even out a couple of the bends and add a little green paint.
Everytime I drop a blade on my place, a new crop of rocks begins to grow and I was getting tired of getting off the tractor and picking them up!
My camera was out of juice when I was doing the actual labor, so I'll just describe what and how.
I started out with a jig and 100' of 1" oil field sucker rod.
I cut the rod down to 4' lengths with a chop saw and began bending them to shape on the jig I'd built by tracing the outline of my existing FEL bucket.
I bent about six by hand, using the cutting torch to heat them, that was enough to find out that I needed help!
I went to HF and bought a $50 dollar 12 volt winch and used it for the other 20 bends.
I then took 2 4' lengths of 1 1/2" x 3/16" thick angle iron and cut 1" holes 1" apart and stuck my bent bars through them and welded them up.
Keeping them straight was the hardest part; I'm still going to have to reheat and rebend a few of the bars to make them line up right.
Next I built plates for the quick attach bucket mount and welded it to the rock bucket and spent an hour or so bending some 3/16" plate to form the hangers for the top of the bucket. (I wound up welding a piece of 1 1/8" OD bar to the plate and heating and beating until I got the correct hook shape.)
I also spent an hour trying to figure out how to tap the 1 1/8" bar for my pins on the bottom of the attachment; even using the drill press I couldn't get the pilot holes straight enough to tap them out larger and make it work.
Finally inspiration struck, I had a couple of implement pins from TSC in my barn, a couple of quick cuts and I welded them on!
The bucket works great in the sandy parts of my property, but it does pick up quite a bit of dirt with the rock.
Luckily the pins for the bottom attachment are not real tight so there is a bit of play and you can "shake" the loose dirt out the bottom.
You're pretty much stuck with the heavy clays though; and you don't want to try and use it when the ground is wet, but otherwise it was well worth the time and minimal cost to build!
All that's left to do is cut off the bars to even them up, even out a couple of the bends and add a little green paint.
")