Building a waste oil burning stove for my shop

   / Building a waste oil burning stove for my shop
  • Thread Starter
#21  
skidsteer.ca said:
I have been toying with this idea for some time now too. I had read Rogers article a year or so ago. Currently I heat my 2400 sq ft shop (18 ft ceiling) with wood and supplement it with a gravity feed oil drip system controlled by a ball valve.
This system works good if you need lots of heat.
The problem is that the oil burns rich if you try to throttle the draft down on the stove. It looks like black cotton candy inside and the smell is all over the yard
I had been thinking of using 2 old 100 lb lpg bottles. Dump the dirty oil into the first tank, seal it and use regulated compressed air to chase it through a strainer then a oil filter into tank # 2
The first tank would have a cleanout for sludge and water at the bottom.

From the clean tank the oil would be fead to the stove again with regulated air pressure.
I had considered using a pressure washer nozzle to atomize the oil and feeding it into a venturi where airflow would be controled by another regulator.

After seeing Rodgers version I'm not sure I should take all this experimenting on or just go with something I'm told is tried and true.
However even with his conical burner I think I'd use air feed as opposed to gravity just because you can make the "hill" as high as you want. Also as I found in my drip system it is easy to plug it up with crud in the oil. So plan on a cleanout somewhere.
One of these
Surplus Center Item Detail
should work good for a flow control valve, especially if you could control the pressure as well.
I'll be watching this thread closely and look forward to learning more.
We generate 150 to 200 gallons of used oil anually, so it would be good to put it to use.
Ken
Ken, you have to have a intake supply of air to the flame. You can not control the flame by the draft. When you turn the oil flow down, you have to have the air ratio right or it will smoke real bad like you said. Drafting firewood is different than drafting oil. Firewood is a solid form of fuel. Oil is a liquid form of fuel (in the form of vapor). Two completely different forms of combustion play a roll here. Rogers heater has a intake pipe that supplies air to the flame. Using the conical burner which keeps the oil under control and the intake air supply keeps the flame stable by keep it hot. Keep the flame hot allow the fuel (oil) to burn properly (clean). When I talk about the flame being hot, I mean core heat. Low burn, you turn the oil flow down so that you have a smaller flame which will not emit allot of heat. But you must still have a core temperture for the remaining oil to burn. So, you must match the air ratio to the oil that is being burnt. You cant do this with the draft. Cutting some of the intake air off does allow you to have a smaller flame, but you have to turn the oil flow down as well to have a controlled low burn. This intake supply of air is one of the keys for burning waste oil. Controlling the diameter of the oil with the conical burner is another (low burn) key. As I was working on my stove tonight, I almost told myself the intake air pipe was not need. But deep down inside, I knew it was needed for the low burn operation. Since my shop is small (1200 sqft.), a low burn is needed or I will be opening the bay doors to let some of the heat out.
 
   / Building a waste oil burning stove for my shop
  • Thread Starter
#22  
svcguy said:
I really like your interest in Rogers heater, as it makes a lot of sense. Waste oil heaters are very efficient when working well. The problem you might have is the thickness of your steel pipe (stove sections). The M.E.N. heater was originally created from a water tank, which is fairly thin material and quite tall. Although thin steel is not as safe as your heater design (which looks really good by the way), it does tend to radiate quite efficiently. Rogers conical burner is brilliant, not only because of the efficiency of the burner puddle (size vs depth), but because of its ease of cleaning. Any waste oil heater not atomizing the fuel is a total pain to clean. Roger explains this very well in his article and his burner is the answer (without a doubt).

What you may find is that your efficiency may be limited by the thickness of your material (heat bypassing the stove body and heat exchanger). Radiant heat is dependent on wall thickness (you will know by the amount of heat escaping up the chimney). To counter act the thickness of material, you might find it an advantage to weld a series of 1/8 or 1/4 by 4 inch fins over the entire length of your heat exchanger to "wick" heat out into the room. These could be inside the tube as well as outside. Welds should run the length of the fins on both sides to ensure for good heat transfer. The greater the surface area, the better the heat transfer.

I am really excited about your project and will be looking forward to hearing more about your experience with the heater. Keep everyone up to date with photos and details.

All the best, Tom
Tom, I agree with you about the heat exchanger. My radiant heater that you see in two of the picture above (mounted right below the trusses). If you go to the end of it and look inside the pipe (you cant see it in those pictures), it has a auger inside of the pipe. This makes the heat roll along the wall as it passes threw the pipe.

As for my heat exchanger, I'm thinking about welding some plates inside the barrel and change the path of the heat. This will make or force the heat to move around inside the heat exchanger before it passes into the exhaust pipe to go outside. The more I can keep the heat inside the heat exchanger, the more heat that will be drived or forced into the thick metal. Or more time for the thick metal to heat up.

As for pictures and details. That will not be a problem. :D
Thanks,
Cliff
 
   / Building a waste oil burning stove for my shop
  • Thread Starter
#23  
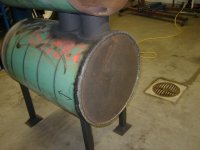
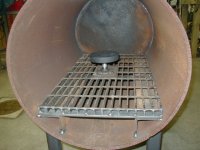
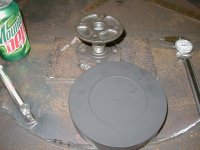
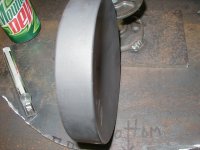
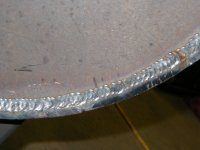
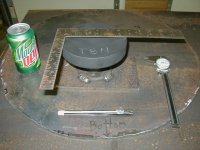
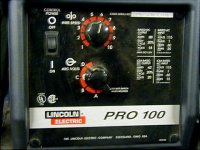
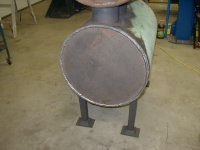
These picture are as far as I got today. The end that I welded up today. That took me almost three hours to weld. I kept hitting the duty cycle on my mig welder. So, to keep my welder from kicking the thermal overload out like I did twice today. I could only weld for about two minutes and had to stop and let the welder cool down for about 10 minutes. My mig is only 100 amp welder (Lincoln Pro 100 ). So, to be able to weld 3/8's steel. I have to weld like this--->ccccc. I got the conical cleaned up and I only painted it to keep it from rusting. I also got the grate supports (angle iron) welded in. I welded some 1/4 thick steel to the grate itself to keep it from warping. Remember, I'm still setting this stove up to burn firewood incase I decide I dont like the performance of burning waste oil.

Thanks,
Cliff
 

Attachments

  • Backside Welded I.JPG
    Backside Welded I.JPG
    116.3 KB · Views: 2,079
  • Backside Welded II.JPG
    Backside Welded II.JPG
    122.1 KB · Views: 1,820
  • Conical Inside Stove.JPG
    Conical Inside Stove.JPG
    142.8 KB · Views: 3,320
  • Backside Conical.JPG
    Backside Conical.JPG
    155.3 KB · Views: 1,826
  • Depth Conical.JPG
    Depth Conical.JPG
    152.5 KB · Views: 2,155
  • Weld.JPG
    Weld.JPG
    114.2 KB · Views: 1,951
  • Conical.JPG
    Conical.JPG
    166.7 KB · Views: 1,858
  • Lincoln Pro 100.JPG
    Lincoln Pro 100.JPG
    119.5 KB · Views: 1,918
   / Building a waste oil burning stove for my shop #24  
Nice. did you turn that conical? Hope you keep giving us updates.
 
   / Building a waste oil burning stove for my shop #25  
LetsRoll,

That thing looks beautiful!! Nice work. If i understand correctly, you draft air in the proper ratio with the amount of oil flow?

Is that correct?

In a standard oil burner they check smoke output & temp. to adjust air, but also, the old tiemrs can tell by looking at the shape and color of the flame.

On this burner, will you have a "view port" or another way to see if the air/oil mix is efficient?

Again, great work, looks like a winner!
 
   / Building a waste oil burning stove for my shop
  • Thread Starter
#26  
   / Building a waste oil burning stove for my shop
  • Thread Starter
#27  
SkunkWerX said:
LetsRoll,

If i understand correctly, you draft air in the proper ratio with the amount of oil flow?

Is that correct?

On this burner, will you have a "view port" or another way to see if the air/oil mix is efficient?

Again, great work, looks like a winner!
Yes and no. Oil flow is not my main concern (flame quality). The quality of the burn is what I'm trying to control here. When I can control how the flame looks (efficient burn) and how much heat it puts out (overall temperture). These two will be what I'm shooting for or what I'm chasing after. As of now, I have small clue what the air and fuel ratio should be. I have a ball park idea, but that will need to be fine tuned. When I get this stove done, the first thing I have to do is burn it outside cause there is a hard plastic coating on the outside the bottom and top barrel. Starting it up outside my shop will burn this coating off. Once the coating is burnt off. I will start taking notes for a hot burn and low burn. How much oil will be dripping into the conical on a low burn per hour and the same for high burn. Also taking notes on how much air is being allowed during low and hot burn. Also noting what lower and upper limits of air for the low and hot burn. After I get these notes writen down. I will turn the oil flow off and let the stove cool down. Then I will try firing the stove up and see what it will take to start the stove with no or little smoke. Just trying to see what the best method would be. Which I already know I will not be able to do. But I'm going to give it a try or look more into it. Cause I really want this waste oil burning stove to work to my standards.
 
   / Building a waste oil burning stove for my shop #28  
Quite a few years ago I did repair work on a small rural school here in Northern California that was heated by gravity fed oil heaters. It was my first experience with units that did not employ pumps and blowers. Worked really well, but were subject to sooting. The issue was one of running too lean, allowing the burner area to cool and poor combustion resulted. The design was really simple - a large steel drum, with a smaller combustion area at the bottom. Oil arrived via a small feed tube to an open burner tray. The combustion area was surrounded by a perforated screen barrier - that allowed combustion air into the area and forced a swirl effect as draft increased. Essentially it superheated the oil into vapor, that being burned in combination with the swirled air would rise into the larger chamber, heated like a champ. You lit it with a few pieces of crumpled newspaper inserted into the chamber to start the process and induce the draft.

Barometric damper on the flue helped hold a steady state on combustion air volume, prevented a huffing condition. A flow regulator valve on the fuel feed permitted a bit of output control.

Seems like that design could serve a waste oil heater pretty well - perhaps thats where you're headed. Problems of sooting fouled up the screens occassionaly - hence the need for service calls. Hope this helped... FWIW.

Good Luck !
 
   / Building a waste oil burning stove for my shop #29  
LetsRoll, I like your scientific approach to determine the best operating conditions, sounds like the way I would do it.

So, bottom line is a good even flame?
Do you have a small view port so you can see it while in operation?

Reason I ask is that I use the view port on my oil burner for my house, the flame shape, size, and color are good indicators for an efficient burn.
 
   / Building a waste oil burning stove for my shop #30  
He guys,
just ran across your thread and thought I would add my 2 cents. I looked into this for the past few years and the best furnace containment design (I believe) is just about what you are making. My arrangement in the top drum was going to be a hot gas to water/antifreeze heat exchanger. (I have made others without). This is so the unit can stay outside, no problems with fire marshal, no worry leaving unattended for an hour or so (you do not want to start stop the unit too much as this is where most of the bad burn and you time can get used up), and better heat control in the shop ( a thermostst controls the circulator pump that brings the hot water into the shop. And don't forget no loss of shop space with it being outside. I know there are disadvantages with the unit being outside, but to me it makes more sense. (unless of course you have a shop the size of a football field).

The other thing I wanted to mention is that the best designs I have seen use a variable speed blower (12v from car works fine), AND a metering pump for the oil. This way it is totally controllable without the worry of runaway.
The best chamber I feel (after making a few and looking at probably a hundred or so)is the dual inverted drake drum. I have used both the cup and the forced air into the cup design and both work BUT... The best, hottest, cleanest burn comes from the hottest chamber tempurature (obviously). With the cup or dish design, most of the heat and flame goes straight up, taking with it unburned fuel. With the drake drum design the burn is taking place INSIDE the two drums which get extreamly hot. And they are scrap drums, so they are easily replaceable when they burn out.

One more thing, insulate the inside of your bottom drum with ceramic (or similar) insulation on the walls. It is available from industrial furnace supply companys. The hotter the inside of your first drum the more efficient, and happier you will be. But do not insulate directly on the bottom! If you have an oil spill, it is a pain to clean. Use firebricks to set your burner on, and they can be removed easily to clean or service.

Well, thats about what I have found and just wanted to pass that on. maybe my latest version will come together this winter...

Joe
 
 
Top