RedDirt
Gold Member
- Joined
- Dec 4, 2007
- Messages
- 469
- Location
- Northern Idaho
- Tractor
- Kubota BX23, Wards 16HP HST Garden Tractor, (previous) D2 Logging Cat
Got a lot of leaves to move? Got a scut or cut? This may be the answer. A two yard dump bucket! The trial run was fantastic. See it in action at Kubota Owning/Operating forum.
This may not fit your needs but it works great for me. Five acres of Black Oaks and Ponderosa Pines make huge fall clean-up. This is sure an improvement over a pitch fork and trailer! The main purpose was to get all my scattered leaf and pine needle piles gathered to one or two central burn areas instead of having a dozen burn piles around the property. And now all those Oak leaves that I want to mulch can be carried over the gravel drive to the garden instead of raking and introducing a bunch of gravel.
Bear in mind: This is a large volume - small weight capacity bucket. No heavy loads allowed!
This is a prototype of wood to see if it would work and to trouble shoot any bugs. The prototype worked so well that with only the addition of a stiffener behind the lip attachment and a pair of metal forks this prototype may stay in service until I break it. That way I can get on to building other things!
All the prototype materials were scrounged from supplies and scraps on hand. My out of pocket cost was zero and took one day to build. If all materials were purchased new cost should be $100 to $150 (for the wooden bucket).
Forks: 2-1x4 w/ 5/8" ply spacer & 12ga 1 1/2" x 1 1/2" x 24" "L" angle reinforcement.
Bottom: 1/2" plywood
Back, top, sides, 1/4" plywood
Backing plates at lip attachment: 1/2" ply
Side cleats: 2x2
Stiffener at top: 1x4 front & back
Cutting edge: 2x4 beveled
Hinges: one large pair bottom-to-back, one sm/med pair back-to-top
Lip bracket 2x2, 2x6 & 1" dia PVC pipe
Bucket attachment: 2-3/8" turnbuckles, wire, thimbles, alum swage connectors.
Fasteners: "Grabber" screws of various lengths
If/when I build the next generation leaf bucket I'd use a sheet metal skin (10ga, 12ga?) over metal stud framing members and piano hinges instead of strap hinges. Not sure yet on a "cutting edge". I "load" the bucket by pushing in material with my Wards tractor rake and the edge just needs to hold the edge straight. Maybe a hemmed front edge with a 3" or 4" x 1/8" or 3/16" would do the job. Worst case would be something like a 1 1/2" x 1 1/2" x 1/8". For my use it really doesn't matter that the cutting edge is beveled.
On to the prototype.
An interesting design feature is that the bucket sides (ends) are removable. The top then hinges down against the back and the pair of these hinge down against the bottom. This knock down feature allows storage in a very minimal space. For my prototype I need to unscrew the ends. With metal construction these could be quick pinned together.
For this bucket the bottom is 3'-0" x 6'-8", back 2'-5" x 6'-8", top 2'-3" x 6'-8". The back to top forms a 90 degree angle. I don't remember the bottom to back angle but I think it was around 119 degrees. "Struck" volume is 1.97 cuyd. These are "rough" dimensions to fit a bx23 bucket. Your dimensions would vary to fit your bucket.
I have in mind to build a set of lip-hung bucket forks but this prototype is based on more of a clamp on style of forks. With minor modifications the design would work with either type.
First some finished pictures then some construction photos:
Well, it lifts
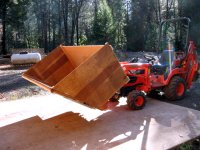
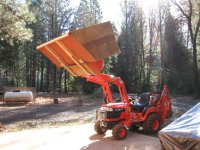
And lifts high
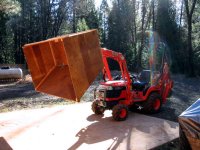
Dumps OK too
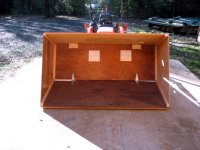
Front opening is 6'-8" wide x 3'-10" high
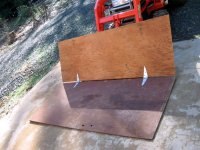
I hinged the bottom and back with strap hinges and laid against the tractor bucket to get a feeling for the size and fit
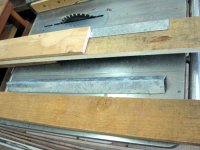
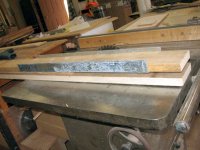
"Make-do" forks are 1x4 wood w/ spacer for cutting edge and sheet metal "L" reinforcing. I placed two through bolts just behind the spacer then the rest of the length was grabber screwed top and bottom. Not the strongest forks but they worked for the prototype.
Here are the forks assembled. They just slide on. They go to the back of the bucket, metal angle facing down and held in place with a screw through the wooden bucket bottom; no fastener to the metal bucket. I placed a 4"x4"x1/2" ply spacer between the bottom wood fork and the bottom of the metal bucket (for the metal bucket cutting edge) held in place with a screw
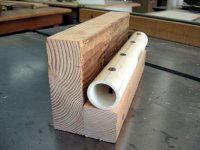
Bracket to attach back of wood bucket to top lip of metal bucket. What you don't see are two more screw in the back of the 2x6 into the 2x2
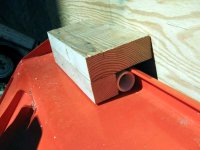
A wedge is placed between to two buckets to push the pipe forward and engage the lip. I had a little misalignment problem and the left bracket never fully engaged the lip but it ran fine this way in trials.
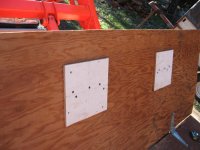
On the inside back of the bucket the lip brackets are backed by a square of 1/2" ply. In trials this was the only evident weak point and I'd run a full length reinforcement at the brackets. The reinforcing could run horizontal through both or use two vertical, one at each bracket. I'd try to make this so it did not interfere with the fold-up design concept. Of course a heavier back would be good, this one is only 1/4" ply.
Main attachment is a cable and turnbuckle assembly that "sucks" the two buckets together. When I install my bucket forks I'll get the common, not weld-on, chain hooks so I can use the hole in the back for this attachment. But the "C" clamps worked fine too. The turnbuckles were what I had (too long) so the pipe spacer was added to keep the lead fair.
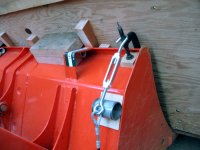
The other end of the cable is through bolted to the bottom of the wood bucket with a spacer block.
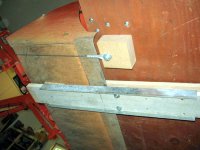
At this point I tested lift and dump. Jiggled a bit. This is where I found I needed to through bolt the forks at the cutting edge spacer. The screws in one fork pulled through when bouncing the bucket.
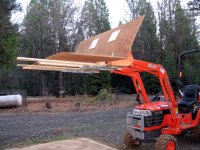
And test dump
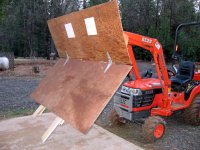
I cut the sides and attached w/ 2x2 cleats. Everything is screwed together on 4" centers
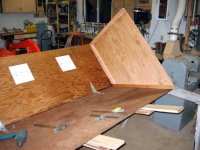
The top is hinged to the back. The hinge is set forward so it sandwiches between the bottom/back strap hinges when folded. I reinforced the front and back of the top with 1x4's. Then added a bevel 2x4 Cutting edge
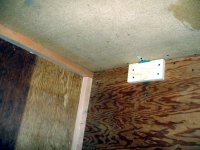
The finished product.
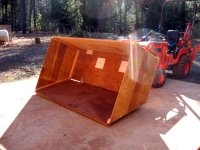
Enjoy.
This may not fit your needs but it works great for me. Five acres of Black Oaks and Ponderosa Pines make huge fall clean-up. This is sure an improvement over a pitch fork and trailer! The main purpose was to get all my scattered leaf and pine needle piles gathered to one or two central burn areas instead of having a dozen burn piles around the property. And now all those Oak leaves that I want to mulch can be carried over the gravel drive to the garden instead of raking and introducing a bunch of gravel.
Bear in mind: This is a large volume - small weight capacity bucket. No heavy loads allowed!
This is a prototype of wood to see if it would work and to trouble shoot any bugs. The prototype worked so well that with only the addition of a stiffener behind the lip attachment and a pair of metal forks this prototype may stay in service until I break it. That way I can get on to building other things!
All the prototype materials were scrounged from supplies and scraps on hand. My out of pocket cost was zero and took one day to build. If all materials were purchased new cost should be $100 to $150 (for the wooden bucket).
Forks: 2-1x4 w/ 5/8" ply spacer & 12ga 1 1/2" x 1 1/2" x 24" "L" angle reinforcement.
Bottom: 1/2" plywood
Back, top, sides, 1/4" plywood
Backing plates at lip attachment: 1/2" ply
Side cleats: 2x2
Stiffener at top: 1x4 front & back
Cutting edge: 2x4 beveled
Hinges: one large pair bottom-to-back, one sm/med pair back-to-top
Lip bracket 2x2, 2x6 & 1" dia PVC pipe
Bucket attachment: 2-3/8" turnbuckles, wire, thimbles, alum swage connectors.
Fasteners: "Grabber" screws of various lengths
If/when I build the next generation leaf bucket I'd use a sheet metal skin (10ga, 12ga?) over metal stud framing members and piano hinges instead of strap hinges. Not sure yet on a "cutting edge". I "load" the bucket by pushing in material with my Wards tractor rake and the edge just needs to hold the edge straight. Maybe a hemmed front edge with a 3" or 4" x 1/8" or 3/16" would do the job. Worst case would be something like a 1 1/2" x 1 1/2" x 1/8". For my use it really doesn't matter that the cutting edge is beveled.
On to the prototype.
An interesting design feature is that the bucket sides (ends) are removable. The top then hinges down against the back and the pair of these hinge down against the bottom. This knock down feature allows storage in a very minimal space. For my prototype I need to unscrew the ends. With metal construction these could be quick pinned together.
For this bucket the bottom is 3'-0" x 6'-8", back 2'-5" x 6'-8", top 2'-3" x 6'-8". The back to top forms a 90 degree angle. I don't remember the bottom to back angle but I think it was around 119 degrees. "Struck" volume is 1.97 cuyd. These are "rough" dimensions to fit a bx23 bucket. Your dimensions would vary to fit your bucket.
I have in mind to build a set of lip-hung bucket forks but this prototype is based on more of a clamp on style of forks. With minor modifications the design would work with either type.
First some finished pictures then some construction photos:
Well, it lifts

And lifts high

Dumps OK too

Front opening is 6'-8" wide x 3'-10" high

I hinged the bottom and back with strap hinges and laid against the tractor bucket to get a feeling for the size and fit

"Make-do" forks are 1x4 wood w/ spacer for cutting edge and sheet metal "L" reinforcing. I placed two through bolts just behind the spacer then the rest of the length was grabber screwed top and bottom. Not the strongest forks but they worked for the prototype.

Here are the forks assembled. They just slide on. They go to the back of the bucket, metal angle facing down and held in place with a screw through the wooden bucket bottom; no fastener to the metal bucket. I placed a 4"x4"x1/2" ply spacer between the bottom wood fork and the bottom of the metal bucket (for the metal bucket cutting edge) held in place with a screw

Bracket to attach back of wood bucket to top lip of metal bucket. What you don't see are two more screw in the back of the 2x6 into the 2x2

A wedge is placed between to two buckets to push the pipe forward and engage the lip. I had a little misalignment problem and the left bracket never fully engaged the lip but it ran fine this way in trials.

On the inside back of the bucket the lip brackets are backed by a square of 1/2" ply. In trials this was the only evident weak point and I'd run a full length reinforcement at the brackets. The reinforcing could run horizontal through both or use two vertical, one at each bracket. I'd try to make this so it did not interfere with the fold-up design concept. Of course a heavier back would be good, this one is only 1/4" ply.

Main attachment is a cable and turnbuckle assembly that "sucks" the two buckets together. When I install my bucket forks I'll get the common, not weld-on, chain hooks so I can use the hole in the back for this attachment. But the "C" clamps worked fine too. The turnbuckles were what I had (too long) so the pipe spacer was added to keep the lead fair.

The other end of the cable is through bolted to the bottom of the wood bucket with a spacer block.

At this point I tested lift and dump. Jiggled a bit. This is where I found I needed to through bolt the forks at the cutting edge spacer. The screws in one fork pulled through when bouncing the bucket.

And test dump

I cut the sides and attached w/ 2x2 cleats. Everything is screwed together on 4" centers

The top is hinged to the back. The hinge is set forward so it sandwiches between the bottom/back strap hinges when folded. I reinforced the front and back of the top with 1x4's. Then added a bevel 2x4 Cutting edge

The finished product.

Enjoy.
Last edited:
