Ejector Bucket Design

   / Ejector Bucket Design #1  

RedDirt

Gold Member
Joined
Dec 4, 2007
Messages
469
Location
Northern Idaho
Tractor
Kubota BX23, Wards 16HP HST Garden Tractor, (previous) D2 Logging Cat
General consensus is that narrow BH buckets and compact dirt (clay) don't mix. The problem may be able to be solved with a self ejecting bucket.

Remarks on charlz "narrow bucket" thread (Built it Yourself), and my "build a slim trenching bucket?" thread (Kubota own/operate) indicate the likely possibility that when working in a high clay content soil the dirt sticks to a narrow trenching bucket and doesn't readily evacuate. This lead me on a search of "ejector buckets" and my thanks to pycoed (West Wales UK) for leading me to European designs.

US has little offerings for ejector buckets (that I could find). Some European backhoes seem to have a different bucket style and operation of the curl mechanism.

Here is a picture of a European ejector bucket (Harford) with a flap and levers:

Harford Ejector Bucket.jpg

But this European design (Lackender ) caught my eye for simplicity:

Lackender Ejector Bucket.jpg

The Lackender bucket must have a longer curl cylinder that goes over-center of the bucket pivot to fully curl the bucket. My challenge was to see how to make this "half-round, pivot-at-radius" bucket adapt to our shorter curl cylinders and bucket curl levers.

This is what my initial design looks like. (This is my first posting of pdf's. If they view sideways you should be able to click the "rotate" icon when it opens in Adobe to set it straight) When I reviewed my post this was the case AND they didn't open on the first try. On that (cant' open) screen I "canceled" then clicked the attachment once again and they opened fine. Can someone tell me how to better attach pdf's?

View attachment Ejector Bucket1 Layout1 .pdf

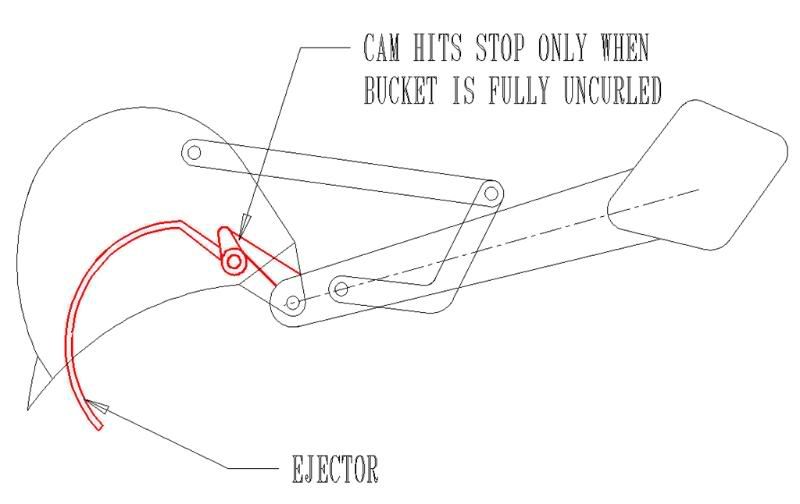
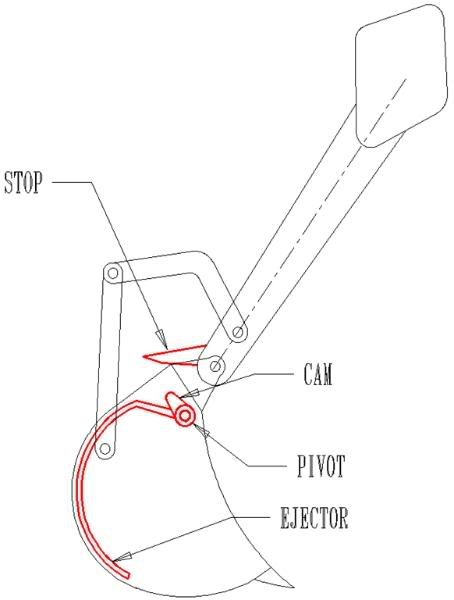
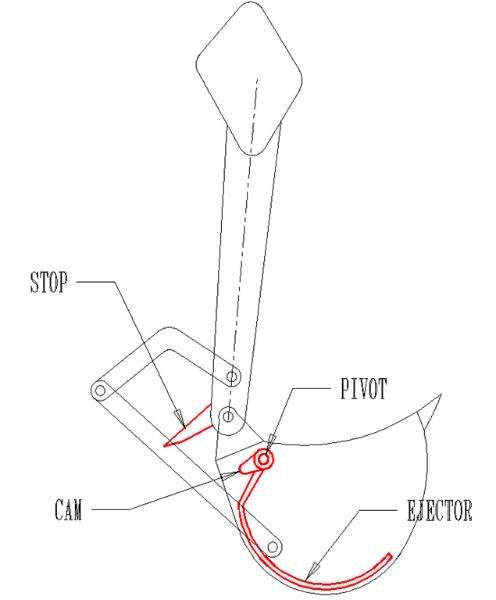
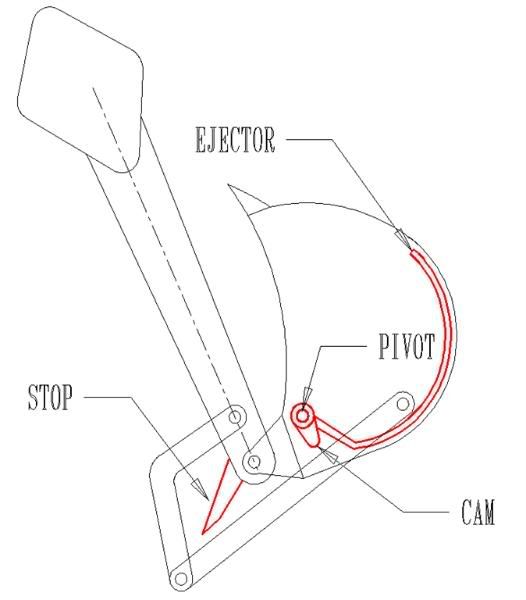
The concept is a 1/3 circle bucket that pivots at the center of the radius. There is a fixed flat plate that is "U" bolted to the bottom of the dipper stick. When the bucket is fully opened the bucket rotates around the fixed plate and ejects the bucket contents.

A modified digging style will be necessary with this bucket. As you begin the trench all the digging must be done with the curl because the fixed plate blocks the opening. This motion must be done a couple of scoops full then I think digging can be resumed in a more familiar manner abet modified somewhat.

This drawing shows the first few scoops being removed on the way to a 3ft deep trench.

View attachment Ejector Bucket1 Layout2 .pdf

An interesting point is the volume of this 7" wide bucket when fully curled (and dirt filled to the ejector plate) is the same as my 12" bucket. This is due to the larger (12"+/-) radius of the ejector bucket (my standard 12" bucket has about a 5" radius back, about 1/3 of a circle. then radiates straight-lined about 5 1/2" beyond the spring points of the curved back).

This is an initial design phase and I'd sure value any feedback and comets before I start a mock-up. I realize the fixed plate attachment needs to be worked out better; it is shown and explained as "U" bolted for concept purpose. The plate is likely to be 1/4" thick with a couple of "L" angles welded on the face for stiffeners.
 
   / Ejector Bucket Design
  • Thread Starter
#2  
After posting I found the pdf drawings opened quicker if I already had Adobe Acrobat running in the background. Maybe this is just my computer; yours may vary.

This bucket is designed for a Kubota BX23. This bucket will have no teeth; I'll add bolt-on's later if I need them.

Further explanation of the first pdf drawing:

I mistakenly drew the curl cylinder with the rod extended when the bucket is fully opened. The rod at this point should be fully retracted.

The bucket with the dimensions represents the fill of the "loaded" bucket. The 8 3/8" is the intersection of the front face of the bucket and the fixed plate (when curled), the 1'-4 7/8" is the fixed plate to the same intersection. With a 7" clear inside width the filled volume (raked) is .77cuft. (BTW, a BX24 8" bucket has a 7" clear width).

On the superimposed bucket the solid green lines are the bucket fully opened and the dashed light blue is for the curled bucket. The 11 1/2" dimension is the "usable" portion of the face of the bucket that is presented to the ditch.

The arc between full open and full curl is less than my standard bucket which has a 180 degree arc. There will need to be some sort of stop incorporated in the curl to keep the the curl lever pin from pushing against the fixed plate.

I tried to work out a mechanism that would allow the fixed plate to pivot, at least at the beginning of the dig, so the plate did not block the opening but the best I've come up with is a series of articulated levers (that I want to avoid for simplicity).
 
   / Ejector Bucket Design
  • Thread Starter
#3  
Found this on another post. One way to keep clay from sticking to the sides of a bucket. Get rid of the sides!

...from Great Britain; they must have a lot of sticky clay there.

clay_spade.jpg
 
   / Ejector Bucket Design #4  
In Holland (lots of clay, the polder soil was seabottom untill 80 years ago !!) we call that a banana bucket. ;)

Usually a banana bucket is enough. However when i was 17, i had a holiday job where i had to follow the mini-excavator, to search for cables crossing our trench, and stick the clay out of the banana bucket every 5 cycli.

The operator said that next time he would bring a chain bucket. When i asked what that was, he said that in very sticky clay, the bucket wouldnt have a back plate either, but just chains to hold the ball of clay. But that only works in pure clay, like in excavation pits for brick factories.
In normal trenching conditions, they would attach a chain to the bucket lip and to the boom: When the bucket is fully curled open, the chain would be pulled tight and slit through the clay ball: Once there is a slit through, the two lumps of clay would normally fall out easy.
If not, you could also make a hinged plate in the bucket, which the chain will pull up when the bucket opens.
 
   / Ejector Bucket Design #5  
Hi Ray,
I found your self ejecting bucket quite a neat idea so I thought I might give you and idea to make it a little more unique. I've seen your design and fabricating skills so I don't think this would be out of the question for you to make. My thought stems from the fact that the ejector plate is stationary. My concern is that if you ever wanted to start digging with the bucket fully uncurled (like I do to get maximum reach) then the ejector plate blocks the bucket until you start to curl the bucket. The more you curl, the more you can get into that bucket.

The presumption would be that you would not get a full bucket until almost fully curled since the stationary ejector plate is in the way. However, sometimes I've gotten full buckets with the bucket fully uncurled and only using the dipper stick or boom to dig, without curling the bucket. In that case, the stationary ejector plate might get bent inwards ... maybe not, but it could?

So I was thinking of a pivoting ejector plate that ONLY ejects when the bucket is fully uncurled AND is free floating or rotating as soon as you start to curl the bucket slightly. To me, that would be the way to go.

You can do this with a pivot, a stop and a cam. Below, I've taken a drawing of my (existing) bucket and designed that kind of cam/pivot ejector system. Please keep in mind that I did not spend a lot of time to make it perfect. I would imagine you would want to shape the bucket and ejector plate for maximum performance. I drew these pictures only for an example and to show the concept. You will have to design it to be perfect, of course.:)

These are clickable thumbnails so click on them to enlarge.
They show the concept with the dipper stick and bucket in several positions.

 
   / Ejector Bucket Design #6  
Just to clarify Rob...

That cam is basically on the side of the bucket? Or does the stop go through a slot in the back of the bucket?
 
   / Ejector Bucket Design #7  
For these types of buckets, would you or does it make sense to have the bucket itself with "no back". Since the ejector plate acts as the back, I would be concerned that any material that gets by the plate would be continuously compacted when the bucket is curled. Is this not a concern?
 
   / Ejector Bucket Design #8  
I saw a bucket that was piped for compressed air... don't know where the air would come from... but it was designed so a blast of air would eject the material.
 
   / Ejector Bucket Design #9  
Defective said:
Just to clarify Rob...

That cam is basically on the side of the bucket? Or does the stop go through a slot in the back of the bucket?
Yes, there would be a slot in the back of the sample bucket so the cam and stop could meet. It's just a concept so the actual shape of the bucket and ejector ... even the pivot point and cam size should be customized.
 
   / Ejector Bucket Design
  • Thread Starter
#10  
Renze said:
In normal trenching conditions, they would attach a chain to the bucket lip and to the boom: When the bucket is fully curled open, the chain would be pulled tight and slit through the clay ball: Once there is a slit through, the two lumps of clay would normally fall out easy.
If not, you could also make a hinged plate in the bucket, which the chain will pull up when the bucket opens.
---------------
3RRL
"...the ejector plate blocks the bucket until you start to curl the bucket."
Rob
----------------
BX 24
"For these types of buckets, would you or does it make sense to have the bucket itself with "no back". Since the ejector plate acts as the back, I would be concerned that any material that gets by the plate would be continuously compacted when the bucket is curled. Is this not a concern?"
---------------
ultrarunner
"I saw a bucket that was piped for compressed air... don't know where the air would come from... but it was designed so a blast of air would eject the material."
---------------
3RRL,
"Yes, there would be a slot in the back of the sample bucket so the cam and stop could meet. It's just a concept so the actual shape of the bucket and ejector ... even the pivot point and cam size should be customized." - Rob


Thanks for all the feedback

Renze,
The chain concept is a good one and easy, with or without a hinged plate. Either might be a good "quick-fix" for anyone that has a standard bucket and dirt sticking problems.

Rob,
Yes, that is a shortcoming of my design and why I mentioned the modified digging process. I like your cam/lever concept and will probably try to develop it for my fit. Great idea. I tried similar before my first post but it wasn't so neat. See later in this post for pics of another lever action ejector plate similar to your idea.

BTW- I am going to send you a PM regarding your posting style. I like the thumbnails and I have questions about that and also your drawing >jpg conversion; my attempts did not go as expected.

BX24,
Good observation, thanks. Maybe I just need a couple/few straps across the back to hold the shape of the bucket and leave the rest of the space empty. Somehow though I think a back may be needed for efficient digging but, for sure, a "clean-out" bolt-on plate might be a necessity.

ultrarunner,
It would probably work (air) but you'd likely need a good volume (and I have no air available on board).

Rob,
One of the inherent problems with the lever actuated ejector flap is this is a very narrow bucket and the cross tube of the curl cylinder rod fills the space between the bucket attachment "ears". At least it does on mine. The bucket itself is not much wider than the curl rod pin. Then, if a slot is in the back of the bucket for the lever, the lever it hits the curl rod. See below for side levers.
----------------
Here are some additional photos from John in "Wet Wales"

First two are his ejector bucket. Notice the actuating levers on the side of the ejector flap (seen best in second photo). I also notice that the bucket has a large opening in the back similar to what BX24 mentioned.

ejector1_sm.jpg ejector2_sm.jpg

Here is the dipper stick. Note the bolts protruding from the sides to catch the ejector activating levers. (The bucket in these pictures is not the ejector bucket. BTW- his buckets do not have our typical scissors arm on the curl rod)


dipper3_sm.JPG

dipper2_sm.JPG

So I'm back to the drawing board for some modifications, maybe total redesign. Thanks again for all the good suggestions.
 
 
Top