Kernopelli
Veteran Member
- Joined
- Oct 16, 2006
- Messages
- 2,207
- Location
- Carterville, Illinois
- Tractor
- Mitsubishi MTE2000D, Dig It 258 Mini Ex, Deere Z930A ZTR
With garden season coming up soon I had started thinking about tilling. It seems every year I get a new caller asking about getting their garden spot tilled. (Usually goes something like this); " Hey Darryl, this is "so and so"....remember, we were in 1st grade together.....uh, I saw a tractor in your yard yesterday and was wondering if you would like to come by my place and till my garden for me? I'll buy the {beer,soda, cold water,etc}....waddaya say! Well, I get over there and their "garden spot" is an area of compacted clay resembling concrete that is so compacted and hard it won't grow weeds.
I have scarifiers on my box blade that I can use to break things up with before making passes with my tiller but then I'm faced with how to get the box blade and the tiller over there in one trip on the tractor. Sooo, I started looking through my scrap with the intention of building something relatively light and portable to make the initial ground breaking with. This is what I ended up with.
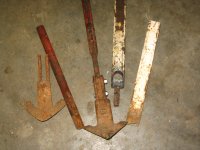
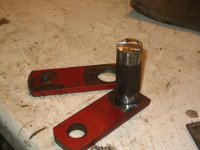
The first photo is some 2 1/8" OD- 1 7/8" ID square tube and some sweeps I had taken off a cultivator at the scrap yard a couple of years ago.
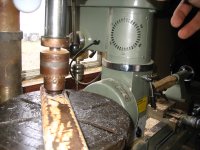
Second photo, drilling three evenly space 1 1/2" hole to accept the shanks for two sweeps. I can use either one sweep in the center or two on the outside.
Third is welding in a couple of cat 1 pins.
Four pic is how it looking so far.
Five is welding up a vertical support for the top link.
Six is 2" X 6" X" X 1/4" pieces that were drilled and then I welded in 1" bar stock for the top link attachment that mates with my quick attach.
Seven is the top link mate attached to the frame.
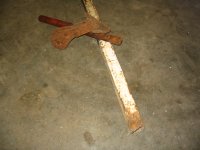
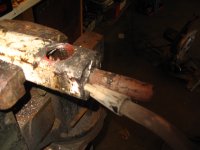
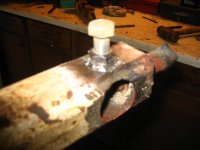
Eight is where I had to decide how to attach the cultivator shanks. I had originally decided to drill the shanks and use pins but after breaking 2 drill bits, decided I would just grind 3 flat areas along the length of the shanks to allow for some adjustment in their length and weld in some heavy bolts that would hopefully tighten up enough in the flat grinds and hold the shanks securely.
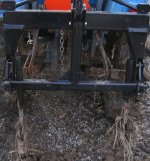
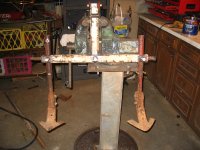
Nine is the finished product.
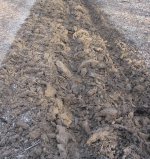
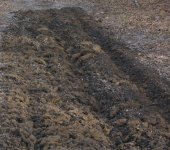
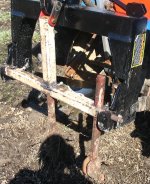
Ten is after taking it out and giving it a try in our extremely muddy ground. So far it worked great but I'll have to try it again when things dry out again.
I have scarifiers on my box blade that I can use to break things up with before making passes with my tiller but then I'm faced with how to get the box blade and the tiller over there in one trip on the tractor. Sooo, I started looking through my scrap with the intention of building something relatively light and portable to make the initial ground breaking with. This is what I ended up with.
The first photo is some 2 1/8" OD- 1 7/8" ID square tube and some sweeps I had taken off a cultivator at the scrap yard a couple of years ago.
Second photo, drilling three evenly space 1 1/2" hole to accept the shanks for two sweeps. I can use either one sweep in the center or two on the outside.
Third is welding in a couple of cat 1 pins.
Four pic is how it looking so far.
Five is welding up a vertical support for the top link.
Six is 2" X 6" X" X 1/4" pieces that were drilled and then I welded in 1" bar stock for the top link attachment that mates with my quick attach.
Seven is the top link mate attached to the frame.
Eight is where I had to decide how to attach the cultivator shanks. I had originally decided to drill the shanks and use pins but after breaking 2 drill bits, decided I would just grind 3 flat areas along the length of the shanks to allow for some adjustment in their length and weld in some heavy bolts that would hopefully tighten up enough in the flat grinds and hold the shanks securely.
Nine is the finished product.
Ten is after taking it out and giving it a try in our extremely muddy ground. So far it worked great but I'll have to try it again when things dry out again.
Attachments
-
 Feb 069.JPG861.5 KB · Views: 6,020
 -
 Feb 070.JPG880.5 KB · Views: 2,810
 -
 Feb 071.JPG657.5 KB · Views: 2,083
 -
 Feb 072.JPG861.5 KB · Views: 1,698
 -
 Feb 073.JPG868.7 KB · Views: 1,613
 -
 Feb 074.JPG841.4 KB · Views: 2,670
 -
 Feb 075.JPG816.4 KB · Views: 1,713
 -
 Feb 079.JPG568.7 KB · Views: 1,776
 -
 Feb 080.JPG928.8 KB · Views: 2,796
 -
 Feb 081.JPG484.3 KB · Views: 5,011
Last edited:
 (no nothing's wrong-just bad humor)