Backhoe Wood Splitter Improvements

   / Backhoe Wood Splitter Improvements #1  

F.L. Jennings

Bronze Member
Joined
Nov 7, 2008
Messages
82
Location
Ouachita Mountains, Arkansas
Tractor
Kubota L4200
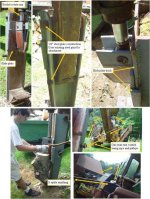
I built this wood splitter attachment for my backhoe last winter and am always trying to make it better, more functional etc. Recently I added the following features that are showing themselves to be very useful.

1. A detachable (just hooks on) wood ramp that is 5 feet long and about 13-14" wide. I made spring loaded anti-rollback bars and placed them along each side. These allow round wood to roll over them then they spring back up and won't let the wood roll back. The ramp will pivot in any direction to suit whatever slope the boom is. The universal joint method even allows the ramp to be used When I use the splitter in a near vertical position. The pivoted foot frame allow the whole thing to be set up level and used as a work platform while splitting wood.

The bucket attachment and linkage pins on the hoe boom were used to mount the assembly.

2. A pair of split wood returns (bringer-backers) that are very loosely connected to the truck assembly (wood pusher). These have proven to be a great labor saver. When wood is split you often want to resplit (sometimes multiple times such as with kindling) and these split wood retractors or "bringer backers" as I jokingly refer to them keep me from having to bend over and pick up all of the split pieces, even though a piece will sometimes fall off.

They are VERY loosely connected (threaded 1/2" studs) to the truck assembly. This loose connection allows them not to be damaged when twisted grain or other unruly wood trys to mess things up.

We started heating with wood again last winter so my tired old bones needed some hydraulic assistance. The whole thing works great and is largely built out of metal I had on hand. The Cylinder rod pin I turned on a 9" lathe andt then welded it to the plate truck assembly. I have split 4 or 5 cords with it so far and can do it right in the woods.

Here are a few drawings of what I have made so far. Mines not all painted yet so these pictures are much more explanatory than a lot of unpainted iron. Some welds are shown unpainted

Thought this might give somebody a few ideas or that you could improve on what I've done. I don't have $50 in the whole thing and it can be removed easily and the bucket re-attached. The tractor is a Kubota L4200 and the backhoe is a 9ft. Bradco. After I get the thing painted up and looking nice I can post pix.

SplitterNotedCompressed.jpg


SplitterPartial.jpg


PARTIAL ENLARGED VIEW
 
   / Backhoe Wood Splitter Improvements #2  
Very innovative and great graphics too!
 
   / Backhoe Wood Splitter Improvements #3  
great inovation. like to see your cable system control details...
 
   / Backhoe Wood Splitter Improvements #6  
   / Backhoe Wood Splitter Improvements #7  
found these pics of a backhoe splitter on the net. i think i'm going to copy this one. there were no details on the build, just the picture with captions on it. a
 

Attachments

  • log_splitter_collage.JPG
    log_splitter_collage.JPG
    89.6 KB · Views: 1,942
   / Backhoe Wood Splitter Improvements
  • Thread Starter
#8  
I didn't spend much time on these graphics but I think you can see how the cylinder is controlled.

1. The control arm assembly is just a 1/2" pipe fabrication with a vertical control handle that rotates independently from the arm. The vertical pipe sits down over a vertical rod that is welded to the angle splitter frame.

2. The control cables (3/32" steel cable with plastic coating) have a loop on each end. one end goes over a stud welded to end of control crossarm, and the other loops over the hooked bar that fits over the joystick handle.

3. The control cables goe around homemade sheaves that I turned from bar stock. They are each supported by a piece of 3/4" sq. tube that is bolted to the outrigger framing.

4. I use the outrigger positioning to set the slack/tension in the cables.

5. When operating the splitter;

a. I stand just to the right of the loading ramp after having filled it with rounds to be split. As I split pieces many of the larger ones need to be resplit. The retactors pull the split pieces back up and some times I stack one on top of another to save a cycle of the cylinder. Very large pieces when split, I just take one half (or whatever) and lay it aside on top of the other wood on the ramp. THis keeps me from having to always bend over to pick up pieces.

b. The ramp can be used at either side of the splitter/backhoe boom.

c. The boom is normally extended to near horiz. to about 18" above the ground. At present I usually rest the splitter on a chunk of wood to keep the boom from settling lower. I intend to make a swing down support on the bottom of the splitter frame so that using a piece of wood is not necessary.


d. The splitter can also function in a near vertical position with both inner and outer booms pulled in. The pivoting ramp/work table can be used no matter what the splitter angle as it can adapt to whatever you are doing.

I designed and built this splitter with economy in mind. I'm a geat believer in using whatever you have at hand to create what you need. The cable and a few fasteners etc. are the only money I have invested in this, except of course welding materials (wire and gas)

I have seen the backhoe splitter on youtube where the operator sits in the normal backhoe operator's seat and it looks great. When you have to deal with larger wood and/or tough wood I think you would find yourself always having to get off the tractor for some reason to deal with a problem. I split some stuff that is 24" in diameter or greater and I do not see any material of that size being split on that unit.

Yesterday I split 2/3 of a cord of 22" dia. Hickory and am still very pleased with the operation of my "junkyard brainstorm." As a professional mechanical/structural designer I refuse to create things that won't work or that I couldn't make myself, although some of the more complex ones take a little massaging from time to time! I was a journeyman tool & die maker before going into engineering 40 years ago, so I've made a lot of stuff and designed a lot of stuff. I had a lot of fun making this one and am really enjoying using it - especially since 100% of our heat is from firewood.

Everything is pretty much finished so I will paint it all up some for appearance's sake.

Frank Jennings, Senior Designer
Mid-South Engineering Co.


SCONTROLMAN-1.jpg


DSC01328.jpg

The cables attach to a bent bar that is welded to each side of a 1" pipe coupling. This coupling (top end closed off) just slips over the end of the joystick that controls the cylinder and the outer boom.

DSC01346.jpg


This photo shows the cables going around one of the WR sheaves and hooked onto the joystick fitting.
 
   / Backhoe Wood Splitter Improvements #9  
F.L., I like your idea of using the outriggers as cable adjusters. did you consider any other way to do it? my stabilizers tend to leak down too much for that to work for me. i'm trying to figure a way to go from horizontal to vertical without wasting a 1/2 hour 're-rigging' my controls.
the design i'm fiddling with is going to have a support at the far end too. thinking maybe 2x2 square tubing with a 6" square plate at the bottom, that swivels up and outa the way for vertical splitting.
 
   / Backhoe Wood Splitter Improvements
  • Thread Starter
#10  
F.L., I like your idea of using the outriggers as cable adjusters. did you consider any other way to do it? my stabilizers tend to leak down too much for that to work for me. i'm trying to figure a way to go from horizontal to vertical without wasting a 1/2 hour 're-rigging' my controls.
the design i'm fiddling with is going to have a support at the far end too. thinking maybe 2x2 square tubing with a 6" square plate at the bottom, that swivels up and outa the way for vertical splitting.

If you are going to split in both horiz/vert positions a separate set of cables might be best. I've settled on the horiz as my favorite since I have no wood to really lift and I do far less bending over. Setting up my controls, including stretching out the booms, etc doesn't take over 5 minutes. When I set up to split I'm usually going to be there a while. The tension to operate the joystick IS NOT banjo string tight (too tight will not work too well) but actually has some slack in the cables. Your bleed down of the outrigger cyls may not be a big problem, especially if the outriggers are "laid out" a little. The weight of them will be enough to keep things stretched out.

Whatever you do, do with labor and fatigue in mind. It's easy to do something a few times, but if you have to do it for hours on end (bending over, lifting wood etc) it gets old fast!


Here are a few more pix. I've been busy cutting/splitting wood lately so haven't snapped any new photos but will soon, which I will post to this thread.

DSC01291.jpg


I didn't even have controls when I took this photo - just a piece of old telephone cable with each end tied to the joystick and each side running around part of the outriggers. Sort of like reins for a horse.

DSC01343.jpg

This is last winter's photo and have made many improvements, including the loading ramp, moving controls closer to tractor, shortening the control arm vertical post, making split wood retractors & etc., but it still might help you.


DSC01339.jpg

I have added a plate keeper either side here (over the existing stub pins) the plates bolt to the angles & have a "half hole" that fits down over the pin and keeps the entire assembly from pivoting around the rearmost pins. - Just some keeper plates -

DSC01330.jpg


As far as tensioning goes you can use fixed position mounts (connected to whatever is handy and out of the way) and small turnbuckles to adjust the tensions. I started w/turnbuckles which you can see in the stretched out photo, but really didn't need them.
 
 
Top