Making 3 pt pallet forks

   / Making 3 pt pallet forks #1  

MJPetersen

Veteran Member
Joined
Feb 23, 2007
Messages
1,255
Location
Warsaw, Poland
Tractor
YM 1510-D
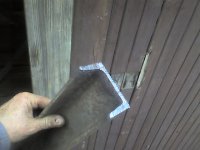
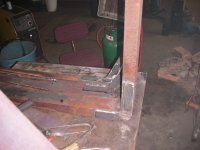
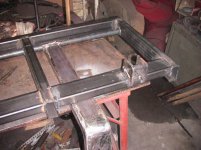
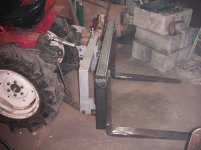
There are times that I want forks for carrying things around that are on a pallet, at least it would be helpful if I had such a thing. I had in my collection of junk a piece of channel that I thought would make a good set of forks. So I cut the channel to length with the torch, bent it to make the fork and then tapered it to make it more "fork like." :D

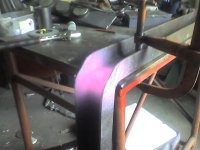
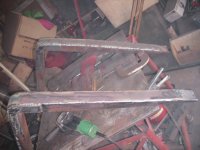
The forks lay around for awhile in this state, but one day I decided that just bent was not enough so I began reinforcing in a bit with patches on the sides of the bent area. But they are looking like forks! :)

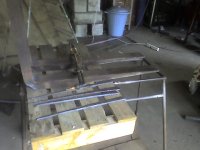
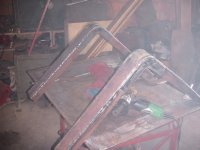
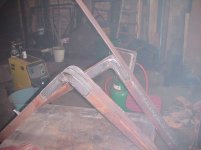
Then as I thought about it I decided that they could do with some internal strengthening too. So I welded a rib into the channel part of the fork around the bend.

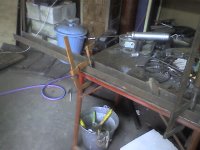
Then they lay for a while longer, while I did other, certainly more important things.

The saga will continue.

Mike
 

Attachments

  • Photo_042908_001.jpg
    Photo_042908_001.jpg
    61.6 KB · Views: 1,574
  • Photo_042908_004.jpg
    Photo_042908_004.jpg
    79.2 KB · Views: 1,319
  • Photo_050508_001.jpg
    Photo_050508_001.jpg
    70.4 KB · Views: 1,591
  • Photo_050508_005.jpg
    Photo_050508_005.jpg
    66.4 KB · Views: 1,546
  • IMG_2026.JPG
    IMG_2026.JPG
    889.8 KB · Views: 1,504
  • IMG_2023.jpg
    IMG_2023.jpg
    202.2 KB · Views: 1,383
   / Making 3 pt pallet forks
  • Thread Starter
#2  
I finally decided to finish the forks, I had tripped over them once too often.:eek: But I now thought that I should enclose the channel. So I put an additional rib in the thinner part and covered it over with a 5 mm thick flat stock. It was not as hard to take it around the bend as I thought it might be. It had a tendency to twist a bit, but a hammer on red steel straightens things out, or at least conforms it.;) After trimming the tips and a bit of grinding they really are looking like forks.:rolleyes:

Then I used a hole saw to cut the a space for the pipe on which the fork will hang and welded in the piece of pipe. I plan on a 35 mm mild steel bar that the forks will hang on. When the forks themselves were done, the project stalled for a couple of weeks. But I counted up my "mad money" and decided that I finally had enough to get a lathe--I have wanted one for like forever and the exchange rate for the dollar has jumped up for us. So maybe the time was right.

The one that I finally decided on was not going to be man-handled, but requires something more stout. Maybe finish the forks huh? I ordered the lathe and headed for the garage to finish them up.

Mike
 

Attachments

  • IMG_2031.JPG
    IMG_2031.JPG
    977.6 KB · Views: 1,350
  • IMG_2030.JPG
    IMG_2030.JPG
    955.7 KB · Views: 726
  • IMG_2028.jpg
    IMG_2028.jpg
    182.1 KB · Views: 897
  • IMG_2025.jpg
    IMG_2025.jpg
    197.4 KB · Views: 830
   / Making 3 pt pallet forks
  • Thread Starter
#3  
I wanted to get maximum lift out of it so I decided that the lowest that they could reach would be the ground, so I calculated what my frame shold look like. I bought new (heh, when you are in a hurry you do things like that) some 40 x80 mm with a 3 mm wall thickness. With a hole saw I prepared vertical pieces with places for a piece of pipe to support the carry bar. Carefully aligned then all up and welded the pieces of pipe into the supports.

I made my frame by welding a piece across the top and then 2 shorter pieces between the legs as a back rest for the forks and an attach point for the 3 point mount. These pieces are on edge to give more strength in the lifting points and to allow the forks to be straight. All the welding on the top frame had caused the legs to spring together, but a small hydraulic jack pushed the legs apart to make room for the bottom cross pieces.

At this point in time I ran out of wire for the welder--argh!:mad: So, this morning, yes I am caught up, I had a couple of "honey-dos" and then I bought some wire and headed to finish the forks up, as the lathe was supposed to come today. And it did. the delivery guy, they must be the same the world over, simply dropped it in the drive and from there it was up to me. Since it weighs almost 1000 pounds. Rain was forecast so back to the shop. I quickly finished the welding and made some 3 pt brackets for the bottom lift arms, after fitting it on the quick connect I finished it off by making top link connection. The fit and finish leave a bit to be desired. The ends of the boxes should be closed in and the spatter clean up a bit, the brackets need smoothing out and rounding off, but it seemed functional. Now to give it the test.

Mike
 

Attachments

  • IMG_2039.jpg
    IMG_2039.jpg
    226.4 KB · Views: 1,765
  • IMG_2034.JPG
    IMG_2034.JPG
    937.1 KB · Views: 694
  • IMG_2036.jpg
    IMG_2036.jpg
    222.3 KB · Views: 781
  • IMG_2033.jpg
    IMG_2033.jpg
    200.8 KB · Views: 1,143
  • IMG_2041.jpg
    IMG_2041.jpg
    204.3 KB · Views: 2,406
   / Making 3 pt pallet forks #4  
Very nice! A Job well done.

I'm sure you will be happy you have them finished and able to use them.

They do make life much easier for many tasks.

Regards
Sherweld
 
   / Making 3 pt pallet forks
  • Thread Starter
#5  
First I picked up the light pallet with the lathe stand. That was nothing I could have carried those in by hand!! But the big box was a different matter--I do not know wha tthe max for the 3 pt on the 1510 D is (I did not want to know) but I thought that I would just give it a try.

Opps forgot the front weights. But the 3 weights were still not enough--I could bring the front down by sitting on the weights--Hmm another 100 kilo. I set and strapped on a 7 hp 3 phase motor, but that was not enough, but by sitting on the hood and facing the back I could get the front wheels on the ground. The pressure relief kept popping, but I go the thing off the ground--I did not need or want it too far off. It was a bit awkward pushing the clutch with the toe of my right foot and steering backwards, but slowly I got the thing in the garage.

I doubt that I will ever pick up anything heavier than that in the future so the forks have been trial tested at the max and nothing broke!!:D That makes me very happy. Now in the future I can finish the forks as they should be finished and be confident that they are quite capable of picking some heavy loads. I know that I could have taken out the quick hitch and with the gain of a few inches maybe picked it easier, but I was in a hurry.:rolleyes: I also knew that I could open up the box and take out a few heavy items--four jaw chuck, back splash, tray, tool box, etc., But did I mention that I was in a hurry.

Nothing like a need to push a project to completion.:rolleyes:

Mike
 

Attachments

  • IMG_2043.jpg
    IMG_2043.jpg
    261.5 KB · Views: 1,327
  • IMG_2044.jpg
    IMG_2044.jpg
    246.8 KB · Views: 992
  • IMG_2045.jpg
    IMG_2045.jpg
    230.8 KB · Views: 1,537
  • IMG_2048.JPG
    IMG_2048.JPG
    842.8 KB · Views: 948
   / Making 3 pt pallet forks #6  
MJ,

Outstanding job on the forks!

Now that you've "load-tested" them, I know you'll find a million uses for them.
 
   / Making 3 pt pallet forks #7  
MJ;
Very interesting article on making the forks. I thought about making them out of channel but I didn't think they would have the strength after bending and reinforcing them. Well done !
I took the easy way and bought a set of 5k forks for $80.00 and encased them in channel. If you look real close by the lower tine you will see where I have a hole to install the three point pin. The the top arm mount is visible on the horizontal brace. I also intend to use them on the three point as well as the loader. So far the loader has picked up a bit more than 2500# with the forks. The Bradco backhoe on the rear weighs a ton so it helps to keep the rear tires on the ground. It won't move unless the four wheel drive is activated on the TC 55 DA New Holland.
I'm building a loader for a small John Deere. I'm tempted to try your method building forks for it just for the experience. Thanks for the info and pictures jr
 

Attachments

  • 2008-07-29 Garage 011 (3).jpg
    2008-07-29 Garage 011 (3).jpg
    103.6 KB · Views: 1,359
   / Making 3 pt pallet forks
  • Thread Starter
#8  
Thanks guys for the kind words. I am very satisfied with the strength of the channel forks. The strengthening has made the forks stronger than will ever be exceeded on my tractor. I am sure that I will use them for many things. I can now move implements around in their parking places to keep the grass growing and to mow. I can carry loads of bricks around and lots of other things. Maybe even stack and store firewood on pallets. Lots of possibility. I anticipate being able to change them over to the FEL, when I make it some time. :)

One thing that I want to in finishing them up sometime is to drill and thread a hole in the end of the main support rod to fasten a retaining plate. I noticed that the shaft shifted about an inch to one side with the load. I made the shaft removable so that I could put on other fork designs--a fork for composting materials, for firewood (with a grapple like holder), and other things. The support shaft could be pulled out and the other set of forks put in very quickly.

Mike
 
   / Making 3 pt pallet forks #9  
My step mom had some forks that were going to go on her bobcat when she lived in Utah. When she moved up here to Oregon, she brought the forks with the snowmobiles. The forks sat in the shop for a while and a scraper was going to take them. I asked if I could have them so I hauled them to my grandpa's farm for storage. Right now, the forks are down the road getting welding done to them so I can put it on the 3 point of my dads 3720 johndeere for the rock yard I will run this summer. Some people wonder why 13 year old would be that into equipment. Ive been told that I can operate skidsteers better than some professional operators. :D I will take some pictures when they are finished!
 
   / Making 3 pt pallet forks #10  
im 16 year old thats likes that kind of stuff. i can run a bob cat not bad.
 
 
Top