My Personnel Lift Project

   / My Personnel Lift Project #1  

Spencer

Veteran Member
Joined
Jan 2, 2002
Messages
1,270
Location
Western Michigan
Tractor
NH TC33D w/R4 Tires, Rear Remote, Hydraulic Toplink, 2 Auxiliary Work Lights, 7308 Loader w/Kasco Uni-Hitch (Quick Tach)
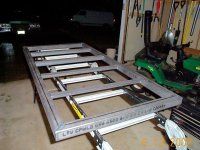
I started working on my first project tonight. After seeing Jim Gerken's nice personnel lift and after reading numerous posts by Wroughtn_Harv I decided it was time for me to make my own personnel lift. I plan on building my pole barn this summer and even though I have two sets of nice scaffolding I thought a personnel lift on the tractor would be nice to have. I don't plan on putting in any cement until the pole barn is up so the standard scaffolding would be a major pain to use in the sand.

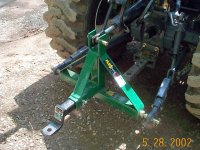
I have a Kasco Quick-Tach adapter Forks, and my <A target="_blank" HREF=http://www.tractorbynet.com/forumfiles/5-145669-Switch_Hitch.jpg>Switch-Hitch</A>. I would prefer to make the personnel lift hook right up the Uni-Hitch but after calling my dealer I decided not to go that route. The cheapest set of Quick-Tach plates he could get were $119 and that is just about the same price I paid for all the material I bought to make this whole project. I decided to have the personnel lift hook up to the Switch-Hitch's 2" receiver. It seemed the most economical and reasonable choice.

The lift will be 30" by 60" and have two levels. The lower level will be for holding my smaller generator for those projects where I will need 120 volt power. The other purpose for the lower level is to get the upper level higher and make the safety rail more rigid. My FEL will only lift to about 8 feet at the pivot and I wanted my feet to be higher than that. So I will make the lower level 30" high and then have a 42" safety rail on the upper level making the whole structure 6 feet high.
 
   / My Personnel Lift Project
  • Thread Starter
#2  
Here is a pic of the upper level (deck) that I worked on tonight. It is made out of 2" by 2" square tubing with an 1/8" wall. It has 1.5" by 1.5" by 1/8" angle iron every foot for bracing to stiffen up the expanded metal that will cover the deck.
 

Attachments

  • 53-160148-Mid_Base.jpg
    53-160148-Mid_Base.jpg
    113 KB · Views: 1,677
   / My Personnel Lift Project
  • Thread Starter
#3  
I got two different kinds of expanded metal for the project. I got "3/4 #9 Flat" for the decks and "1-1/2 #13" for the sides. Here is a pic of the two sheets of expanded metal.
 

Attachments

  • 53-160149-Expanded_Metal.jpg
    53-160149-Expanded_Metal.jpg
    132 KB · Views: 1,082
   / My Personnel Lift Project
  • Thread Starter
#4  
Here is a pic of my little tig welder that I am using on this project. It is made by Thermal Arc (a division of Thermal Dyne). It works on either 120 or 240 and automatically senses which voltage it is hooked up to. I have had it for about 3 or 4 years and have never used it for anything personal. I travel around the country installing commercial food service equipment. I use it to weld stainless steel on the job sites. It is rated at up to 190 amps and has a lot of features for a little 19 pound package. It will do both tig and stick. It has a spot weld timer on it. It has a built in gas solenoid valve. It has high frequency arc starting. It has a variable pulse feature. I have never used it for stick but I did go down to the welding shop and had them make me a stinger cable in case I needed better penetration that what I would get with the tig. I wasn't sure because I deal with stainless sheet metal all the time. I never have had the pleasure of working with thicker mild steel. I think I will be fine with the tig but I may use the stick when I weld up the main 2" receiver tubing to the personnel lift. That tubing is 2" by 2" with a 1/4" wall.
 

Attachments

  • 53-160154-Tig_Welder.jpg
    53-160154-Tig_Welder.jpg
    111.2 KB · Views: 973
   / My Personnel Lift Project
  • Thread Starter
#5  
Here is a pic of my smaller plasma cutter. This one is 120 volt and has a built-in air compressor. I have a larger 120/240 volt Miller Spectrum CutMate 375 but this little cutter is my favorite. It is made by Thermal Dynamics (a division of Thermal Dyne). It works well on sheet metal up to about 12 gauge. I bought the Miller for larger stuff and I also thought I might get a cleaner edge on the smaller stuff but the Thermal Dynamics works just as well on the smaller stuff. I plan on using this to cut the expanded metal tomorrow.
 

Attachments

  • 53-160155-Plasma_Cutter.jpg
    53-160155-Plasma_Cutter.jpg
    122.4 KB · Views: 806
   / My Personnel Lift Project
  • Thread Starter
#6  
This project will probably take me at least 3 or 4 days to get to the painting stage. I have a beautiful 19 month old daughter that keeps me pretty busy. Hopefully I can do a little each day and post some new pictures.
 
   / My Personnel Lift Project #7  
I'm not sure just how high you're planning on using this personnel lift. I know at your home on your tractor it'll only be for eight to ten feet. But there might be the time when you lend it out or you use it on another project.

Sooooooooooooo a couple of ideas for you to consider. The first of course would be to have it mount on forks. It looks like you're going to build it right so you might wanna give your contraption some options to expand it's horizons and go up in the world. Definately consider the forks. That way it can be used by others. And the most common method is forks.

Secondly I'd be sure and have the sides with a forty two inch height. I'd put in a door at one or both ends. I'd permanently attach safety chains so that no matter which side the forks came in the contraption could be safely secured to the tractor or forklift.

I'd make the top most rail out of three quarter solid round bar stock. This would be for a lanyard point of attachment. That way if you let someone else borrow or you sell this to someone there is the option of using safety harnesses.

Since you're making it right you will have the option of selling it when you're done. Someone will see it and want it and be willing to pay your price. Since we know the odds of that happening over the odds of you forming a permanent relationship with the contraption, well, make it so the next owner will be able to have every safety option you can think of. After all, it might not be he that uses it. But the dumbest, clumsiest, and most accident prone fool he has on the job.

Chances are he won't be the perfect son in law. But he could be the perfect son in law's father. You'd hate to ruin that perfect relationship for your daughter by having the one man that could give her true happiness hate you right out of the gate just cause you built the thing that killed his father.

So do it right, learn from the experience, and send it down the road when you're done.
 
   / My Personnel Lift Project #8  
Spencer, Nice project and I sure do like the toys you have for working on it. I sort of like Harv’s idea of fork mounting it. It would seem that if you had to move material all you’d have to do is slide the lift off and you would be ready to go.

Keep the photos coming so we can see the finished product.

MarkV
 
   / My Personnel Lift Project
  • Thread Starter
#9  
Harv,
I value both your judgment and your experience and I hope that after you’re read my response below you will let me know what your think of my thoughts. I plan on using the lift for various purposes. I'll be using it to build the pole barn first but have other uses in mind. I will use it for trimming trees and working on the existing house, etc.

I did think about having the lift mount to my forks but I think I have made the right decision about going the 2" receiver way. My forks weigh more than my Switch-Hitch so that would reduce my lifting capacity (not by much, but still). To use it with the forks I would have to have some sort of device to secure it to the fence on the forks, like the safety chains you mentioned. In order to use the safety chains effectively I would need to have the lift up tight against the fence. Using my 30” by 60” design that would leave two 18” sections of fork sticking out in front of the lift (I have 48” forks). I’m sure most of you are cringing at the damage that could do. I could have altered my design to be 48” instead of 30” but I don’t see much value in having an extra 18” of workspace in that direction. The further out I go from the tractor the lower my lift capacity is. I thought I would get more function out of having a longer workspace from right to left like in my 30” by 60” design. I could have made some sort of spacer to anchor the lift 18” away from the fence but again that would reduce my lift capacity. With my 2” receiver design I can also mount the lift to my 3-point because I have a 2” receiver that mounts on the 3-point (see attachment). I’m not sure yet of all the reasons that I might want the personnel lift mounted on the 3-point but then again most people probably never saw a rear blade mounted on a FEL like I did <A target="_blank" HREF=http://www.tractorbynet.com/cgi-bin/compact/showflat.pl?Cat=&Board=projects&Number=153770&page=&view=&sb=&o=&vc=1>here.</A> Having the lift mount on forks may make it more versatile for someone else but having it on the 2” receiver makes it more versatile for me.

I do plan on putting a door in on one end of the lift. I bought some 1” by 1” square tubing with an 1/8” wall. I bought some nice heavy-duty pipe and a piece of solid round stock that fits nicely inside the pipe to make some hinges out of. The other three sides of the lift will be fixed.

I have a couple of different ideas about the top safety rail. I am not sure which way I will go yet I will see when I get that far. I will probably end up enclosing all three sides and the door with the expanded metal.

The beauty of being able to weld is that nothing has to be permanent. If after considerable use by myself I found this lift worthy of sale. I can easily cut the 2” receiver tube off, weld on two pieces of rectangular tubing to the bottom, and fashion up some safety chains. I seriously doubt that I would ever sell it though, I have been self-employed for over 13 years and therefore I am always thinking about liability. Having it on the 2" receiver makes a good excuse for not letting anyone else borrow it.

Anybody is welcome to chime in here; I welcome all points of view.
 

Attachments

  • 53-160279-2_Inch_Receiver.jpg
    53-160279-2_Inch_Receiver.jpg
    143.3 KB · Views: 1,079
   / My Personnel Lift Project
  • Thread Starter
#10  
<blockquote><font size=1>In reply to:</font><hr>

Spencer, Nice project and I sure do like the toys you have for working on it.

<hr></blockquote>


MarkV, These are actual TOOLS that I am just now trying to turn into TOYS. The tractor and all its implements are toys I am trying to justify to the wife are tools.

<blockquote><font size=1>In reply to:</font><hr>

It would seem that if you had to move material all you’d have to do is slide the lift off and you would be ready to go.


<hr></blockquote>


All I will have to do is go up to my quick-tach and remove the personnel lift and the switch-hitch all as one assembly just by lift two levers. Then I can go over to my forks and lock them on with the same two levers.
 
 
Top