J_J
Super Star Member
- Joined
- Sep 6, 2003
- Messages
- 18,928
- Location
- JACKSONVILLE, FL
- Tractor
- Power-Trac 1445, KUBOTA B-9200HST
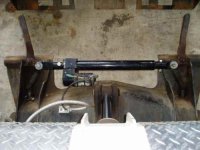
Found a picture of something that you might can use on your adapter. A linear actuator for open and closing the locking pins.


Your drawings are some of the ones in my pile!
It does but only about 1/4 to 3/8 of an inch.
Yeah I left that one 'path' through the holes to help stiffen things at the top. By gusset do you mean just welded to those pieces (air underneath) or also welded along the flat plate?
Hmmm hadn't thought about pressure more on one side of the bucket than the other. It _is_ twisty and I had really only thought about when the curl cylinders come full back. (need to put those 'stop blocks' back in)I used angle because I have a pile of it, another cragislist buy
The other thing I am a little concerned about is the 'softness' of the locking pins. Been wondering if it is better to have 'hard' pins?

I have one question for the group. As I am looking at how to attach the plate to the bucket it looks like I might need to raise the QA plate so the attachment points are slightly higher than stock, like an inch or so. Making the bucket 'lower' compared to the lift arms.
When using the bucket I like to fully curl it back, put the weight of the tractor on it and back drag. This leaves a nice, smooth, somewhat packed finish to the dirt. The curve of the bucket works perfect for this. Because of this I kept the plates the cylinders connect to as low as possible. However after studying it a bit and looking at the scratch marks on the bucket I think the locking pins and lower part of the adapter might get in the dirt a little.
So is 'lowering' the bucket in relationship to the arms about 1" a 'bad thing'? I am thinking of tacking the plate to the bucket enough to put it back on the tractor for a better look-see.
That would be sweet! Doesn't help much with the weight issue though. Nice thing about a small tractor is I could just use one of these:
if I could find a place to carry it!
Charlz,
Very nice build, I have a question: What keeps the locking pins handles in the locked position, I have been drawing up some ideas for a quick attach for my L4200 and have been stuck on the locking pins, I really like the simplicity of your design, I just dont know what to fab up to keep the locking levers from popping up
and if you curl the bucket all the way back somewhat quickly with weight of the bucket on there... well let's just say a new street elbow and some oil in the loader reservoir are in order along with moving those stop pins I also added the gusset between the loader bracket and top 45 degree plate as suggested by MWB. I then figured out the height and length of the gusset and marked out a rectangle. By using the curve on the paper I could trace it from one corner to the other. Then I moved to the opposite corner and did the same thing. This gave me two gussets in one 'rectangle' with only a little 'football' of waste material in the middle. I can see where a plasma table system sure would be handy! 

Also, the holey angle iron between the sides might not be strong enough. There has been debate about how important (structurally) this piece has to be but you will likely bend or twist that angle if you only get one side of the bucket hooked (this does happen). I understand that your loader does not have a huge lift capacity but you can subject it to a lot of stress with the tractor.