You are using an out of date browser. It may not display this or other websites correctly.
You should upgrade or use an alternative browser.
You should upgrade or use an alternative browser.
making a subframe for my 01 John Deere 4300 and Prairie Dog backhoe attachment
- Thread starter dfkrug
- Start date
/ making a subframe for my 01 John Deere 4300 and Prairie Dog backhoe attachment
#11
OP
dfkrug
Super Member
- Joined
- Feb 3, 2004
- Messages
- 7,177
- Location
- Santa Cruz Mtns, CA
- Tractor
- 05 Kioti CK30HST w/ Prairie Dog backhoe, XN08 mini-X
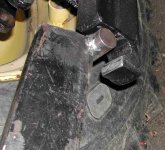
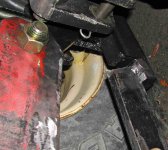
This is how the lower part of the hoe-side of the subframe fits into
the saddle seen above.
I used some 1.125" rod, which fits just about perfectly inside some
schedule 40 steel pipe, size 1.5" I think. I cut some 2" pieces of this
pipe the long way to make the saddles. This is how I made the saddles
for my Kioti subframe, too:
http://www.tractorbynet.com/forums/build-yourself/95092-yet-another-custom-backhoe-subframe.html
This design is simpler, however. I will not use any bolts on the lower
part of the mount.
Attachments
RoyJackson
Rest in Peace
- Joined
- Nov 17, 2001
- Messages
- 24,890
- Location
- Bethel, Vermont
- Tractor
- John Deere 4052R Cab,, Deere 855D UTV, Z920A Zero Turn Mower and assorted implements
How much ground clearance will you lose (if any) with the subframe?
OP
dfkrug
Super Member
- Joined
- Feb 3, 2004
- Messages
- 7,177
- Location
- Santa Cruz Mtns, CA
- Tractor
- 05 Kioti CK30HST w/ Prairie Dog backhoe, XN08 mini-X
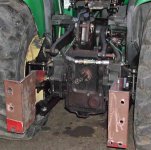
Here's the long story on ground clearance, Roy.
The minimum ground clearance seems to be at the front diff, and that is
not affected by the subframe. The 2nd lowest hanging point is the center
of the rear gearbox, where the drawbar is attached. The rear part of the
subframe is a bit higher than that, so you lose nothing in the rear. (Note
that any JD owner can gain 2" of clearance back there by just removing the
drawbar bracket.)
Under the middle of the tractor, the ground clearance is about 3" less than
without the subframe mounted.
OP
dfkrug
Super Member
- Joined
- Feb 3, 2004
- Messages
- 7,177
- Location
- Santa Cruz Mtns, CA
- Tractor
- 05 Kioti CK30HST w/ Prairie Dog backhoe, XN08 mini-X
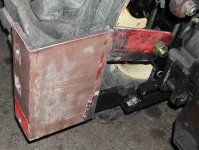
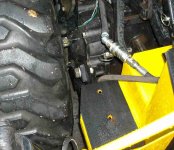
In this series of pix, I have completed the mockup and tack-welding of
the hoe-side elements. With the hoe unbolted and moved away, you
can see how everything goes together.
Next, I will do the finish-welding and paint everything before re-attaching
to the backhoe.
You can't see it, but I welded anti-turn tabs on one side of each side plate
next to the 1" nuts. This allows me to tighten the bolts with just one
wrench; getting 2 wrenches in there can be difficult. This is superior
to just welding the nut to the plate because it gives just a bit of play. The
holes are drilled to a tight tolerance.
Attachments
RoyJackson
Rest in Peace
- Joined
- Nov 17, 2001
- Messages
- 24,890
- Location
- Bethel, Vermont
- Tractor
- John Deere 4052R Cab,, Deere 855D UTV, Z920A Zero Turn Mower and assorted implements
Keep 'em coming, df!!
This is a great thread!
This is a great thread!
OP
dfkrug
Super Member
- Joined
- Feb 3, 2004
- Messages
- 7,177
- Location
- Santa Cruz Mtns, CA
- Tractor
- 05 Kioti CK30HST w/ Prairie Dog backhoe, XN08 mini-X
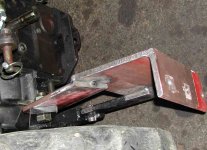
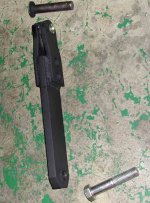
The last thing I had to fabricate is a toplink. This is not absolutely necessary,
but it will add a bit of stiffness without overloading the toplink bracket. I made
an 11/16" pin to take up the slop in the toplink bracket holes so it fits pretty tightly.
Stiffness in the subframe is very important; flex leads to worn bolt or pin
holes, and eventual metal fatigue and cracking. But don't believe me; just
look at the subframes on serious, purpose-built backhoes. These subframes
feature no visible flex in the frames.
Careful observers will see the similarity of my toplink to a Woods 3-pt enhanced
toplink. I have a bunch of these, so I shortened one up and welded it solid. It
is over one foot shorter than the standard 3-point toplink. Sadly, I ran out of
gloss black paint, so it is flat-black. The show must go on.
Attachments
OP
dfkrug
Super Member
- Joined
- Feb 3, 2004
- Messages
- 7,177
- Location
- Santa Cruz Mtns, CA
- Tractor
- 05 Kioti CK30HST w/ Prairie Dog backhoe, XN08 mini-X
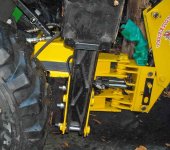
And here is the final result.
I mounted the hoe as close as I could to the tractor. My tires are about 50% worn, so
I aimed for a 1" clearance to new tires. I trimmed the step a bit, and achieved
a slightly closer mount than the last 4300 subframe, due to the 3/4" additional
wheel spacing I got from reversing the rear wheels.
I made a mount for a new seat, and was off to the races.
Attachments
a new member to this community.thinking of building a mini backhoe,for a power tiller of 12bhp.so i require some detailed free backhoe plans.please help with any valuable guidance and plans if any.thank you.
email kairala27@rediffmail.com.
email kairala27@rediffmail.com.
kairala said:a new member to this community.thinking of building a mini backhoe,for a power tiller of 12bhp.so i require some detailed free backhoe plans.please help with any valuable guidance and plans if any.thank you.
email kairala27@rediffmail.com.
Your biggest limitation will be weight. A backhoe needs at least 1000lbs of ballast to be at all useful. Otherwise the backhoe will move the tractor. I think you should create a new thread to discuss this machine