DIY Cab - Finally decided it was time

   / DIY Cab - Finally decided it was time
  • Thread Starter
#51  
Thank you for the comments and suggestions. Hopefully the cab will be disassembled for painting by the end of this week. I'm getting very anxious to get it completed. The schedule slipped over the past few weeks with other things happening. We had a couple projects at the house and my Mom became hospitalized and passed last week.

I've been trying to decide what colors to use where. The colors are ROPS gray and orange. I had been thinking of doing the entire cab frame and skin gray, and the roof orange. When I saw it sitting in the shop this AM I imagined it might look good to do the cab frame in gray and the skin in orange. Suggestions welcomed. The project has stirred a fair amount of interest in the weld shop. One of the guys who paints our fab work is dying to shoot some color on it.

For the front of the cab where it swallows the hood, one of the guys pointed out some leftover clear plastic material from one of those strip-type doors as found on refrigerated rooms. The same stuff will work for the "ingrown" fender flares. I'll get pics when I come to that part as well as some other detail items that may be of interest.

The heat may not be completely necessary, and I'll be plumbing it with a bypass just in case it's too much. The cab itself could be viewed as unnecessary. I got through the last 23 winters here with no more than insulated coveralls. I got tired of being cold and having snow blow in my face, plus I wanted to see how tough it would be to build a cab. One thing with the cab is that the cost will stay below $1,000 in cost unless the glass guy comes up with a nasty surprise. That's only half as much as a new cloth cab with plastic windows and no heat.
 
   / DIY Cab - Finally decided it was time #52  
On my homemade cab I am using lengths of what looks like 'paint brush by the yard' It is mounted in an aluminum strip with a slight angle.
The product is used to seal the gaps around public storage locker doors. The bristles are about 2.5" long.
Keeps out water, snow, and blocks cold air yet won't mar the tractor metal work finish.
B4 that I used different types of weather strip foam strips but they all captured dust and grime and marred the paint surfaces.

Thank you for the comments and suggestions. Hopefully the cab will be disassembled for painting by the end of this week. I'm getting very anxious to get it completed. The schedule slipped over the past few weeks with other things happening. We had a couple projects at the house and my Mom became hospitalized and passed last week.

I've been trying to decide what colors to use where. The colors are ROPS gray and orange. I had been thinking of doing the entire cab frame and skin gray, and the roof orange. When I saw it sitting in the shop this AM I imagined it might look good to do the cab frame in gray and the skin in orange. Suggestions welcomed. The project has stirred a fair amount of interest in the weld shop. One of the guys who paints our fab work is dying to shoot some color on it.

For the front of the cab where it swallows the hood, one of the guys pointed out some leftover clear plastic material from one of those strip-type doors as found on refrigerated rooms. The same stuff will work for the "ingrown" fender flares. I'll get pics when I come to that part as well as some other detail items that may be of interest.

The heat may not be completely necessary, and I'll be plumbing it with a bypass just in case it's too much. The cab itself could be viewed as unnecessary. I got through the last 23 winters here with no more than insulated coveralls. I got tired of being cold and having snow blow in my face, plus I wanted to see how tough it would be to build a cab. One thing with the cab is that the cost will stay below $1,000 in cost unless the glass guy comes up with a nasty surprise. That's only half as much as a new cloth cab with plastic windows and no heat.
 
   / DIY Cab - Finally decided it was time #53  
nice job... cant wait till i see the finished project.
 
   / DIY Cab - Finally decided it was time #54  
How much smaller all around will the glass be compared to the window opening to allow for the weather-stripping/mounting gasket? Or maybe I should say how much of a gap between the window opening and glass?
 
   / DIY Cab - Finally decided it was time
  • Thread Starter
#55  
How much smaller all around will the glass be compared to the window opening to allow for the weather-stripping/mounting gasket? Or maybe I should say how much of a gap between the window opening and glass?

The glass will be glued in, so it will be a little larger than the openings. The openings are about 5/8" smaller than the glass on eash side.
 
   / DIY Cab - Finally decided it was time #56  
Very nice looking cab,,, and like you ,,cab is nice but that heat in the cab is so much nicer... For 25-30 yrs I would be out for hrs plowing FIL,BIL, church lot and mine with everytype winter clothing I could find to keep warm ,wasn't my tractor using the FIL. After buying mine ,told my wife needed a cab, no problem buy one, could not see paying 3-5000 for a metal so bought my first Original Cab with/glass window and wiper. Have had 2 since then all the same but last 2 added water type heater. So much nicer ,,If only out for 30 min that is one thing out for 2-3hrs heater even with my cheap cab ,plus light sweatshirt much nicer than 5 or 6 layers of clothes. But for those who don't agree fine,, let them put on all the articles of clothing and hand warmers . I'm going to stay a lot warmer ,, yes not air tight and yes when wind blows and blowing snow with blower I get a very small amount in cab , total of 10min out of 3hrs I can handle that amount.
 
   / DIY Cab - Finally decided it was time #57  
Awsome cabin build Chim - like a real pro. Just thought though, when looking at the metal on the lower back part of the cab that it may obstruct your view of the linkages when connecting machinery?
 
   / DIY Cab - Finally decided it was time #58  
Amazing piece of fab work, very impressive. What do you think that thing will weigh once you're finished and how easy is it to take off/put on?
 
   / DIY Cab - Finally decided it was time
  • Thread Starter
#59  
Without sitting in the seat and looking, I can't tell you how much of the view is blocked. I hope not all that much. The bottom of the window is roughly 3 or 4 inches above the seat back. Maybe a DIY set of EZ extensions will be needed.

I don't know the weight, but would guess somewhere between 200 and 250#. It isn't too hard to take apart and put together. As mentioned in an earlier post it is made in 4 major pieces (plus the lift-off doors). It was all together for a final fit last week, and we had it apart in about 10 minutes.

There are a couple metal panels that will get a little Bondo to smooth them out a bit. Then it'll be ready for paint and glass. The glass is all cut and ready. I'm off work all week but will be heading in to hopefully wrap it up and have one of the guys shoot it late this week / early next week.
 
   / DIY Cab - Finally decided it was time
  • Thread Starter
#60  
How do these projects end up taking so long to complete? I thought the cab would easily be finished before Christmas, and now New Year's Day will pass before the thing is done. At least it's getting closer all the time. I was off work this past week using up vacation days. Managed to get the heater "plumbing" ready to mount the heater, finished light mounting brackets, did a layout and made a small switch mounting plate and with some assistance from Santa's elves completed the bodywork and shot the primer. Finish painting is scheduled for Monday - fingers are crossed.

When we do the finishing touches and assembly I'll take more pictures. Some of you may find different facets interesting and perhaps useful. I know that I benefited from researching cab builds others have done. If there's something from my build that can help someone else that's great. It's been a lot of fun most of the time. Probably the most challenging thing (except for estimating the completion date) was working with the odd shape of the tractor. It wasn't like building a dog house or installing cabinets in the laundry. Not much of anything on it is anywhere near close to square, level, round or plumb. Like most tractors, the Kubota is a combination of different angled parts joined with French curves.

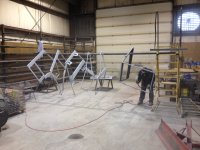
Here are the sections. Left to right are the right side, left side, front, right door, left door and "Picasso" is priming the back/top. The roof is on sawhorses behind the other parts.
photo.JPG
 
 
Top