OP
graydog111
Bronze Member
- Joined
- Mar 15, 2012
- Messages
- 95
- Location
- Mustang, OK
- Tractor
- 5 Gravelys, 1963 4010 & 1950 B John Deere, Great Dane ZTR
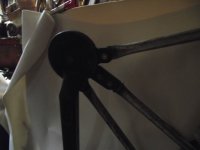
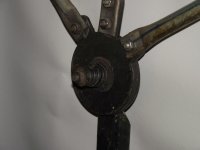
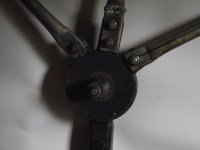
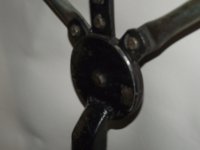
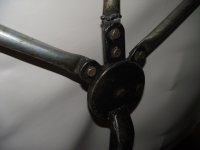
Here are the photos of "spring/disc/ball assembly". Not as good as I had hoped, but the best I could do.
The Build:
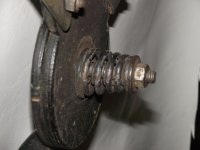
I went to a local auto parts store and found he stocked some 3/8 SS balls. I needed 2 but bought 4.
I cut out the four = 1/4" steel discs drilled a 3/8" center hole, and welded one to each of the upright supports. I welded 3 tabs on the other two discs for the bows to bolt to.
I then bolted each pair together and drilled a 1/8" pilot hole with the center tab extending straight up. I unbolted each pair, and enlarged the 1/8" hole in the one that was welded to upright to 3/8" and deep enough to let the ball go in about 2/3 of it's diameter. I enlarged the hole in the discs with the tabs using a 3/8" bit, but drilling only about 1/8" deep.
The depth will depend on how easily you want it to fold back, how well it is lubricated, and how strong the springs are. I did not grease mine, but after several years, I took it apart to weld a broken bow and greased them. After that, I had to get stronger springs or it would fold down without any reason. I am now using 2 springs on each set of discs, one inside the other. They are all old brake springs etc. that I have collected over the years.
Click on thumbnail to enlarge.
The Build:
I went to a local auto parts store and found he stocked some 3/8 SS balls. I needed 2 but bought 4.
I cut out the four = 1/4" steel discs drilled a 3/8" center hole, and welded one to each of the upright supports. I welded 3 tabs on the other two discs for the bows to bolt to.
I then bolted each pair together and drilled a 1/8" pilot hole with the center tab extending straight up. I unbolted each pair, and enlarged the 1/8" hole in the one that was welded to upright to 3/8" and deep enough to let the ball go in about 2/3 of it's diameter. I enlarged the hole in the discs with the tabs using a 3/8" bit, but drilling only about 1/8" deep.
The depth will depend on how easily you want it to fold back, how well it is lubricated, and how strong the springs are. I did not grease mine, but after several years, I took it apart to weld a broken bow and greased them. After that, I had to get stronger springs or it would fold down without any reason. I am now using 2 springs on each set of discs, one inside the other. They are all old brake springs etc. that I have collected over the years.
Click on thumbnail to enlarge.


 )
)


