Show What Tool You Made*

   / Show What Tool You Made* #171  
Where did you get that choker chain?

I buy the choker chains or just the hooks at a logging supply or chainsaw dealer ( not box store or hardware chain ). You can order them on line from BaileysOnLine.com or Labonville.com Two size hooks are made for 3/8" or 5/16" chain.
 
   / Show What Tool You Made* #172  
Thanks Gordon I'm getting one.......... Lee Johnston
 
   / Show What Tool You Made* #173  
bindrout_1 002a.jpg
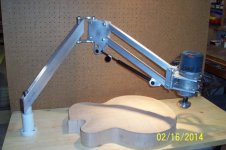
I built this fixture with parallel linkage and two arm pivots to hold the router in a vertical position while swinging it over a fairly large area. It's used to rout binding ledges on guitar bodies in this case but could be used for other router applications that require keeping the router in a vertical plane. The gas strut provides counterbalance and has an adjustable stop. Used aluminum 1x2 and 1x1 by 1/8" wall square tubing. All pivots are zero clearance with steel against UHMW.
Similar arrangements are used in machine shops for holding an air motor for tapping holes as a secondary operation to CNC machines.

Edit: Router appears out of level in the photo due to lens distortion.
 
   / Show What Tool You Made* #174  
Nice workmanship. Can you give a close up of the vertical swivel joints on the angled 1x2? And how did you make them, I've been puzzling on this for days and cant figger it out.

I think i have the same bosch router came in a countertop installers kit. Have used it for everything for years very light and smooth.
 
   / Show What Tool You Made* #175  
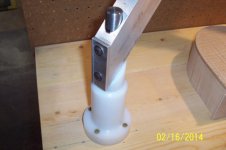
bindrout_1 003a.jpg
This shows the attachment of the 3/4" round to the 1x2 rectangular. The 3/4" shaft has two tapped 1/4"NC-20 holes to accept the 1/4" button head capscrews which pull the shaft tight inside the hole thru the 1x2. The "joint" is between the 3/4" round and the UHMW mounting block with the angle cut UHMW acting as a thrust washer. Used a long 3/4" endmill to cut the hole down thru the 1x2 on a 45 degree angle.

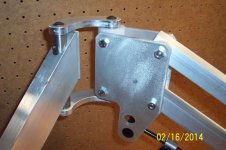
bindrout_1 004a.jpg

The curved links are bolted solid to the left 3/4" shaft and the pivot is between the 3/4" shaft and the UHMW sandwiched between the 1/4" plates.
Thanks for the interest. I'm more than happy to answer any additional questions, dimensions etc.
 
   / Show What Tool You Made* #176  
Choker Chain Grab Hook. Push it under the fallen log/tree, hook on to the choker chain, and then pull the choker chain under. A lot easier than pushing the pin end of the choker chain under and then trying to find it to grab it with your finger tips and pull it thru.
View attachment 361982

Thats great, would really help when working solo. I could have used that many times. Except I'd lose it out in the woods somewhere. Easy to make another one though.
 
   / Show What Tool You Made* #177  
This shows the attachment of the 3/4" round to the 1x2 rectangular. The 3/4" shaft has two tapped 1/4"NC-20 holes to accept the 1/4" button head capscrews which pull the shaft tight inside the hole thru the 1x2. The "joint" is between the 3/4" round and the UHMW mounting block with the angle cut UHMW acting as a thrust washer.

Interesting. The base is withstanding significant bending force where any give could damage an expensive and time consuming work product. Gonna have to get some of that white stuff and start learning properties and applications. Thx!
 
   / Show What Tool You Made* #178  
The weight of the router, during use, is actually resting on the workpiece (guitar body in this case) which takes the strain of the mounting UHMW base. One of the bearings on the cutter arbor absorbs this vertical load and also establishes the depth of cut in the vertical direction. A second bearing (commonly referred to as a rub collar) establishes the horizontal depth of cut.
You are certainly correct in "seeing the load" on the base and I'm planning to add a larger piece of metal under the base with three adjusting screws to allow leveling the base to the fixture table. I'm also currently adding a third member between the two curved links to align and stiffen them to each other. No end to the fun and I'm learning as I go.
The UHMW is interesting material to machine and cuts well with sharp HSS tools. It is difficult to deburr and just laughs at sandpaper. I prefer using Delrin as it isn't quite so tough. Aluminum would actually be a better material for the base but didn't have any that size on hand.
 
   / Show What Tool You Made*
  • Thread Starter
#179  
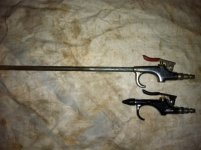
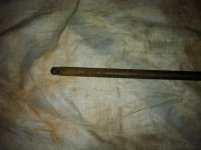
I retired from wheat farming in Western Oklahoma in 2003 and sold my 4450 John Deere. Lots of dust collected on the radiator and A/C condenser fins and is difficult to blow it out. I took a Milton type air nozzle, removed the tip from the 1/8" pipe threads and added a 24" piece of 1/8" black pipe. I welded the end shut, then drilled a .125 inch hole near the end to blow out at a 90 degree angle. I could then stick the pipe extension in between the radiator and the condenser, blowing the dirt out of both of them without damaging the fins. It really worked good.

photo3.jpg

photo4.jpg
Click on photo to enlarge, then look on the left end to see the 1/8" hole.
 
Last edited:
   / Show What Tool You Made* #180  
graydog...that's pretty slick. Lots of guys around here could use that idea. OK to pass along?
 
 
Top