Show What Tool You Made*

   / Show What Tool You Made* #41  
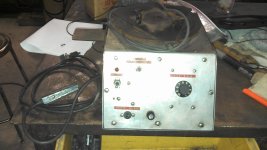
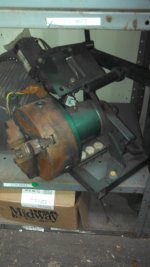
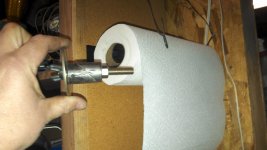
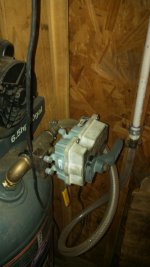
The first two are rotatory weld positioners so you can weld around things without stopping. First one is for flat thing's the second for longer sections (has a 3" through hole).

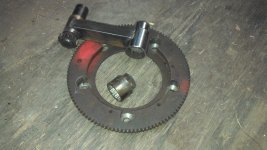
An old fly wheel machined to bolt to a brake drum to tighen axle nuts on old VW's the incert socket is for the gland nut on the flywheel. 45 ft/lb in is 270 ft/lb out (stamped into the flywheel where orange paint is just incase I don't remember)
 

Attachments

  • IMG_20130306_211529_446.jpg
    IMG_20130306_211529_446.jpg
    333.1 KB · Views: 1,329
  • IMG_20130306_211749_489.jpg
    IMG_20130306_211749_489.jpg
    272.4 KB · Views: 1,334
  • IMG_20130306_211929_392.jpg
    IMG_20130306_211929_392.jpg
    474.7 KB · Views: 1,160
   / Show What Tool You Made* #42  
Nine can pneumatic can crusher, paint can rack beside it holds them horizontal so the tube doesn't clog. And quarter turn paper towel dispenser holds tight so it stays put when you yank on them with wire stay so the wind doesn't blow them all over the place.

I'll add more later, if there is interest, my battery is getting low.
 

Attachments

  • IMG_20130306_212940_932.jpg
    IMG_20130306_212940_932.jpg
    329.9 KB · Views: 1,681
  • IMG_20130306_213039_050.jpg
    IMG_20130306_213039_050.jpg
    284 KB · Views: 1,556
   / Show What Tool You Made*
  • Thread Starter
#43  
Hydraulic press out of 6" channel iron with homemade press brake, note the drilled bolt for an easy way to release pressure.

A 2" receiver mount for a bench vice so you have one where you need it.

Everyone needs a press and a press brake. I have the press, but not the press brake (yet). I made a metal brake which is really nice to have, but cannot handle anything thicker than about 16 gauge. It is about 10 years old. The only thing wrong with it is that it should have been at least 48" wide. I bought the metal at a salvage yard where "What you see is cheap; New metal is 20X higher", so I settled on a 38" wide bed. These photos show the bending of a metal piece. Click thumbnail to enlarge.

Brake #3.jpg Brake #4.jpg

Brake #5.jpg Brake #6.jpg

A vise on the receiver is really handy to have. That's a BIG vise.
 
   / Show What Tool You Made* #44  
One more for the night.

An old pool valve controller modified to remotely work a ball valve remotely on an air compressor. Once you kill the lights it keeps air pressure in the tank. Keeps from having to keep everything else leak free.
 

Attachments

  • IMG_20130306_214516_905.jpg
    IMG_20130306_214516_905.jpg
    995.5 KB · Views: 1,420
   / Show What Tool You Made* #45  
Here is a pantograph I built that gets a lot of use. Uses a regular hand torch the section of piano hinge to press the cut lever. Plexiglas is great if you only have a few parts because it is so easy to make a template or they can be made from steel so the magnet guides the torch around. The torch mounts unbolt and you can clamp a plasma in for other materials. Makes for easy cutting and faster to setup than the CNC table for just a few parts.

The speed control is a dash light dimmer out of an'86 RX7. The laminated paper next to it is a pressure/nozzle chart for the torch.

What brand and model torch are you using for those clean cuts? I want one like it.
 
   / Show What Tool You Made* #46  
Victor 100, my hands don't make them look that good though. I have only gone up to 2" thick with the tips and regulators I have but the book claims you can cut up to 12" thick!
 
   / Show What Tool You Made* #47  
Not sure I understand the logic behind that. Don't the lines of force follow an arc from 1 pole to the other. So the only time you would miss it is if the crack was very short and directly parallel to the magnet, centered between the poles but fairly far away? Ah the weaker the magnet the more likely that would be a problem too. His seems to be a very strong magnet.

Basically what you have is a magnet that you've bent into a U shape. Here's a picture of the magnetic fields of your magnet. The strongest lines are the shortest distance between the poles, hence they will be the ones to best detect a crack. I have drawn to back cracks, a green one and a yellow one. The green one will not show up well because it's inline with the magnetic field where as the yellow crack is blocking the magnetic field and is easily detected. Think of it as putting a flat piece of steel into a stream. If you put the steel into the stream sideways (yellow crack) it will block the water from easily flowing. The water will now have to flow around the sides and disrupts the water flow. By rotating the magnetic field by 90 the yellow crack now becomes inline with the magnetic field and the green crack is blocking the magnetic flow. So for best results you check twice (the second time 90 degrees from the first) so no matter which way the crack runs you will detect it.

magneticFieldLinesAttractive.jpg
 
   / Show What Tool You Made* #48  
Victor 100, my hands don't make them look that good though. I have only gone up to 2" thick with the tips and regulators I have but the book claims you can cut up to 12" thick!
Thanks, my hands never made them look that good with my old torch. I couldn't get it to cut as thick as claimed, either.
 
   / Show What Tool You Made* #49  
Using the correct tip and pressures is important and makes a big difference, thus the chart right next to the speed control. If everything is just right, the slag on the bottom of the part falls off when it hits the expanded metal below.
 
   / Show What Tool You Made* #50  
Nine can pneumatic can crusher, paint can rack beside it holds them horizontal so the tube doesn't clog. ...

..

...

Wait a minute. A hydraulic can crusher?
Surely there is more to this story and probably more photos we can oogle over. This sound like a great project. More details?
 
 
Top