Gordo 56
Silver Member
When we build our pole barn house we know we want to put in Radiant floor heating to heat our home but haven't decided on how we want to cool the house. So I have been researching the best option for keeping our house cool in the hot humid summers of Iowa and I came upon a an interesting concept that we might consider incorporating into our building design, Earth Tubes. In this post I will explain what they are, how they work, some of the draw backs, and how I would build a low-cost design.
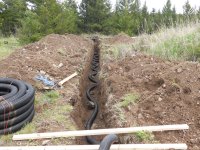
What Are Earth Tubes
Earth Tubes are a passive heating and cooling technique that uses tubes that are buried at least 6' feet in the ground that has air passing through them and uses the constant temperature of 50 degrees of the earth to cool and dehumidify air in the summer and warm air in the winter before entering the building envelope. They are often used as a supplement to conventional central heating or air conditioning systems. They work best in extreme climates that have high heat in the summers and very cold temperatures in the winters like Iowa.
Earth tubes are sometimes not installed correctly because they are poorly misunderstood and are somewhat experimental but are nothing new. They were was first used by the Romans a couple of thousand years ago. They also gained popularity again in the 70's and 80's but many failed because of improper installation that caused water (from condensation)to collect in the tubes and after a few years developed mold or bacteria and the air coming from the tube was then unhealthy to breath.
How They Work
In the summer hot humid air enters the tube from the outside and as it goes through the tube, the earth surrounding the tube cools the air and causes condensation to build on the inside wall of the tube. This cools and dehumidifies the air before it enters the house.
In the winter cold air will enter the tube and the earth at 50 degrees will warm the incoming air before entering the house. This will especially work well with a wood stove or fireplace because they consume lots of air when used and usually cold air is pulled from under your doors and around your windows as well as other places that leak air in the building envelope.
The Drawback of Earth Tubes
There are criticisms of earth tubes and the biggest are the high cost to install a system for something that just supplements your heating and cooling needs and the condensation that forms in the tubes in the summer. The systems that are most cost-effective I have researched calls for a wide trench at least 8' feet deep with several inches of gravel at the bottom and then several tubes at least 6" to 8" diameter and around 80' long with a continuous slit on the bottom so condensation can drain out and then they must have some type of land scape fabric or sock put over the tube so no bugs can enter the slits in the tube. You can see where this would cost thousands to do. But with this system there is still a concern with Radon entering the tubes from the ground and getting into the house.
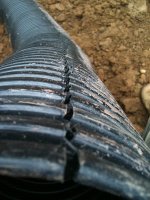
a continuous slit in tube to allow condensation to escape.
How I Would Do It For Less
I think I have come up with a less costlier solution for doing earth tubes and we hope to incorporate them into our home design if I can get it done at a low-cost. Sometimes the best plan is the most simplest one and mine is very simple.
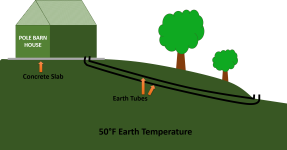
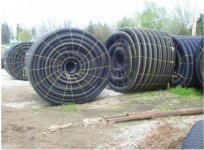
As you can see from my wife's drawing above of our hillside how I would do our earth tube design. My earth tubes will follow the natural curve of our hillside 6' 1/2 feet under ground and will not have a slit until at the bottom of the hill where the last few feet will have a slit and a fabric sock to allow the water to drain from condensation and to keep insects out of the tubes. Only the last few feet of the earth tube will have gravel under it with another 3" pvc perforated pipe imbedded in the gravel that goes to daylight to drain. This cuts cost and also stops all worry about Radon Gas getting into the system. I plan to use two 100' rolls of 6" non-perforated plastic drain pipe that you can buy at McCorkels in Columbia Iowa for 99 cents a foot and it will be in a straight line, not serpentine like the photo at the top of the page.
The reason I chose 6'1/2 feet for the depth of my tubes instead of the recommended 8' is lots of people do field tile in the state of Iowa and most of their trenchers can go down to almost 7 feet, so I think I can get it done for a reasonable rate. I think it will still work at that depth, any less depth will not have a stable enough temperature during extreme heat or cold to work properly. The whole key to this design is to have the earth tube slopped like on a hillside to a place where this condensation can drain out to alleviate the mold problem. At the bottom of the hill where the earth tubes come out on the hillside will look something like the photo below.

Air Intake of Earth Tubes
It will come out of our slab in the pole barn house like in the photo below.
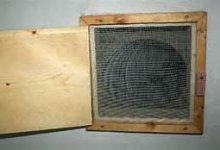
I would also have a door on ours so I can turn it off if not needed. We would probably only use the earth tubes in extreme weather.
There is some argument whether you need a fan to move air through the tubes. I think in the winter no fan will be needed as the cold outside air enters the tube and it starts to warm from the earth, it will rise naturally like in a chimney, especially with the fireplace going will help pull the air into the tube. The summer is when I think you will need a low velocity fan to pull the heavy colder air up the tube and it maybe something as simple as below.
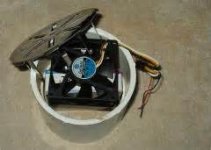
If we do earth tubes we will have them installed and in place before our pole barn house is built. I think the best place is on either side of a wood stove or fire place, or by your cold air return if you have a conventional heating and cooling ducted system. Another advantage of this design is you could flush these out once a year to get rid of any dust or dirt by sticking a garden hose in the earth tubes from inside the house.
As you can see my earth tube design is a simple design with a simple concept and will not cost much to do. I will let you know more when I find out what it will cost to have the two trenches dug. I think with all the hills in Iowa this design will work for a lot of homes there. I am interested to hear what many of you think of earth tubes and if you think my design will work?
Update
I have talked to one person that does field tile in Iowa and he said he can do it with tube and trench for 2.00 a foot. So if I do 200 feet of earth tube it will only cost 400.00. Now he did say that since it was such a small job they may charge an additional 300.00 just to come out and set up. So I think I can get it done for 700 bucks. Now this has got me thinking, if I do 4 earth tubes which will bring my total to 400 feet, will that still be considered a small job and would they still charge me 300 for setup? If I could get 4 tubes done for 800.00 it would be even better.

What Are Earth Tubes
Earth Tubes are a passive heating and cooling technique that uses tubes that are buried at least 6' feet in the ground that has air passing through them and uses the constant temperature of 50 degrees of the earth to cool and dehumidify air in the summer and warm air in the winter before entering the building envelope. They are often used as a supplement to conventional central heating or air conditioning systems. They work best in extreme climates that have high heat in the summers and very cold temperatures in the winters like Iowa.
Earth tubes are sometimes not installed correctly because they are poorly misunderstood and are somewhat experimental but are nothing new. They were was first used by the Romans a couple of thousand years ago. They also gained popularity again in the 70's and 80's but many failed because of improper installation that caused water (from condensation)to collect in the tubes and after a few years developed mold or bacteria and the air coming from the tube was then unhealthy to breath.
How They Work
In the summer hot humid air enters the tube from the outside and as it goes through the tube, the earth surrounding the tube cools the air and causes condensation to build on the inside wall of the tube. This cools and dehumidifies the air before it enters the house.
In the winter cold air will enter the tube and the earth at 50 degrees will warm the incoming air before entering the house. This will especially work well with a wood stove or fireplace because they consume lots of air when used and usually cold air is pulled from under your doors and around your windows as well as other places that leak air in the building envelope.
The Drawback of Earth Tubes
There are criticisms of earth tubes and the biggest are the high cost to install a system for something that just supplements your heating and cooling needs and the condensation that forms in the tubes in the summer. The systems that are most cost-effective I have researched calls for a wide trench at least 8' feet deep with several inches of gravel at the bottom and then several tubes at least 6" to 8" diameter and around 80' long with a continuous slit on the bottom so condensation can drain out and then they must have some type of land scape fabric or sock put over the tube so no bugs can enter the slits in the tube. You can see where this would cost thousands to do. But with this system there is still a concern with Radon entering the tubes from the ground and getting into the house.

a continuous slit in tube to allow condensation to escape.
How I Would Do It For Less
I think I have come up with a less costlier solution for doing earth tubes and we hope to incorporate them into our home design if I can get it done at a low-cost. Sometimes the best plan is the most simplest one and mine is very simple.

As you can see from my wife's drawing above of our hillside how I would do our earth tube design. My earth tubes will follow the natural curve of our hillside 6' 1/2 feet under ground and will not have a slit until at the bottom of the hill where the last few feet will have a slit and a fabric sock to allow the water to drain from condensation and to keep insects out of the tubes. Only the last few feet of the earth tube will have gravel under it with another 3" pvc perforated pipe imbedded in the gravel that goes to daylight to drain. This cuts cost and also stops all worry about Radon Gas getting into the system. I plan to use two 100' rolls of 6" non-perforated plastic drain pipe that you can buy at McCorkels in Columbia Iowa for 99 cents a foot and it will be in a straight line, not serpentine like the photo at the top of the page.

The reason I chose 6'1/2 feet for the depth of my tubes instead of the recommended 8' is lots of people do field tile in the state of Iowa and most of their trenchers can go down to almost 7 feet, so I think I can get it done for a reasonable rate. I think it will still work at that depth, any less depth will not have a stable enough temperature during extreme heat or cold to work properly. The whole key to this design is to have the earth tube slopped like on a hillside to a place where this condensation can drain out to alleviate the mold problem. At the bottom of the hill where the earth tubes come out on the hillside will look something like the photo below.

Air Intake of Earth Tubes
It will come out of our slab in the pole barn house like in the photo below.

I would also have a door on ours so I can turn it off if not needed. We would probably only use the earth tubes in extreme weather.
There is some argument whether you need a fan to move air through the tubes. I think in the winter no fan will be needed as the cold outside air enters the tube and it starts to warm from the earth, it will rise naturally like in a chimney, especially with the fireplace going will help pull the air into the tube. The summer is when I think you will need a low velocity fan to pull the heavy colder air up the tube and it maybe something as simple as below.

If we do earth tubes we will have them installed and in place before our pole barn house is built. I think the best place is on either side of a wood stove or fire place, or by your cold air return if you have a conventional heating and cooling ducted system. Another advantage of this design is you could flush these out once a year to get rid of any dust or dirt by sticking a garden hose in the earth tubes from inside the house.
As you can see my earth tube design is a simple design with a simple concept and will not cost much to do. I will let you know more when I find out what it will cost to have the two trenches dug. I think with all the hills in Iowa this design will work for a lot of homes there. I am interested to hear what many of you think of earth tubes and if you think my design will work?
Update
I have talked to one person that does field tile in Iowa and he said he can do it with tube and trench for 2.00 a foot. So if I do 200 feet of earth tube it will only cost 400.00. Now he did say that since it was such a small job they may charge an additional 300.00 just to come out and set up. So I think I can get it done for 700 bucks. Now this has got me thinking, if I do 4 earth tubes which will bring my total to 400 feet, will that still be considered a small job and would they still charge me 300 for setup? If I could get 4 tubes done for 800.00 it would be even better.
Last edited: