The Suburban Farmer
Silver Member
The Concept:
I have a small workshop... well, it's actually not that small, but I have a lot of stuff. One of the problems has been where to store tools that I don't use all that often. Putting them on a shelf or under the workbench was OK, but it made it tough to justify pulling them out if and when I need to use them, and sometimes I found myself ignoring them. I recently had a project that required some heavy use from my mitre saw and my planer, and decided to build a stand for them. But, after thinking about it a bit, I thought that 2 stands might be too much. After a bit of thinking (and some web browsing) I decided to make one small-footprint stand for both of them, and started drafting plans for a flip-top cart.


The Build:
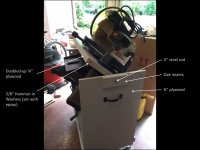
Since I'm cheap, everything was built with parts around the shop. I used some leftover 3/4" plywood for the bottoms and sides, and a piece of 1/2" round steel to make an axle, and doubled-up 3/4" plywood for to make the tool shelf.
First, I used my router to make a 1/2" inch rounded groove down the middle of both pieces of the top section, then I fit the bar and dry-fit the pieces, and then used epoxy to join the bar to the grooves and the two pieces of plywood together to make a 1.5" top. I checked the balance, and to my surprise it was perfect. I didn't need to trim anything to balance it out -- the old "measure twice, cut once" concept worked this time.
I was worried that the plywood might not be structurally strong enough to serve as the pivot-points, so I used some hard oak stock that I had to make the swivel points. I doubled-up the oak, drilled holes for the axle, and put those into cutouts, centered on the sides. They are intentionally built to be replaceable, and are held in place with screws, but no glue. Right now, I'm not using bushings. I didn't have any that fit, but considering this will get "flipped" VERY rarely, I'm not too worried about wear at the pivot points right now.
At first, I thought about using gate latches to secure the top in place. But then I was afraid that the side panels wouldn't provide enough structural integrity with just gate latches, so I decided to make screw-in pegs to hold the top in place, as well as to allow me to tighten them up and "join" the top to the sides. This worked perfectly, and when tightened down, there is NO lateral play in the stand. To make the anchors, I used some 3/8 hammer-in nuts, and mounted the 3/8th bolts into wooden handles using some JB Weld. See pic below. With these in all 4 corners, it takes about 30 seconds to remove them all, and using 4 provided all the structural integrity that I needed.


The hard part was balancing the mitre saw and the planer themselves. Just centering them on the top doesn't work -- the center of gravity isn't aligned between the two that way, so I had to find the COG for both, and then make sure that the COG was along the axle for both tools. It took some trial and error, but they were finally in place and bolted through the top using 3/8 carriage bolts. Now balanced, the top will swing easily with one finger, but stay in place when fully flipped.
Finally, I added some locking casters on the bottom and put on a coat of gray paint and added some handles on the sides to make it easy to move.
The Results:
So, how does it work? PERFECTLY. I used it for 2 full days and don't have a single complaint. It is sturdy as a rock, easy to flip, and it fits perfectly between my workbench and my welding station taking up half the space I had originally planned.
Not sure if I would use this for my PRIMARY tools, but for the "use it sometimes" tools, I found this to be a great solution to my storage problems, and now it's so easy to use these tools that I will likely find myself using them instead of just letting them collect dust underneath my workbench.
I have a small workshop... well, it's actually not that small, but I have a lot of stuff. One of the problems has been where to store tools that I don't use all that often. Putting them on a shelf or under the workbench was OK, but it made it tough to justify pulling them out if and when I need to use them, and sometimes I found myself ignoring them. I recently had a project that required some heavy use from my mitre saw and my planer, and decided to build a stand for them. But, after thinking about it a bit, I thought that 2 stands might be too much. After a bit of thinking (and some web browsing) I decided to make one small-footprint stand for both of them, and started drafting plans for a flip-top cart.
The Build:
Since I'm cheap, everything was built with parts around the shop. I used some leftover 3/4" plywood for the bottoms and sides, and a piece of 1/2" round steel to make an axle, and doubled-up 3/4" plywood for to make the tool shelf.
First, I used my router to make a 1/2" inch rounded groove down the middle of both pieces of the top section, then I fit the bar and dry-fit the pieces, and then used epoxy to join the bar to the grooves and the two pieces of plywood together to make a 1.5" top. I checked the balance, and to my surprise it was perfect. I didn't need to trim anything to balance it out -- the old "measure twice, cut once" concept worked this time.
I was worried that the plywood might not be structurally strong enough to serve as the pivot-points, so I used some hard oak stock that I had to make the swivel points. I doubled-up the oak, drilled holes for the axle, and put those into cutouts, centered on the sides. They are intentionally built to be replaceable, and are held in place with screws, but no glue. Right now, I'm not using bushings. I didn't have any that fit, but considering this will get "flipped" VERY rarely, I'm not too worried about wear at the pivot points right now.
At first, I thought about using gate latches to secure the top in place. But then I was afraid that the side panels wouldn't provide enough structural integrity with just gate latches, so I decided to make screw-in pegs to hold the top in place, as well as to allow me to tighten them up and "join" the top to the sides. This worked perfectly, and when tightened down, there is NO lateral play in the stand. To make the anchors, I used some 3/8 hammer-in nuts, and mounted the 3/8th bolts into wooden handles using some JB Weld. See pic below. With these in all 4 corners, it takes about 30 seconds to remove them all, and using 4 provided all the structural integrity that I needed.
The hard part was balancing the mitre saw and the planer themselves. Just centering them on the top doesn't work -- the center of gravity isn't aligned between the two that way, so I had to find the COG for both, and then make sure that the COG was along the axle for both tools. It took some trial and error, but they were finally in place and bolted through the top using 3/8 carriage bolts. Now balanced, the top will swing easily with one finger, but stay in place when fully flipped.
Finally, I added some locking casters on the bottom and put on a coat of gray paint and added some handles on the sides to make it easy to move.
The Results:
So, how does it work? PERFECTLY. I used it for 2 full days and don't have a single complaint. It is sturdy as a rock, easy to flip, and it fits perfectly between my workbench and my welding station taking up half the space I had originally planned.
Not sure if I would use this for my PRIMARY tools, but for the "use it sometimes" tools, I found this to be a great solution to my storage problems, and now it's so easy to use these tools that I will likely find myself using them instead of just letting them collect dust underneath my workbench.
Attachments
Last edited: