3pt lawn dethatcher plans - FREE

   / 3pt lawn dethatcher plans - FREE #1  

MadReferee

Elite Member, Rest in Peace
Joined
Apr 28, 2003
Messages
3,741
Location
New Hampshire
Tractor
Kubota B2710, IH TD6-62 dozer with Drott 4n1 bucket loader
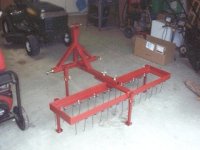
By popular request, I have created build plans for the 3pt lawn dethatcher that I built a few weeks ago (Here and Here ). The plans include a complete materials list along with a cut list, build instructions for the dethatcher platform, general purpose hitch and park stands and photos and diagrams. Also included are build hints, alternative designs, and the required page of disclaimers.

The plans are in a Word 2000 document that is about 1.2mb in size. Zipping will not significantly reduce its size.

If you want a copy, please PM me with your REAL email address.

Happy building.
 
   / 3pt lawn dethatcher plans - FREE
  • Thread Starter
#2  
I just finished building another 3pt dethatcher for a local TBNer. This one had only 7 tines per row and was sized for a BX series Kubota or any tractor with a 48" or so rear tire width. I have attached a picture.

I did update the plans to give additional construction details and some info on how to properly layout the tines for any number of tines per row.

As always, just PM me with your real email address and I will send a free copy of the plans in Word 2000 format.
 

Attachments

  • 533510-new-2a.jpg
    533510-new-2a.jpg
    73.8 KB · Views: 8,791
   / 3pt lawn dethatcher plans - FREE #3  
That is a good welding job. Thanks for the offer. I have a small craftsman tractor with a dethacher I haven't tried yet.
David
 
   / 3pt lawn dethatcher plans - FREE #4  
Awesome drawings! Thanks for all of your hard work in putting this document together. You made it look so simple and straightforward. I'm definitley going to put one together this winter!

Thanks again,
Doug /forums/images/graemlins/grin.gif /forums/images/graemlins/grin.gif /forums/images/graemlins/grin.gif
 
   / 3pt lawn dethatcher plans - FREE #5  
That looks great. Any possibility that you will have time to make a few more? If so, I would be interested in purchasing one sized for the BX. My only requirement is that it be left unpainted so I could paint it Kubota Orange. My welding skills aren't what they used to be...... they were bad, now they are horrible. /forums/images/graemlins/grin.gif /forums/images/graemlins/grin.gif
 
   / 3pt lawn dethatcher plans - FREE
  • Thread Starter
#6  
I put a coat of Rust-Oleum primer on it which is what you see in the picture. You can then paint it whatever color you want.

I have enough steel on hand to build a few more. You have to supply the tines from Agri-Fab.

PM me and we can discuss details.
 
   / 3pt lawn dethatcher plans - FREE #7  
Paul sent me a copy of these. He did a great job laying everything out. Now can't wait to work on the yard some more to actually have need for this so I can just building it - oh - and learn how to weld. /forums/images/graemlins/laugh.gif
 
   / 3pt lawn dethatcher plans - FREE #8  
Okay....need to reopen this debate: What about access to the lift pin nut? All the inplements I have now have open lift pin mountings giving access to re-tightning.

Regards,
Kevin
 
   / 3pt lawn dethatcher plans - FREE
  • Thread Starter
#9  
</font><font color="blue" class="small">( Okay....need to reopen this debate: What about access to the lift pin nut? All the inplements I have now have open lift pin mountings giving access to re-tightning.)</font>

I explained this in the thread describing the construction ( here ) and it is also explained in detail on the plans. But for those who need to know, here it is again.

One nut for the lift arm pin is welded to the back of the end cap which is then welded to the 2" x 2" drawbar tube. If I had used a wider tube then I would have cut an opening in the bottom so that a socket or box wrench could be used to tighten the nut instead of welding it. The lift arm pins are the double nut adjustable ones from Agri-Supply (#11930).
 
   / 3pt lawn dethatcher plans - FREE #10  
I guess I should have read the instructions.....na...thinking of half in plate tabs leaving them exposed.

We'll see

Kevin
 
 
Top