Guy37
New member
- Joined
- Feb 29, 2016
- Messages
- 23
- Location
- Quebec, Qc
- Tractor
- Universal 643, John Deere 310A, Sumitomo SH60
I am writing the story of the ups and downs I faced in the making of my (yet incomplete) firewood processor with the hope it will help an unqualified person, such as myself, tackle this challenging but rewarding project.
A year ago, I became aware of a machine the would make an easy work of cutting and splitting firewood. I used to do it with a vertical splitter powered by my farm tractor, but it was too much work for a guy in is seventies even for a dozen face cords or so a year.
So I allowed a neighbour to take away fallen and sick trees on my 20 acres wood lot. But since he cannot do it any more, I decided to take care of that myself after seeing hundreds of videos on YouTube and reading on the subject on different forums, mainly on this one. I though I could do an EASY simple processor in a couple of months after the snow was gone and start making firewood early in July even if I knew nothing about hydraulics and not much more on welding. All I needed was a few cylinders, some steel, my old way wagon and a couple of thousands $.
Was I ever WRONG. So, I made a nice Sketch-Up plan, not much detailed, I will wing it as I go along. And I did, I did measure, remeasure, cut, recut, weld, re weld, grind and regrind times and times again.

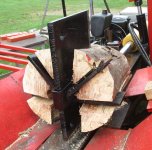
The first thing I bought was a large 5.5 inch cylinder to avoid too much re-splitting, six months before using it. I learned later that one is not to believe all an advertiser publishes. It was supposed to be 22 inches of extension but was only 18'' which is tight when you roll in 16 inches cut logs. I have now learned how to measure the possible extension of a cylinder. I was also impressed by the supposed force, 50 tons, forget that PSI thing, cannot be important I though. WRONG.

I used an old hay wagon that had to be reinforced and enlarged it to make it a 5 feet by 10' platform.

A 7 feet length of an old hay conveyor is cut, reinforced and, jacked up as a trough for my 8 logs, so the cut log will roll down to the splitter.


I bought a great metal saw with 8 inch long lasting blades. WRONG. The expensive blades makes super clean cut, but wont last if you cut 3/4 or 1 inch thick stock. I have 7 or 8 to prove that. I may try to resharpen some that still have enough teeth, next summer.


For 150.00$ I bought a 1/2 inch x 6X6 H beam. Scrap metal is expensive here at .60 a pound while new one is at 1$. I though it should be rigid enough. WRONG. With the centre only 3/8 thick, I was told it would bent. So, I welded a 1/2 inch plate on one side and a 1/4 inch on the other side. Now the vertical is 1 1/8 inch and should hold on well.


Once the H beam in place, I built a slanted table for the cut logs to roll down to the splitter, but a little higher and close to the beam. BAD IDEA. The split pieces can go wide and they did and unwelded that table as well as the posts holding the log lift.

I bought a used 12hp lawn tractor motor thinking it would be easy to make it fit to the 16 gpm hydraulic pump. WRONG. First, the screws for the mounting bracket go in specific holes the are on dedicated motors, no on any or all motors. So a plate was bolted on the motor and holes were drilled to correspond to the bracket bolt holes. Second, the motor shaft needed to be 4 inches and now, because the plate shortened the available shaft to only 3 I had to weld a piece of 1 inch shaft, something I was not looking forward to do.


I found different new cylinders locally at a good price and I thought I would find a way to fit them in later. WRONG. Its better to have a good idea of the length of the ram that will do the job rather than adapting your work to the cylinders you have. For instance, I had to unweld the attachment to the log flip table (at the end of the in-feed deck (not yet installed) twice to have it where I needed it.

The TBN system does not allow me more pictures right now.
Part 2 is coming up in a few minutes.
A year ago, I became aware of a machine the would make an easy work of cutting and splitting firewood. I used to do it with a vertical splitter powered by my farm tractor, but it was too much work for a guy in is seventies even for a dozen face cords or so a year.
So I allowed a neighbour to take away fallen and sick trees on my 20 acres wood lot. But since he cannot do it any more, I decided to take care of that myself after seeing hundreds of videos on YouTube and reading on the subject on different forums, mainly on this one. I though I could do an EASY simple processor in a couple of months after the snow was gone and start making firewood early in July even if I knew nothing about hydraulics and not much more on welding. All I needed was a few cylinders, some steel, my old way wagon and a couple of thousands $.
Was I ever WRONG. So, I made a nice Sketch-Up plan, not much detailed, I will wing it as I go along. And I did, I did measure, remeasure, cut, recut, weld, re weld, grind and regrind times and times again.
The first thing I bought was a large 5.5 inch cylinder to avoid too much re-splitting, six months before using it. I learned later that one is not to believe all an advertiser publishes. It was supposed to be 22 inches of extension but was only 18'' which is tight when you roll in 16 inches cut logs. I have now learned how to measure the possible extension of a cylinder. I was also impressed by the supposed force, 50 tons, forget that PSI thing, cannot be important I though. WRONG.
I used an old hay wagon that had to be reinforced and enlarged it to make it a 5 feet by 10' platform.
A 7 feet length of an old hay conveyor is cut, reinforced and, jacked up as a trough for my 8 logs, so the cut log will roll down to the splitter.
I bought a great metal saw with 8 inch long lasting blades. WRONG. The expensive blades makes super clean cut, but wont last if you cut 3/4 or 1 inch thick stock. I have 7 or 8 to prove that. I may try to resharpen some that still have enough teeth, next summer.
For 150.00$ I bought a 1/2 inch x 6X6 H beam. Scrap metal is expensive here at .60 a pound while new one is at 1$. I though it should be rigid enough. WRONG. With the centre only 3/8 thick, I was told it would bent. So, I welded a 1/2 inch plate on one side and a 1/4 inch on the other side. Now the vertical is 1 1/8 inch and should hold on well.
Once the H beam in place, I built a slanted table for the cut logs to roll down to the splitter, but a little higher and close to the beam. BAD IDEA. The split pieces can go wide and they did and unwelded that table as well as the posts holding the log lift.
I bought a used 12hp lawn tractor motor thinking it would be easy to make it fit to the 16 gpm hydraulic pump. WRONG. First, the screws for the mounting bracket go in specific holes the are on dedicated motors, no on any or all motors. So a plate was bolted on the motor and holes were drilled to correspond to the bracket bolt holes. Second, the motor shaft needed to be 4 inches and now, because the plate shortened the available shaft to only 3 I had to weld a piece of 1 inch shaft, something I was not looking forward to do.
I found different new cylinders locally at a good price and I thought I would find a way to fit them in later. WRONG. Its better to have a good idea of the length of the ram that will do the job rather than adapting your work to the cylinders you have. For instance, I had to unweld the attachment to the log flip table (at the end of the in-feed deck (not yet installed) twice to have it where I needed it.
The TBN system does not allow me more pictures right now.
Part 2 is coming up in a few minutes.
Last edited: