Bucket Level Indicator--A New Approach

   / Bucket Level Indicator--A New Approach #1  

npalen

Elite Member
Joined
Nov 17, 2009
Messages
3,482
Location
Beloit, KS
Tractor
Kubota B9200 HSTD and Mahindra 3015
LEVEL-INDICATOR-1.JPGLEVEL-INDICATOR-2.JPGLEVEL-INDICATOR-3.JPG

I've been filling these cold winter days with fabbing and testing this bucket level indicator. It's an idea from a friend in New York State who built and has been using his for about 10 years. He used connecting rods rather than the 1/16" cable on mine. No particular reason for cable other than easier adjustment of length while calibrating. May use rods for permanent installation.

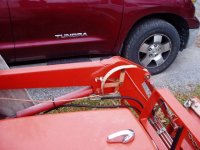
The pics show the leveler mounted on the outside of the right loader arm which makes it a little easier for calibrating since the loader valve is there. The round silver object is a 5" diameter neo magnet, again handy for testing. It's super strong and can only be moved by hitting fairly hard with a soft hammer and could probably be used for permanent mounting.

The 1st picture shows the loader raised with bucket level, the next shows loader raised bucket not level, the third shows loader at ground level with bucket leveled. The last picture shows the leveler on my friends tractor where the rods are used to operate the indicators.

I'm not sure if there are other methods, out there, that will show bucket level with the loader raised. This one is handy in that "bucket level" can be shown prior to dropping the loader to ground level which saves time while moving back to the "pile" and dropping the loader for another load. Showing bucket level with loader raised is very handy for something like forks where level is normally difficult to see from the tractor seat.

Questions and suggestions are appreciated.

Edit: To clarify---The white pointer (first three pictures) is "stationary" while the "silver" one is attached via cable to the loader frame upright and the curved "quadrant" is attached via cable to the loader bucket.
 

Attachments

  • Level Indicator.JPG
    Level Indicator.JPG
    72.3 KB · Views: 2,014
Last edited:
   / Bucket Level Indicator--A New Approach #2  
Looking good! Can you explain in more detail how the bucket level measurement is achieved, not just the indicator.
 
   / Bucket Level Indicator--A New Approach #3  
This is very interesting. I would also like to see an A to Z installation to understand how it works.
 
   / Bucket Level Indicator--A New Approach
  • Thread Starter
#4  
Let me think about what I can do to clarify how the system works. It's rather simple in concept but it took me a while to really understand it. I was confused even while building and assembling the components just how the thing works. It's similar to how a mechanical self-leveling loader works in some respects.
Thanks for your interest and happy to answer specific questions.
 
   / Bucket Level Indicator--A New Approach
  • Thread Starter
#5  
Sorry, duplicate post.
 
   / Bucket Level Indicator--A New Approach #6  
Looks good! I really learned the importance of the indicator when I started using the front blade for snow. With skid shoes a slight change was the difference between leaving 1" and leaving 1/4".
 
   / Bucket Level Indicator--A New Approach #7  
Very interesting...would like more details.
 
   / Bucket Level Indicator--A New Approach #8  
Maybe take some pictures from the side showing the linkage and mounting on the bucket to start?
 
   / Bucket Level Indicator--A New Approach #9  
Let's see if I understand. The cable going towards the rear pivots the scale with boom movement and the one going forward moves the pointer based on the curl?
 
   / Bucket Level Indicator--A New Approach
  • Thread Starter
#10  
Let's see if I understand. The cable going towards the rear pivots the scale with boom movement and the one going forward moves the pointer based on the curl?

Actually the opposite. The pointer is moved by the cable going towards to the rear attaching to the loader frame upright. The quadrant is moved by the cable going to the bucket.

I have some additional pix to post and will include a detailed description of each step of the build. Will hopefully get that info posted yet today. Thanks for your interest everyone.
 
 
Top