Boom Pole

   / Boom Pole #1  

RobJ

Elite Member
Joined
Jul 10, 2005
Messages
3,486
Location
Spring, TX (Houston)
Tractor
Kubota L2500
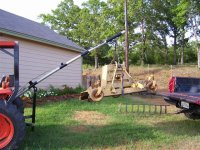
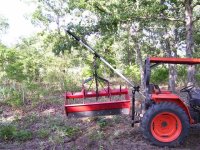
Got the boom pole built last week and tested this weekend. I went with the straight pole design, where the pole is the top link (IE no top link needed). Because of the materials I used I have to make a couple changes, I already cut off the part of the square frame below the pins (allow the 3pt to go all the way down, and will re drill the holes at the pivot...thus lowering the pole height at it's lowest position. But after getting into the office this morning I noticed I probably overloaded it. My 5' FM is heavier than I thought. 530#. Boy that truss strap was tight. Another reason I'm going to strengthen it as well. The box blade is much lighter, about 420#. The inner lifting eye also makes it easier to handle. With the FM on the back, I could just about tip the tractor over by hand!! But the idea is to just move in into the back of a pickup...and I can lift it and back the truck under it so the tractor doesn't have to move. This pole is easier to handle to.

Rob
 

Attachments

  • boom1.jpg
    boom1.jpg
    89.9 KB · Views: 1,006
  • boom2.jpg
    boom2.jpg
    93.6 KB · Views: 772
  • boom3.jpg
    boom3.jpg
    107.7 KB · Views: 759
   / Boom Pole #2  
Try a larger diameter pipe, I used a 3" schedule 40 and I am going to 4" schedule 40 with the three inside. how much do Case factory forks weigh at 10 feet out? We have simular ideas.

25735DSC00014-med.JPG

Jim
 
   / Boom Pole
  • Thread Starter
#3  
I almost got some 3" sch 40 they had at the steel yard, a lot heavier and I didn't think I needed it. This one is sch 40 2.5".

I ain't making another one....I promise!! :) Even though the boom part is the easiest.
 
   / Boom Pole #4  
Got any pictures of the top link end? Did you just weld a heim joint into the pipe?
 
   / Boom Pole
  • Thread Starter
#5  
Greg,

i'll shoot a pic tonight for you. But basically I took a piece of 1/4" plate to cover the end of the pipe, burned a hole in the plate large enough for a 1" bolt. Welded the 1" nut to the inside of the plate (end cover plate), then welded the plate to the pipe. So now the 1" bolt can be screwed into the end cap. Then I welded a piece of 1"x2" (I think, I changed this part once) solid bar (about 2-3" long) onto the head of the bolt. Then burned a 3/4" hole in it so I could attach it into the top link mount. I had a smaller/lighter design but decided to beef it up. It ain't pretty but it's holding.

Heim joint, something I learned new today. On my BIL humongus one I posted a picture of they welded this joint to the pipe. I only have one of these and it works, TSC didn't have just the joint on sale so what I did was cheaper and works just about as good.

Look for a pic later tonight, I'm going to be working on it again tonight.
 
   / Boom Pole
  • Thread Starter
#6  
Here is a pic of the top link joint. Sorry for the crappy pic (not happy with the new Kodak C340 and I'm a little to close). It's actually 2 3/8" plates welded together with the 1" bolt. As mentioned, it ain't pretty!!

Rob
 

Attachments

  • link1.JPG
    link1.JPG
    82.5 KB · Views: 641
   / Boom Pole #7  
It is hard to admit this, but my boom pole is not as long as yours. It also isn't very elegant, but it works.

I have a really ugly and old post hole digger that was apparently too heavy to move for the previous owner of our property. I found it down below a pile of junk he left. It probably was made from melted-down WWII battleships. It is nasty heavy. At the end of the boom-pole, someone welded a couple of 3/8-inch plates that extend just beyond the gear box. The hole accepts a standard Cat-1 toplink hitch pin (3/4, 7/8-inch ???)

I just take the auger off and put a chain over the pin. It actually works much better as a boom pole than a post hole digger because the rusty old handle always falls out or bends in some strange position when I'm trying to dig holes, or the bottom part of the auger falls out.

Just and idea.

Knute
 
   / Boom Pole #8  
Well just don't get under it when lifting... If you build another one, I would reccomend larger tube say 3" and increase the height of the topstrap where it passes over the structure going to the lift arms. Triangles are your friend. In this case a larger triangle would be better. The topstrap and the cantilever post form 2 back to back triangles that transfer a tension load up and over the cantilever post to the point where the strap attaches to the base of the boom. The larger that triangle(taller), the more force is transfered from the bending pole to tension on the topstrap. With the cantilever post short like you made it, the topstrap dosn't have as much mechanical advantage so it is under a lot of strain yet is not as effective at keeping the boom pole from bending as it could be. You could also pre-stress the whole assembly during construction by supporting the pole at the ends and putting enough weight in the middle to bend the pole slightly(very slightly, say 1/8") down in the middle, then weld on the topstrap. When you removed the bending force, The pole trying to return to straight would put the topstrap under tension or pre-load it removeing some of it's stretch before a load is applied to the boom. When you applied a load, the pole would have to bend past straight(it's strongest position) before it started bending down with the load.
 
   / Boom Pole
  • Thread Starter
#9  
RonMar said:
Well just don't get under it when lifting... If you build another one, I would reccomend larger tube say 3" and increase the height of the topstrap where it passes over the structure going to the lift arms. Triangles are your friend. In this case a larger triangle would be better. The topstrap and the cantilever post form 2 back to back triangles that transfer a tension load up and over the cantilever post to the point where the strap attaches to the base of the boom. The larger that triangle(taller), the more force is transfered from the bending pole to tension on the topstrap. With the cantilever post short like you made it, the topstrap dosn't have as much mechanical advantage so it is under a lot of strain yet is not as effective at keeping the boom pole from bending as it could be. You could also pre-stress the whole assembly during construction by supporting the pole at the ends and putting enough weight in the middle to bend the pole slightly(very slightly, say 1/8") down in the middle, then weld on the topstrap. When you removed the bending force, The pole trying to return to straight would put the topstrap under tension or pre-load it removeing some of it's stretch before a load is applied to the boom. When you applied a load, the pole would have to bend past straight(it's strongest position) before it started bending down with the load.


Ron a lot of good stuff here and I could have used it. I just sort of copied some on the net. But I noticed the other night that the pole is slightly bend. I think the top strap I used stretched some (I didn't think the FM was over 500#). So since I went with a straight pole design (no top link), the pole is easy to redo. I think I will go back for the 3" pipe and a little taller top strap.

In the mean time I added a 1/2" square tubing on top of the top strap (welded along the lenght) to beef up the strap. I wanted solid but couldn't find any. Hey I'm not happy unless I build the same thing 2-3 times anyway.

Any thoughts on where/how my cantilever? In the middle of the pole, end like I have it. Severl I found on the net all seem to have the cantilever at the point of the bottom support.

Thanks,
Rob
 
   / Boom Pole #10  
Rob..
The cantilever should be at the same point as the bottom support. It transfers a compressive force that offsets the tension in the topstrap. If this compressive force is at the point of the bottom support, it doesn't add any shear or bending stresses to the pole itself, but passes directly through the pole to the bottom support.
 
 
Top