Home made BrushGuard

   / Home made BrushGuard #1  

deerhunterf350

Gold Member
Joined
Nov 1, 2005
Messages
274
Location
St. Louis, Mo
Tractor
New Holland TC55DA
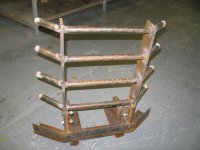
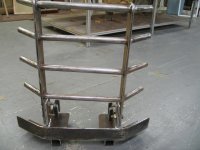
Had a chance over the Holiday Weekend to take some measurements and put together a BrushGuard for the TC-55.

To protect those Nice Curves up Front :D . And Expensive Headlinghts from what I have been reading.

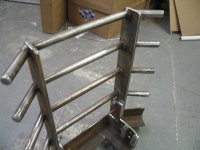
I was busy cutting and fabricating and didn;t have a chance to snap pics during the Building stages. But have taken some photos this evening.

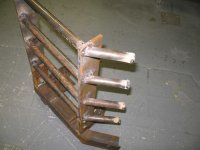
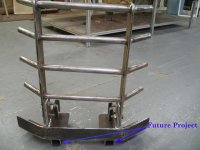
This is it Together , still needed to be cleaned up.
 

Attachments

  • FromLeft.jpg
    FromLeft.jpg
    421.5 KB · Views: 3,216
  • TopRight.jpg
    TopRight.jpg
    338.8 KB · Views: 2,174
   / Home made BrushGuard #2  
Are those solid bars or tubing? One heck of a job. Paint it up get it mounted and post some pics........
 
   / Home made BrushGuard
  • Thread Starter
#3  
I have 2 - 1/2" Bolts in each side in the Pic, But when bolted on the Tractor. The Bottom 1/2" bolt will stay and have a Nylon Lock nut, to allow it to pivot forward for clearance for the hood. The Top 1/2" bolt will be replace with a 1/2" Clevis pin , to make for a tool free forward pivot.
 

Attachments

  • HingeBolt.jpg
    HingeBolt.jpg
    280.5 KB · Views: 1,972
   / Home made BrushGuard
  • Thread Starter
#4  
1" od DOM Tube, with .156 Wall thickness. It should take a licken and keep on ticken.
 
   / Home made BrushGuard
  • Thread Starter
#5  
Here it is hinged forward, it can presently "Fall" completely forward. I have plans to make an attachment point on the Stationary Base and the Pivot Guard for a short length of Vinyl coated 1/8" cable to be attached to. This will act as a stop and only allow so much forward pivot.
 

Attachments

  • HingedForward.jpg
    HingedForward.jpg
    399.3 KB · Views: 1,506
   / Home made BrushGuard
  • Thread Starter
#6  
Here is a Front view after and hour and a half of grinding and cleaning up all the Welds.
 

Attachments

  • FrontAfterCleanup.jpg
    FrontAfterCleanup.jpg
    270.5 KB · Views: 1,871
   / Home made BrushGuard
  • Thread Starter
#7  
The Back after cleanup.

And the capped Pipes.
 

Attachments

  • BackAfterCleanup.jpg
    BackAfterCleanup.jpg
    239.7 KB · Views: 1,106
  • PipesCappedandClean.jpg
    PipesCappedandClean.jpg
    301.9 KB · Views: 1,398
   / Home made BrushGuard
  • Thread Starter
#8  
Tomorrow Night I am going to put it in the SandBlaster and hit it with 30 Grit Aluminum Oxide Blast media. That should give it a good cleaning and Medium textured surface for the paint to hold onto. Then shoot one maybe two light coats of Van Sickle Gray Primer.

Then a couple of light coats of Van Sickle Premium Gloss Black. To Finish it off.
 
Last edited:
   / Home made BrushGuard
  • Thread Starter
#9  
Last one for the Night.

I went ahead and added two Receiver Hitch Tubes, to the bottom of the Guard. Because of clearance issues with the 18LA loader. I could not put anything other than the 3"x3"x1/4" accross the Front. But I wanted to be able to add some weights to the Front when the Loader is off and using heavy 3pt implements. So the next project will be a Weight Holder Frame for suitcase weight. When the Loader is removed, We will slide the Weight Frame into the receiver tubes, slide a hitch pin in, put the Suitcase style weights on the Frame and off we go.
 

Attachments

  • FutureProject.jpg
    FutureProject.jpg
    283.8 KB · Views: 1,784
   / Home made BrushGuard #10  
Deerhunter,

Love your project!

And the receiver tube on the front gives me a great idea to add one to my grill guard. I need to mount some weights on the front for my pulverizer when I have the FEL off, so having a receiver hitch makes it easy to mount weights that are easy on/off.

THANKS.

ron
 
 
Top