Upcoming build - question for grader owners

   / Upcoming build - question for grader owners #1  

djw250

Silver Member
Joined
Dec 2, 2005
Messages
200
Location
Hurricane alley (South Louisiana)
Tractor
Mahindra 3510
I'm planning to build a road grader soon similar to the dura-grader and others like the one detailed in another recent thread. My question for owners of this type of grader is what is the best vertical angle for the angle iron supporting the cutting blades? I would guess at setting the angle at about 45 degrees from the bottom of the skids, but I'm not sure. Any input appreciated.
 
   / Upcoming build - question for grader owners #2  
Well, the angle on mine was not set by any "grading" science ;)

I have 900x300mm sides (3' x 1') and the thing is 1200 wide (4'). It was built to be pulled by my B7100 - which is traction limited by its light weight. I don't have blades on the angle iron - I just used the MIG to put a wear edge on it. The front (cutting) angle iron is set level at the rear and the front cutting edge is dropped 20mm (3/4") down. The angle is 65mm (2.5") stuff.

It grades like a champ. I have a 100mm (4") piece of bar I can drop down some guides on top of the rear blade and this piles up an alarming quantity of dirt - about the limit for the tractor to slug along with.

I also have a couple of bits of angle welded on the top that hold a pair of 50kg (110lb) weights. These are essential for a good result - the thing itself weighs (as a guess) about 80kg. Since I operate it in float - that ain't a lot of weight to force it in.

I can take some pictures when I eventually get back home, but you'll have to forgive the crappy welds - I re-engineered the MIG while making this until the sodding thing worked properly. Weld quality is as a result, pathetic. Until the welder started feeding properly and then it is nice, but the cutting edges were the first bits I did and the cough-splutter of the welder made this a major PITA.

Hope this helps! My grader works a treat!

/Kevin
 
   / Upcoming build - question for grader owners
  • Thread Starter
#3  
Thanks for the reply Kevin. I'd love to see some pictures of your grader when you get the chance. Welding on a hardend edge is a great idea, and cheaper than buying a hardened cutting blade. Did you have a problem with the angle iron warping when you welded the edge?

I'd like to make mine wide enough to do half of my 1/4 mile gravel road in one pass, but that would be about 6.5 to 7 feet, which is probably too much for my Mahindra 3510 to pull without losing traction. I'm guessing 6 feet would probably be about max.

Thanks,
Dave
 
   / Upcoming build - question for grader owners #4  
I built mine similar to how Kevin describes. The cutting blades are made of 4" X 1/4" angle layed open side down with a piece of 1/4" flat strap welded across the opening to form a triangular tube. My cutting edge is also built up migweld ground to a modest edge. The flat bottom of the rear triangle blade sets flush with the bottom of the sidewalls. The rear of the front blade sets flush with the sides while the front of the blade runs below the sidewalls by 3/4" so the front blade is probably around 47 degrees. Here is a link to my original post with pics.

http://www.tractorbynet.com/forums/build-yourself/77820-rons-grader.html?highlight=rons+grader

If I had it to do over again, I would probably re-orient the triangular tubes so that the backside was vertical instead of the 45 degrees that it is now. As it is now, clumps of grass/turf can hang up on the top edge instead of rolling cleanly over the blade. Loose dirt and rock roll over the top edge nicely. I oriented the angle the way I did to have the widest side in line with the direction of pull for the greatest rigidity. It is plenty strong and during my driveway build, the front edge bit into and rolled rocks from the ground that were quite large, one as big as a basketball. I would also probably make the sidewalls higher, but the boxtube I made the sidewalls out of was heavy and readilly available to me. I also added a swing down gate on the back that meets the rear blade. When down, this collects dirt like a box scraper for relocation. because of the lower sidewall height, larger rocks and clumps of sod will sometimes hang up betweeen blade and raised swing gate. Again loose soil and gravel travel right over the blades.

Good Luck with your project.
 
   / Upcoming build - question for grader owners #5  
RonMar said:
I built mine similar to how Kevin describes. The cutting blades are made of 4" X 1/4" angle layed open side down with a piece of 1/4" flat strap welded across the opening to form a triangular tube. My cutting edge is also built up migweld ground to a modest edge. The flat bottom of the rear triangle blade sets flush with the bottom of the sidewalls. The rear of the front blade sets flush with the sides while the front of the blade runs below the sidewalls by 3/4" so the front blade is probably around 47 degrees. Here is a link to my original post with pics..

Hmmm... That should read Kevin's is similar to mine I think! Your post pre-dates my build! I like the "flap" at the back to convert to a box-blade like thing. Wish I thought of that!

My angle is only 2.5" rather than RonMar's 4" and I don't have any problems with chunks-o-stuff getting hooked up on it. I too strengthened the angle by closing the open side with a piece of (in my case) 10mm (3/8") x 90mm (a bit under 4") plate.

Keeping the angle straight was a worry, but it turned out just fine. Weld in small bursts, keep it sensibly cool and even was all I did. The angle has a tiny bit of banana in it, but nothing to worry about. The sides are just plate and have 20x5 (3/4"x3/16") skids on the bottom. I wasn't thinking while welding those (I got outraged by the MIG playing up:eek: ) and they ended up with an enourmous bow. Fixed by using a chain and jack :rolleyes:. Needed the chain and some dogs (loadbinders) when it came time to weld the 3pt stuff on the topside too.... Not proud of hacking the metal so much, but it works!

I will post some pics when I get back home.

Some random thoughts on using this on the driveway though - my drive is not level and a hydraulic top link would be very nice :eek: . Also, the driveway material is what in Australia is called "blue metal" - dolomite limestone rubble. The action of the grader is that the front edge cuts (nicely) and the loosened material is then churned/dragged between the front cutter and the rear "smoother". This churning has the effect of separating out the fines. So along the drag path I have powdery dolomite on the surface and gravel at the end of the runs. I can't see any way of avoiding this, and it isn't a biggie (assuming it ever rains here again) as the powdery stuff sets like concrete. But it is worth knowing this before you start building, if this is a problem with the materials you use.

I have a never-ending problem in that people use the top of my driveway to do a 3 point turn when they realise they've missed the turn at the junction and they "churn" the driveway creating ruts. When it does rain here, the rain happily moves most of the driveway down the nicely made ruts to the bottom of the driveway :mad:. I guess I should look at this as a guaranteeing seat time, so it's not so bad!

I've done a tiny bit of non-driveway work with it (levelling a site for a 15mx9m shed (50'x30' approx)). This is in H-E-A-V-Y clay and it cuts nicely there too. The weights were critical when cutting virgin ground though - it tended to "chatter" over the surface till I got enough weight on it.
 
   / Upcoming build - question for grader owners
  • Thread Starter
#6  
Great info guys! I appreciate all the input. RonMar I like the idea of closing in the angle for more strength, and it looks like your grader works great from the pics.
 
   / Upcoming build - question for grader owners #7  
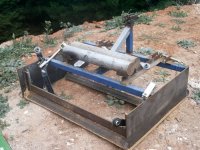
OK, here are some pictures as promised. First, the cutting edge. edge.jpeg

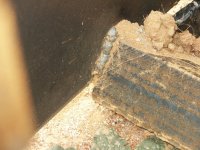
This is made from 65mmx65mm (2.5") angle with the open side closed by plate. The rear of the angle is flush with the bottom of the skid and the front is simply dropped 20mm (3/4"). The "wear edge" is nothing more than weld from the MIG. I can re-do the welds if they wear away - much cheaper than buying a wear-edge!

This is the view from the rear. rear.jpeg

The 3PL is lying on the grader (sorry). The cylinders are the weights I use. The drop-in plate is visible. Very effective, but the slot it drops down into gets slightly jammed with small stones...

Next step is to paint it, now that I'm back home and I know it works!

Hope this is of some help.

/Kevin
 
   / Upcoming build - question for grader owners #8  
Kjm that is a back view of the grader and that back blade is used to somewhat compact the soil you scrapped off ?
 
   / Upcoming build - question for grader owners #9  
Actually I think that is just the other side of the angle iron he used as the blade. Your just looking at it like he did it to smooth the dirt or as a rear push blade but I think if you consider where the other half of the angle iron is you will understand. I thought he had added a rear pushing blade like is found on a lot of box blades until I thought about it being angle iron.
David from jax
 
 
Top