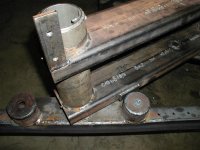
Update: Primed on Wed, painted flat white on Thursday, painted Safety Yellow on Friday and Sat. Spent Sat afternoon putting it together mechanically and hydraulically. Sunday morn took to woods, spent two hours working it. Did some trail raking, some heavy re-shaping in a few places, added two more water diversions in areas that needed them, even used the rake offset trunion cylinder hydraulics to slide the rear end of the tractor out of a precarious side-hill situation, etc. During this session, I found two hoses were too short and one started wearing thru, otherwise I was very pleased with the overall results. Offset is habit-forming!!! Got home, ate dinner, went back out to replace two hoses with foot-longer ones, did so, and then noticed I had twisted the tine-bar about 15 degrees , each side. No outragious work had been done, certainly less than it will eventually see, so I would call it "normal duty", so the fact that it twisted disapointed me a bit. The tine bar is 5/16" thick, 4x4 angle. My King Kutter was 1/4 " 4x4, so I thought this would be stronger than that one was. Two facts I am considering: I used the heavy duty tines from Agri-supply. These do some serious digging, but still do spring out if contacting a root or huge rock. But they probably put a lot more stress into the tinebar. And, there is a lot of "stuff" welded to the tinebar, so it got it pretty hot. I think it got soft from the heat of all the welding (my fault, I should have keept it cooler).
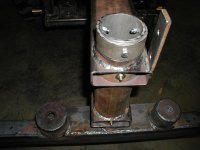
Anyway, the plan is to build a new tinebar of 3/16" wall 4x4 tube. This is, in some ways, easier than the original plan, and offers many times the torsional stiffness of the angle shape element. The only real challenge is deciding how to get access to the bolt heads. I don't want to bolt clear-thru, 'cause then they will not stay tight over time. So, one plan is to drill 1 inch holes on the top surface, coincident with the tine-mounting holes. Another idea is to hole saw larger holes (and fewer of them) that allow reaching four bolt heads at a time from the top or back surface. A third plan i am considering is to cut a 2 inch wide slot out of the top surface, leaving a 1 inch flange on each edge, use the slot for access, then after tine bolting, add back on a flat metal patch with clearance holes, matching tapped holes in the remaining flanges of the tube. There are variations of these plans too. I am open to suggestions too, as I think through my next step. I will try to get some materials by Friday.
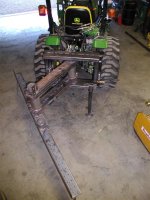
") Hopefully one of the final pic's will show it "in use"
Hopefully one of the final pic's will show it "in use"