Homemade landscape and trail rake

   / Homemade landscape and trail rake #1  

jimgerken

Veteran Member
Joined
Nov 26, 2001
Messages
1,638
Location
Minnesota
Tractor
John Deere 3720
OK, here goes. I may/will be building a rake for landscape use, for driveway maintenance, and for rocky ATV trail maintenance. I have recently sold my old one, a highly modifyed King Kutter 72 inch, to which I had added just about everything. But before I start, I thought I'd ask all you experts for input on what you feel are valuable features. To stimulate the conversation a bit, so far I am planning:
side-to-side hydraulic swiveling (normally done manually by pulling out a pin..)
weight brackets to allow addition of small suitcase weights
quick-hitch compatibility (I use Speeco brand Q.H.)

This will hang on my 2520, with hydraulic TNT.

When used on the trail, the use is extreme duty, with rocks as big as a foot across expected to move off the trail with the rake's guidance. Any thoughts on using the heavy duty rakes tines Agri-Supply has instead of the standard duty ones. the HD ones are 1.25 x 3/8". they cost 6 bucks each, but I would also space them out a bit further too.

Thanks for any input you have.
 
   / Homemade landscape and trail rake #2  
I am working up plans for a new rake also. A variable ammount of swivel is a good idea. The first one I made for a garden tractor using the standard duty Agri-Supply tines worked very well. I added struts out to the ends and made alternate attach points for those so I could put it at an angle. What I found worked better was a single attach point and a chain out to each leg. I could then change the length 1 chain link at a time which gave a lot more angle adjustment.

Collectively, depending on tine spacing, the standard duty tines are pretty strong. It is when you single one out for punishment such as hanging it up behind a small stump head, that their spring characteristics really get tested. Of course the overall weight of the rake will determine how much force a single tine will have to endure before the 3PH rides up and over, while the end of the tine "pole-vaults", the obstruction. As long as the rock rolls/slides fairly easilly, the standard tines should collectively work them off to the side allright.

Being able to offset the rake to one side or the other, particularly when angled would be desireable. I have to snake thru some trees on my property so a rake too wide is not advisable. But when angled, the pattern gets narrow and getting in near fixed objects is difficult. Being able to offset the pattern outside one tire or the other with the rake at an angle would be a good thing.

My first one didn't have provisions for gauge wheels. The one I am about to start will:) I don't know if I will build in provisions for an offset as it adds substantially to the complexity of the structure. I however don't use the angle feature all that often as I am usually just dragging in the loose branches/fuel to a single point to burn it anyway so I will probably continue to live with the narrower pattern at an angle.
 
   / Homemade landscape and trail rake
  • Thread Starter
#3  
RonMar, how much offset would we want? Would about 1 foot each way (two feet total travel) be enough? I suppose there are at least two ways offset can be accomplished: Put a second swivel axle in the "boom" part that extends back from the 3-point hitch lower cross member. OR put some kind of linear track to slide the tine bar straight sideways, pushed by a small but long (1.5 inch by 2 foot) hyd cylinder.
I agree with the need for this feature. I can remember times I wanted to groom a lot closer to an edge to sweep off some rocks, but the tractor was already close enough to the edge of the trail to suit me for safety reasons.
 
   / Homemade landscape and trail rake #4  
Enough to allow you to get the tines out past the wheels. It would depend on what you were doing I guess. Clearing a path along a bank where it would be desireable for the debris to go over the bank would require more reach as would reaching into a depression or swale/ditch along a road or trail with the forward angled end of the rake to remove debris and gravel from the ditch to the center of the road or trail. It all depends on how close you want the tractor wheels to get to the edge or down into the ditch:).

I was thinking of a crossbar with a center and two offset attachpoints(5 attach points total). By using two cylinders for the support struts out from the drawbar to the crossbar, then you could set the angle wherever you needed it. This combined with gauge wheels and a top and tilt might be pretty good for cleaning ditches. Sort of like the attached top view sketch. The 3PH attach point is at the bottom and the rake crossbar is at the top of the pic. By pulling 3 pins where the drawbar and two cylinder rods meet the crossbar, you could offset them 1 position either left or right.
 

Attachments

  • rake.bmp
    109 KB · Views: 3,884
   / Homemade landscape and trail rake #5  
Looks like a great idea. I would think that one cylinder (with a good stroke length) would do just fine. I have seen Just set it to be half extended when the rake is set straight. Can't wait to see pictures of the progress.:) Good luck!
 
   / Homemade landscape and trail rake
  • Thread Starter
#6  
OK, just getting back to this topic after putting a lot of time in on the hydraulics of the JD 2520. I am needing some help here. I need a few pics of how a real roadgrader works, specifically the part of the mechanism that offsets the blade one way or the other. I am trying to decide how to make the rake offset. I have drawn up a plan to do it with a swing-arm scheme. But I should at least look at the alternatives, in case something looks better. If you can get a pic of a grader, to show the offset mechanism, please put it here for me. Thanks.
 
   / Homemade landscape and trail rake
  • Thread Starter
#7  
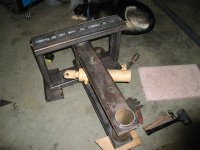
Got a great start on the rake this weekend. I had decided to go with the swing-arm type design. After "sketching it up", and obtaining the trunion-mount cylinder ( the heart of the offset scheme), I made a trip to the junkyard and found a bunch of 2x4, 2x5, 2x6 tubing with 0.188" wall thickness, all for 20 cents a pound. 35 bucks bought all this metal, wow! I milled giant 4 inch holes thru these tubes, and a 1.5 inch hole clear thru for a bushing stock section. After pressing it all together, and tacking it up, it looked like this photo. Also shown is the trunion-mount 3x9 cylinder from Surplus Center, swinging on specially prepped pins in those bushings welded into the tubes. So this important assembly is about complete.
 

Attachments

  • P1010036 (Medium).JPG
    P1010036 (Medium).JPG
    64.4 KB · Views: 3,250
   / Homemade landscape and trail rake
  • Thread Starter
#8  
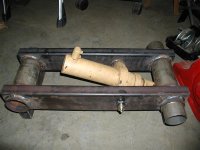
The main frame is shown here, parts are cut to length but nothing is welded yet. Not shown are the plates that the three-point hitch attachment pins stick through. I should maybe explain the "bearing assemblies" that allow the offset and swivel functions. The "axle" part is 3.5 inch pipe, and the "bearing" outer part is 4 inch tubing. There is about 90 thousandths difference between the two diameters, which I feel is too much play in the assembly, so I then add as much galvanized tin flashing material as I can get in there. I was able to get about 60 thousandths worth of tin in there by wrapping it really tight and somehow sliding it together. Once final welding is done, I have a lot of difficulty moving it by hand. I am sure the cylinder will not have any trouble, it has a bit more push than I do. And I added grease zerks so eventually, after paint, there can be some lube added. I have used this method before and it works very well.
 
   / Homemade landscape and trail rake
  • Thread Starter
#9  
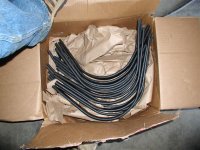
Well, that photo attach didnt work, so here is another attempt. Also, the boxes of tines came from Agri-supply. I opted for the heavy duty ones. 31 tines, for a 78 inch tinebar.
 

Attachments

  • P1010034 (Medium).JPG
    P1010034 (Medium).JPG
    70.8 KB · Views: 3,277
  • P1010037 (Medium).JPG
    P1010037 (Medium).JPG
    85.4 KB · Views: 2,877
   / Homemade landscape and trail rake
  • Thread Starter
#10  
Correction: The tine bar will be 76.25 inches long, I cut it last night.
1.25 inches per tine, plus a 1.25 inch spacing between tines, 31 tines total, and then minus one space (31 tines, but only 30 spaces). The tines have 7/16" holes (two holes per tine) so I purchased grade 8, 7/16" x 1.25" x 20 (fine thread) bolts and nylock nuts. The big drill-athon begins tonight.
 
 
Top