Komatsu D20A-6 ?

   / Komatsu D20A-6 ?
  • Thread Starter
#151  
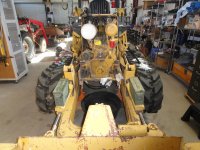
Does anyone know if the hydraulic system on a D20a-5 is stackable i.e. can I add another hydraulic circuit to the system? I want to make a 3 point hitch to the back of my dozer and this would be the easiest way to do it. I want to be able use some of my 3 poin tools and make a ripper attachment also. Any ideas/help would be greatly appreciated


John,

Yes you can put a valve in series, I did just that to operate my log splitter, dump trailer and future ripper. I also plan on some sort of future TPH arrangement as well. See post 89 on page 9 of this thread.

http://www.tractorbynet.com/forums/construction-equipment/99717-komatsu-d20a-6-a-9.html#post1246392

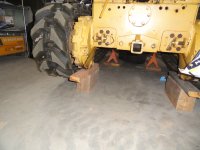
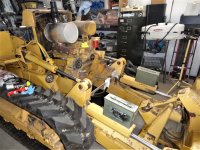
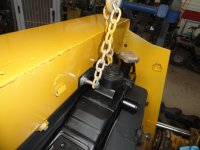
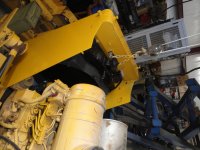
What you need to do is place a valve in series between the output of the pump and the input of the OEM control valve. One of the large steel lines will have to be removed from the valve that goes to the pump. It's a little hard to get to, but do-able. The seat, seat plate, and floor plate will need to be removed. You have to find a hydraulic shop that can make hoses with 30* JIS (Japanese industrial Standard not JIC) 22 mm dia x 1.5 mm thread pitch metric female (Japanese Komatsu) Metric thread fitting on one end and whatever fitting you need for the new valve on the other. Use at least 5/8" ID hose and a good at least 20 GPM rated valve and you wont have any problems.

Larry
 
   / Komatsu D20A-6 ? #152  
MR. Guglio LS, I have a komatsu d20a-6 like yours, I need to replace the right steering clutch I torn it down and have the tracks jacked up off the ground. I've turned the right track to get the bolts out of the clutch. But, I can't turn the left track to get to the bolts on the bottom of the clutch. The other thing is how on earth do I get that monster out of there. I can't afford to pay a dozer repair man to do this please advise. many thanks,
jamesreeves811@yahoo.com
 
   / Komatsu D20A-6 ?
  • Thread Starter
#153  
Hard to believe 12 years have passed since acquiring my hobby Dozer. With over 89,100 views and climbing the popularity and interest in these affordable crawlers for the small homestead owner never seems to fade. Reviving this old thread (hopefully not a violation of some sort of code of ethics) is a good place to continue the saga of the maintenance history and life of this D20A. With all that said here goes with an update on the "liittle Dozer that could".

First off is to answer the 4-year-old question above, my bad for not getting to it sooner. That issue must be resolved by now. But here goes in the interest of how its done. The trick to unbolting the clutch pack is to first remove the 8 bolts closest to the center drive case (yolk release side of clutch pack), then the 8 bolts on the track side, doing it that way you only have to rotate one set of tracks at a time to access all the bolts. Use a strap to pull the opposing break lever to keep the clutch pack from rotating while unbolting. Pulling out that heavy clutch pack is to tie a rope (I prefer a soft cotton rope) around the break band tabs to make sort of a handle then lift it straight out, easy squeezy.

Now for the latest Cooling and exhaust system maintenance and restoration. I do the best I can to keep my equipment up and running with proactive preventive maintenance. If something needs attention take it apart address the issue, then put it all back together in a timely manner just in case something happens to me, that way my wife will not have any trouble unloading all this boy toy stuff "over my dead body" How thoughtful of me is that?

The Winter of 18-19 set in, the ground is frozen hard, snow pack on top, its cold, windy and no outside projects lined up for the dozer, so decided to perform preventive maintenance on the entire cooling system, then exhaust.
First was to drain the radiator, loosen hose clamps and a wire for the head lamps. After that I fitted a small winch on trusty old scissors lift to remove the entire front cowling with radiator attached, its held on by eight bolts, four on each side. Amazingly simple to remove the entire assembly, just need a means of lifting it up and out of the way.

First couple of pics show what it all looks like with the front cowling assembly remove. And of course, to show off the spacious man cave shop to work on it. It's still up on blocks from replacing the steering clutch yolk bearings. Sorry no pics of that project it would have been boring anyway. I do have a picture of the custom yolk pulling tool I had to fabricate. If interested let me know and it will get posted.
 

Attachments

  • DSC02200.JPG
    DSC02200.JPG
    2.6 MB · Views: 188
  • Radiator 0.jpg
    Radiator 0.jpg
    2.6 MB · Views: 210
  • Radiator 1.jpg
    Radiator 1.jpg
    1.2 MB · Views: 195
  • Radiator 2.jpg
    Radiator 2.jpg
    2.8 MB · Views: 197
   / Komatsu D20A-6 ?
  • Thread Starter
#154  
After unbolting the radiator from the cowling, the cowling was cleaned up, sanded, primed with Red Rust-Oleum, followed by Gray Primer then the finish coat.
 

Attachments

  • Radiator 5.jpg
    Radiator 5.jpg
    2.8 MB · Views: 152
  • Radiator 4.jpg
    Radiator 4.jpg
    2.9 MB · Views: 155
  • Radiator 3.jpg
    Radiator 3.jpg
    2.7 MB · Views: 149
   / Komatsu D20A-6 ?
  • Thread Starter
#155  
While the Alkyd Enamel was trying to cure, believe you me paint does not dry(cure) when its 18* outside. Do not let the sunny pictures fool you "Baby its Cold Outside" We are at 7000 feet and its the middle of January this just happened to be a sunny day. I finally wound up lowering the whole thing down inside a very large cardboard box with a ceramic space heater to bake the enamel @ 120* for about 7 days. In the meantime, the radiator was taken to a local radiator shop to be rod-ed out, flushed, pressure tested then painted. The nice thing about painting in the dead of winter there are no bugs to land on, stick to and ruin your perfect paint job. Looks nicer than I could have imagined.
 

Attachments

  • Radiator 6.jpg
    Radiator 6.jpg
    2.8 MB · Views: 143
  • Radiator 7.jpg
    Radiator 7.jpg
    2.2 MB · Views: 151
   / Komatsu D20A-6 ?
  • Thread Starter
#156  
While the Radiator was at the rad shop in Albuquerque, the water pump was removed Pic1 and replaced with a brand new one from Amazon. Amazing to get a brand-new water pump online for a very reasonable price. The old one will get rebuilt for a spare or re-sale. A new 82*c thermostat and bullet proof Kevlar fan belt was installed at the same time. Pic 2 Water pump rear view, a bit rusty all the gaskets and O-rings were very much disintegrating. Pic 3 New water pump installed and ready to start putting everything else back together.
 

Attachments

  • Radiator 10.jpg
    Radiator 10.jpg
    2.8 MB · Views: 150
  • Radiator 9.jpg
    Radiator 9.jpg
    2.9 MB · Views: 157
  • Radiator 8.jpg
    Radiator 8.jpg
    2.8 MB · Views: 153
   / Komatsu D20A-6 ?
  • Thread Starter
#157  
Radiator reattached to front cowling, got it all hooked back up to the winch cable and hanging off the scissors lift. Ready to be moved into position and bolt back on. Between the scissors lift and winch I was able to get all 8 bolts perfectly lined up and threaded in by hand, Man I'm good, okay really lucky. Installed the hydraulic fluid heat exchanger tube assembly, connected the hoses, now ready to attach the front grille. Front grill installed, now ready to move onto the hood and muffler restoration. Oh and last pic sanded and repainted the engine oil pan skid plate.
 

Attachments

  • Radiator 16.jpg
    Radiator 16.jpg
    2.8 MB · Views: 154
  • Radiator 15.jpg
    Radiator 15.jpg
    2.7 MB · Views: 148
  • Radiator 14.jpg
    Radiator 14.jpg
    2.6 MB · Views: 147
  • Radiator 13.jpg
    Radiator 13.jpg
    2.7 MB · Views: 158
  • Radiator 12B.jpg
    Radiator 12B.jpg
    2.6 MB · Views: 149
  • Radiator 12.jpg
    Radiator 12.jpg
    2.9 MB · Views: 156
  • Radiator 11.jpg
    Radiator 11.jpg
    782.6 KB · Views: 148
  • DSC02249.JPG
    DSC02249.JPG
    2.9 MB · Views: 145
   / Komatsu D20A-6 ?
  • Thread Starter
#158  
Underside of the hood was a bit of a rust bucket, so it got sanded and painted with a good matching finish coat. Its too darn cold to paint any more. It has been in the single digits early in the mornings then teens in the afternoons. Should I give the entire dozer a paint job when it warms up then enter it into the pinto bean fiesta parade down main street? In the last pic you might notice my supervisor pleased with the results while at the same time keeping my ride back to the house warm and cozy, what a good boy. He is the best Junk Yard guard dog we have ever had, he is always looking for trouble.

That is it for tonight, must get some much needed shut eye.
 

Attachments

  • Radiator 17.jpg
    Radiator 17.jpg
    2.5 MB · Views: 162
  • Radiator 18jpg.JPG
    Radiator 18jpg.JPG
    2.9 MB · Views: 163
   / Komatsu D20A-6 ? #159  
Just went through the entire thread. That's a neat dozer you have there! Really nice and compact.

You have been doing an amazing job restoring the machine.

Thanks for bringing the thread up with an update.

I love the way it looks with the rubber tracks!

I had this small 1962 Italian Crawler tractor with 26 HP that I restored from top to bottom and I've always wanted to replace the tracks with rubber ones but ended up trading the tractor.
 
   / Komatsu D20A-6 ? #160  
Underside of the hood was a bit of a rust bucket, so it got sanded and painted with a good matching finish coat. Its too darn cold to paint any more. It has been in the single digits early in the mornings then teens in the afternoons. Should I give the entire dozer a paint job when it warms up then enter it into the pinto bean fiesta parade down main street? In the last pic you might notice my supervisor pleased with the results while at the same time keeping my ride back to the house warm and cozy, what a good boy. He is the best Junk Yard guard dog we have ever had, he is always looking for trouble.

That is it for tonight, must get some much needed shut eye.

Why not hang some drop cloths and paint inside? Fire off the salamander afterwards to help the dry time. Maybe break out the redneck powder coating stuff again :D
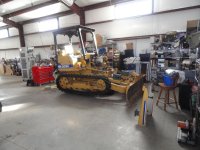
. I missed the switch to rubber track, what do you think of them?
 
 
Top