HOME  DISCUSSIONS  PHOTOS  REVIEWS  CLASSIFIEDS  DEALERS  STORE
 

Go Back   TractorByNet.com > General Forums > Customization
Show Recent Threads:
24 Hours
Since My Last Visit

Reply
 
Thread Tools Display Modes
Old 03-03-2008, 11:20 AM   #1 (permalink)
Elite Member
 
RobJ's Avatar
 
Join Date: Jul 2005
Location: Spring, TX (Houston)
Posts: 2,895
Default Making Lift Arm Telescoping sway bars

We've all seen them, we've all wanted them, some have ordered and installed them. But some of us can't afford them. So I'm starting a thread to make some. Not sure where it'll end because this is an in progress thread(the worse kind for the poster!!).

I fall into the can't afford them so I will attempt to make them...before my next trip up to the country...2 weeks. I'm not a welder by trade so it might not be pretty, functional I hope.

To buy the parts needed from Kubota, I need...

2 piece telescoping pieces - $85 (includes some hardware, not much)
1 piece that mounts to the ROPS - $15.00
1 piece that mounts to the lift arm - $20

This is per side so that $120 times 2 = $240 plus shipping and maybe tax. Prices at TractorSmart and Messicks are close to the same. Forget walk in dealer prices.

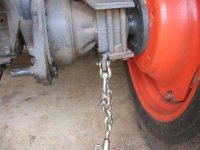
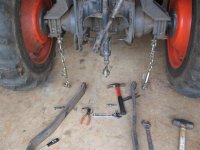
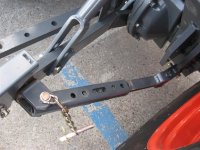
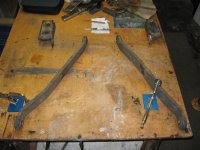
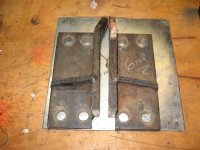
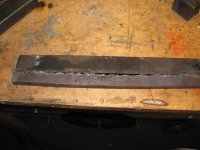
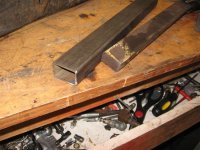
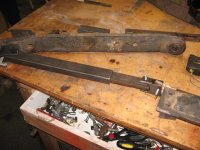
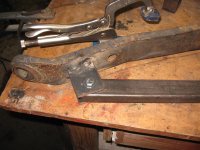
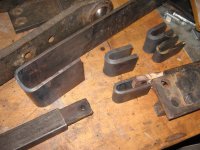
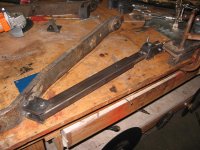
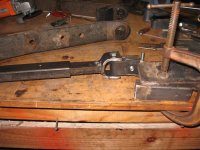
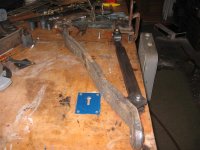
I'm going to try this with what I have. First looked at 16ga square tubing. Maybe a little light. 1" fits nicely into 1.25". It's easy to drill and work with, to bad. I have some 1"x1.5" 12ga tubing. This looks close to what Kubota is using. The other factory piece is solid bar. For this I have some 3/4" x 2" in house. The 3/4" will slide into the rect. tubing. I'll cut off 3/4" of the solid bar for the sliding piece, this will bring it down to 1.25" and it'll fit nicely. The hardest parts to make are the rolled pieces that mount to the lift arm and ROPS. Tonight I will try to heat and roll these pieces. I have to make 3 per side, lift arm, ROPS, and the piece that is welded to the solid bar and hooks up to the ROPS piece. This piece has to up and down and left and right.

What I'm starting with.....and the factory look.
Attached Images
File Type: jpg 3-point.JPG (100.4 KB, 750 views)
File Type: jpg 3-point (2).JPG (108.1 KB, 686 views)
File Type: jpg lift-arm-stabil.jpg (131.0 KB, 751 views)
__________________
L2500
RobJ is offline   Reply With Quote
Old 03-03-2008, 11:21 AM   #2 (permalink)
Elite Member
 
RobJ's Avatar
 
Join Date: Jul 2005
Location: Spring, TX (Houston)
Posts: 2,895
Default Re: Making Lift Arm Telescoping sway bars

I took everything home and layed it out in the same position as on the tractor. Everything was in line so a flat work table worked fine.
Attached Images
File Type: jpg making-3pt-stabilizers (6).JPG (108.6 KB, 666 views)
__________________
L2500
RobJ is offline   Reply With Quote
Old 03-03-2008, 11:27 AM   #3 (permalink)
Elite Member
 
RobJ's Avatar
 
Join Date: Jul 2005
Location: Spring, TX (Houston)
Posts: 2,895
Default Re: Making Lift Arm Telescoping sway bars

I always wondered why the ROPS mounts were angled in. I'm guessing because of the bolt that's close by. I heated one and straighted it out. It'll work better this way with either stabilizer system I end up with.

Also is a shot of the 2" flat bar I trimmed. This piece is only 12" long, I think that's going to be plenty. If I recall from my notes the "real" working lenght difference is only a max of 21" (lift arm pulled in) and a min of 19" (lift arm wide against tire). No 3pt attachment I have is less than 26" wide so the lift arm doesn't need to go in all he way.

So far the rect. tubing is 14" long. The brackets will take up some of that length.
Attached Images
File Type: jpg making-3pt-stabilizers (2).JPG (129.3 KB, 580 views)
File Type: jpg making-3pt-stabilizers (3).JPG (109.9 KB, 484 views)
__________________
L2500
RobJ is offline   Reply With Quote
Old 03-03-2008, 11:28 AM   #4 (permalink)
Elite Member
 
RobJ's Avatar
 
Join Date: Jul 2005
Location: Spring, TX (Houston)
Posts: 2,895
Default Re: Making Lift Arm Telescoping sway bars

A shot of the tubing and solid piece.
Attached Images
File Type: jpg making-3pt-stabilizers (1).JPG (129.0 KB, 512 views)
__________________
L2500
RobJ is offline   Reply With Quote
Old 03-03-2008, 11:31 AM   #5 (permalink)
Elite Member
 
RobJ's Avatar
 
Join Date: Jul 2005
Location: Spring, TX (Houston)
Posts: 2,895
Default Re: Making Lift Arm Telescoping sway bars

This is where I stopped last night. You can sort of get the picture here. That piece attaching to the ROPS and solid bar isn't going to work. I don't think it'll be strong enough. I'm going to try and roll some flat bar tonight.

Film at 11!!

Thanks for looking,
Rob
Attached Images
File Type: jpg making-3pt-stabilizers.JPG (129.0 KB, 538 views)
__________________
L2500
RobJ is offline   Reply With Quote
Old 03-04-2008, 09:51 AM   #6 (permalink)
Elite Member
 
RobJ's Avatar
 
Join Date: Jul 2005
Location: Spring, TX (Houston)
Posts: 2,895
Default Re: Making Lift Arm Telescoping sway bars

I got about an hour in the shop last night. Decent progress. I formed up some of the connector pieces using 1/4" flat bat and some 3/8". Factory looks like 3/8", a little harder to form making a tight turn. The process wasn't that hard, heat up the piece cherry, put it in a vice and make the first curl, then lay it on floor with a piece of 1/2" plate and hammer it home. Still haven't decided which one to use. The nice thing on the 1/4" steel is it's 3 inches wide, so I can form it, then cut it in half and then have 2! The 3/8" bar is 2" wide.

I decided to weld the brackets to the lift arm instead of forming another bracket. It's easy and I can always grind them off later if it doesn't work out.

Rob
Attached Images
File Type: jpg arms-03032008.JPG (127.6 KB, 440 views)
File Type: jpg arms-03032008 (1).JPG (130.7 KB, 421 views)
__________________
L2500
RobJ is offline   Reply With Quote
Old 03-05-2008, 11:07 AM   #7 (permalink)
Elite Member
 
RobJ's Avatar
 
Join Date: Jul 2005
Location: Spring, TX (Houston)
Posts: 2,895
Default Re: Making Lift Arm Telescoping sway bars

Ok done with one side. It's just tacked together for the moment but the pieces are there and work. I'll work on the other side and maybe the stronger link pices in the mean time. I won't see my tractor until weekend after next. Bummer

Rob
Attached Images
File Type: jpg 03042008.JPG (139.8 KB, 463 views)
File Type: jpg 03042008 (1).JPG (125.1 KB, 367 views)
File Type: jpg 03042008 (2).JPG (108.8 KB, 435 views)
__________________
L2500
RobJ is offline   Reply With Quote
Old 03-05-2008, 12:59 PM   #8 (permalink)
Platinum Member
 
firemanpat2910's Avatar
 
Join Date: Feb 2006
Location: Havana Fla
Posts: 657
Default Re: Making Lift Arm Telescoping sway bars

looking good, I have a ford with that set up. I wouldnt want any other kind.
firemanpat2910 is offline   Reply With Quote
Old 03-06-2008, 10:31 PM   #9 (permalink)
Super Member
 
3RRL's Avatar
 
Join Date: Oct 2005
Location: Foothills of the Giant Sequoia's, California
Posts: 5,351
Default Re: Making Lift Arm Telescoping sway bars

Rob,
Those are nice.
lol ... By the looks of things, your drag links could've used them before now?
Be sure to add several holes for adjustment and also a slot in the outer tube so the pin can slide a little. That will help let your 3pt move around a little and not bind up. I really like your "U" joint attachment to the tractor. They whole thing looks very strong and should really help.
__________________
Rob-
...The Older I get...the Better I Used to be...
3RRL is offline   Reply With Quote
Old 03-06-2008, 11:44 PM   #10 (permalink)
Elite Member
 
Join Date: Sep 2000
Location: WI
Posts: 4,605
Default Re: Making Lift Arm Telescoping sway bars

One point. The tube should have about 6 holes and one slot. The slot is about 3/4 to 1" and there are 3 holes on each side. That will give you all the adjustment you could ever need or want. The slot is for the attachments that need to flop around during turns. Not everything is supposed to be dogged down tight.

jb
__________________
john_bud is offline   Reply With Quote
Reply

Thread Tools
Display Modes

Posting Rules
You may not post new threads
You may not post replies
You may not post attachments
You may not edit your posts

BB code is On
Smilies are On
[IMG] code is On
HTML code is Off
Trackbacks are Off
Pingbacks are Off
Refbacks are Off


All times are GMT -4. The time now is 08:02 PM.


HOME DISCUSSIONS PHOTOS REVIEWS CLASSIFIEDS DEALERS STORE
About TractorByNet.com | Terms of Service | Advertise | © 2008 TractorByNet.com