gsdavis1
Silver Member
OK, I just finished up installing power steering on my Mitsubishi MT180HD. I plan on adding a loader in the next few months so power steering was a must in my book. I like the small tractor footprint, so I can get around in tight spaces. Without power steering, using a loader in tight spaces is a bear.
I tried two other systems without success. First I tried a John Deere steering valve from their model 400 garden tractor. It installs on the steering drag link. The problem was that there was not a pressure relief in the system and I blew my tractor pump, cracked it right down the side. Also my draglink moved a long farther than on a Deere 400. So that was a lot of moving hose to contend with.
Next I tried installing a power steering pump from a Volvo on my tractor engine. It had an internal relief valve. I fabricated pulleys and brackets. But the little belt that runs everything on my engine just didn't have the power to turn the pump under a load. I would have had to modify all the pulleys on the engine (water pump, crank, and alternator) to step up to a larger belt. So I scrapped this idea. Defeat again.
So I decided to do it the "right" way. Using my existing tractor hydraulic system through a priority flow divider valve, with a relief valve plumbed into the steering system. I also wanted to use an orbital valve, so that meant tearing out the manual steering box and modifying the steering column and installing the new steering valve.
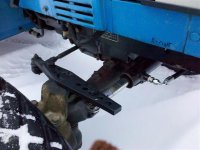
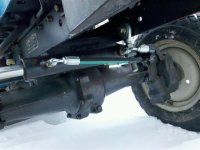
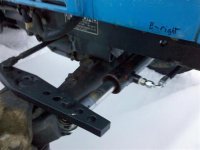
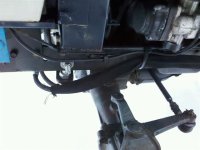
First thing I did was fabricate a hydraulic ram / cylinder to steer the front axle. I chose to install it parallel with the front axle to hopefully keep it out of the way for future loader bracket installation on the tractor side frames. I fabricated a new tie rod that I bolted and welded to the right side steering spindle. The multiple holes will make for more versatile use should I have to replace the cylinder with one with a different stroke. Also, the ram is 1.75 bore with a 1 inch rod. This does make for noticeably uneven steering left to right because of fluid displacement. The cylinder was free so I will deal with that. I did have to weld an "eye" on the end of the cylinder shaft in order to have the proper movement and attachment to the custom steering rod.
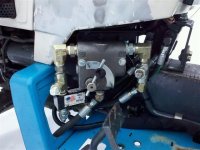
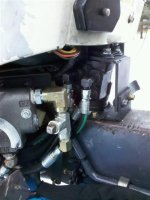
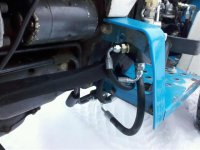
Next, was to remove the drag link. This gave me the room to mount the Priority Flow Divider and the Relief Valve. Both were purchased on ebay. The divider was $50 and the relief valve $30. The relief valve is adjustable from 1000 psi to 2500 psi and it is currently set to 1500 psi and seems to work well there. The priority flow divider is adjustable too. I have it set to about 4. Not sure what that means in gpm but I am glad I had the adjustable one. It took some tinkering to get it on the right setting. Too little and the steering was hard, too much and the throttle had to be very high to get the other tractor hydraulics to operate.
Plumbing all the lines in was difficult. Many trips to the local hydraulic shop for fittings. The hoses are tight but workable. And it doesn't take up much more space that the old drag link and pitman arm did.
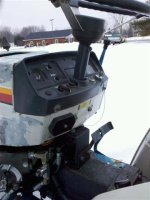
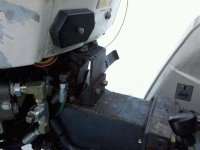
The orbital valve is an Eaton Char Lynn. It is used. I bought it from a Lift truck salvage yard. Cost $150. It included the mounting bracket, the steering column and wheel. It took some time to fabricate the necessary brackets to mount this valve. But I am happy with the final product. The steering valve has 1500psi stamped into the case and it works very well. I used the Eaton steering column and combined it with my column to make a new one. A little longer too since I am 6 foot 5. I also plan on getting a higher seat at some point.
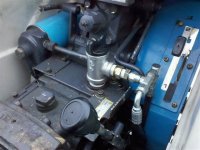
I had to make a way to have the relief valve and the steering valve return flow to the tractor tank / reservoir. I installed a piece of standard plumbing galvanized 禅 into the fill/dipstick port. I connected the return lines to the 1/2 inch side of the tee. I also extended the dipstick with a drill bit extender holder that I had lying around. Cut to length to get a proper fill reading.
I learned SOOO much on this project. It was very rewarding, but very hard too. It is a lot of work and a surprising amount of money. The 8 hoses alone were over $200. There was lots of cutting, thinking, and measuring over and over and over again.
I know it is probably easier to just buy a tractor with power steering from the factory. But money is tight, and I got this tractor at such a good deal that I felt it was worth the effort and time. Plus I learned a lot.
Enjoy the pictures. You can view a video here too.
If you have any questions, feel free to ask. I will help if I can. Many other people helped me along on this project, so this is the least I can do.
I tried two other systems without success. First I tried a John Deere steering valve from their model 400 garden tractor. It installs on the steering drag link. The problem was that there was not a pressure relief in the system and I blew my tractor pump, cracked it right down the side. Also my draglink moved a long farther than on a Deere 400. So that was a lot of moving hose to contend with.
Next I tried installing a power steering pump from a Volvo on my tractor engine. It had an internal relief valve. I fabricated pulleys and brackets. But the little belt that runs everything on my engine just didn't have the power to turn the pump under a load. I would have had to modify all the pulleys on the engine (water pump, crank, and alternator) to step up to a larger belt. So I scrapped this idea. Defeat again.
So I decided to do it the "right" way. Using my existing tractor hydraulic system through a priority flow divider valve, with a relief valve plumbed into the steering system. I also wanted to use an orbital valve, so that meant tearing out the manual steering box and modifying the steering column and installing the new steering valve.
First thing I did was fabricate a hydraulic ram / cylinder to steer the front axle. I chose to install it parallel with the front axle to hopefully keep it out of the way for future loader bracket installation on the tractor side frames. I fabricated a new tie rod that I bolted and welded to the right side steering spindle. The multiple holes will make for more versatile use should I have to replace the cylinder with one with a different stroke. Also, the ram is 1.75 bore with a 1 inch rod. This does make for noticeably uneven steering left to right because of fluid displacement. The cylinder was free so I will deal with that. I did have to weld an "eye" on the end of the cylinder shaft in order to have the proper movement and attachment to the custom steering rod.
Next, was to remove the drag link. This gave me the room to mount the Priority Flow Divider and the Relief Valve. Both were purchased on ebay. The divider was $50 and the relief valve $30. The relief valve is adjustable from 1000 psi to 2500 psi and it is currently set to 1500 psi and seems to work well there. The priority flow divider is adjustable too. I have it set to about 4. Not sure what that means in gpm but I am glad I had the adjustable one. It took some tinkering to get it on the right setting. Too little and the steering was hard, too much and the throttle had to be very high to get the other tractor hydraulics to operate.
Plumbing all the lines in was difficult. Many trips to the local hydraulic shop for fittings. The hoses are tight but workable. And it doesn't take up much more space that the old drag link and pitman arm did.
The orbital valve is an Eaton Char Lynn. It is used. I bought it from a Lift truck salvage yard. Cost $150. It included the mounting bracket, the steering column and wheel. It took some time to fabricate the necessary brackets to mount this valve. But I am happy with the final product. The steering valve has 1500psi stamped into the case and it works very well. I used the Eaton steering column and combined it with my column to make a new one. A little longer too since I am 6 foot 5. I also plan on getting a higher seat at some point.
I had to make a way to have the relief valve and the steering valve return flow to the tractor tank / reservoir. I installed a piece of standard plumbing galvanized 禅 into the fill/dipstick port. I connected the return lines to the 1/2 inch side of the tee. I also extended the dipstick with a drill bit extender holder that I had lying around. Cut to length to get a proper fill reading.
I learned SOOO much on this project. It was very rewarding, but very hard too. It is a lot of work and a surprising amount of money. The 8 hoses alone were over $200. There was lots of cutting, thinking, and measuring over and over and over again.
I know it is probably easier to just buy a tractor with power steering from the factory. But money is tight, and I got this tractor at such a good deal that I felt it was worth the effort and time. Plus I learned a lot.
Enjoy the pictures. You can view a video here too.
If you have any questions, feel free to ask. I will help if I can. Many other people helped me along on this project, so this is the least I can do.
Attachments
-
 Dec_20_2010_9527 (Small).jpg46 KB · Views: 1,836
 -
 Dec_20_2010_813 (Small).jpg41.1 KB · Views: 1,133
 -
 Dec_20_2010_126 (Small).jpg47.2 KB · Views: 1,244
 -
 Dec_20_2010_24 (Small).jpg25.3 KB · Views: 933
 -
 Dec_20_2010_2179 (Small).jpg34.9 KB · Views: 786
 -
 Dec_20_2010_2293 (Small).jpg36 KB · Views: 1,091
 -
 Dec_20_2010_6476 (Small).jpg25.2 KB · Views: 700
 -
 Dec_20_2010_9688 (Small).jpg31.3 KB · Views: 633
 -
 Dec_20_2010_6560 (Small).jpg34.7 KB · Views: 583
 -
 Dec_20_2010_7015 (Small).jpg33 KB · Views: 846
 -
 Dec_20_2010_9162 (Small).jpg39.6 KB · Views: 1,093
") Easier with power steering
Easier with power steering