So you think converting a Pin-On to QA is Easy!

   / So you think converting a Pin-On to QA is Easy! #1  

k0ua

Epic Contributor
Joined
Jun 28, 2009
Messages
30,825
Location
Branson, Mo.
Tractor
Kioti DK35se Hydrostat
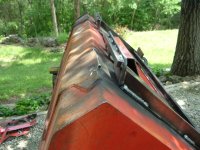
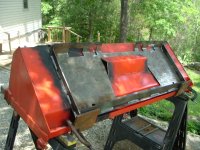
The purpose of this post is to let others know what my experience was in getting
the Pin on Kubota bucket for my LA436 loader turned into a QA bucket. Some would have you
believe this is an easy task. Maybe for them, but it was not for me. Undoubtly some others
may be more skilled with metalwoking than I, but others may experience the same trials that
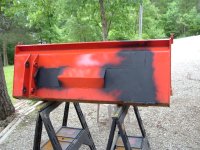
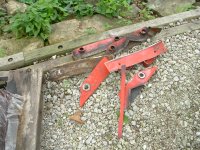
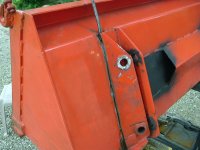
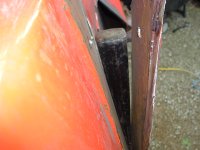
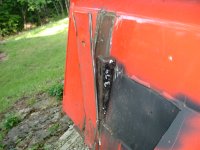
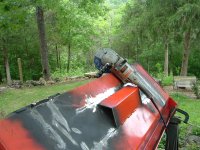
I will post here. Unfortunatly when this picture series starts I have alreardy removed the
right hand "ear" and both sections of the center stiffener metal. I did not think this would
be the time consuming task that it turned out to be so I did not start taking pictures!
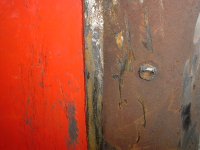
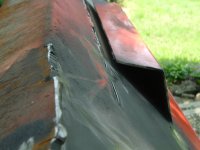
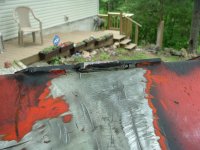
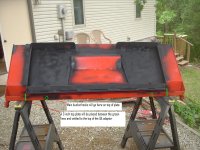
The reason for the paint is to keep it from rusting, as I was only able to work on it
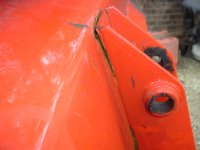
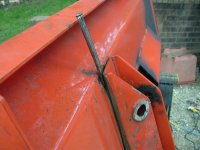
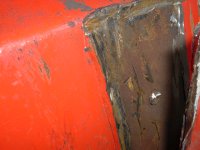
a little at a time. I used a small Acetlylene/Ox torch to remove the "ears" and and angle
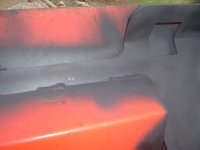
grinder with cutting wheels to remove the center angled stiffener metal. I had a lot of trouble
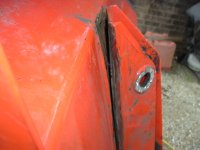
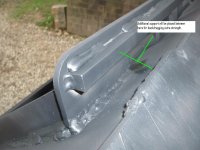
getting the torch to blow thru the very thick metal at the bottom of the "ears" where it is
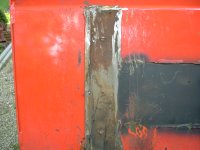
reinforced. I am not very good with a cutting torch. I made a mistake and blew a small
hole in the bucket proper. More to follow as this progresses.

James K0UA
 

Attachments

  • DSCF0425.JPG
    DSCF0425.JPG
    481 KB · Views: 3,321
  • DSCF0426.JPG
    DSCF0426.JPG
    104.3 KB · Views: 1,888
  • DSCF0427.JPG
    DSCF0427.JPG
    467.4 KB · Views: 2,140
  • DSCF0429.JPG
    DSCF0429.JPG
    449.6 KB · Views: 2,025
  • DSCF0449.JPG
    DSCF0449.JPG
    492.2 KB · Views: 2,834
   / So you think converting a Pin-On to QA is Easy!
  • Thread Starter
#2  
Here is where it gets interesting, You can see the "Rolled continous weld" on the inside edge
of the ear, and the single spot welds in the center of the ears. The single spot welds were
not that much trouble, just drill them nearly out and go on. But the "rolling spot welds"
made the entire weld stack nearly 1/2 inch thick. This is more than I could reach with a 4 1/2
inch angle grinder, so I did what I could and then used various wedges to pop the remainder
of the weld including the single spot welds. I would up having to cut the ears off here also
as I tried to "peel" the ears with the wedges, but with the right angle of the ears it made
them too strong, and springy, and a couple of times the wedges jumped about 10 foot into the
air and 10 foot downrange, when struck by the 2 lb hammer. As that was a major safety issue
I resigned myself to cutting and bending/breaking the ears off first before I "peeled" the base
metal off with the wedges. Here you can see how thick the entire weld is from the rolled continous
weld and the MIG weld on the outside. All in all a major PITA to get this thing off. I used
a sawz-all on the bottom reinforced area to get if off, You may have noticed I had to cut off the
pin bushings as I could not get the angle grinder in to cut the welds without doing so.
More to follow.

James K0UA
 

Attachments

  • DSCF0433.JPG
    DSCF0433.JPG
    445.3 KB · Views: 1,222
  • DSCF0432.JPG
    DSCF0432.JPG
    461.3 KB · Views: 1,352
  • DSCF0431.JPG
    DSCF0431.JPG
    464.2 KB · Views: 1,599
  • DSCF0428.JPG
    DSCF0428.JPG
    125.7 KB · Views: 1,661
  • DSCF0437.JPG
    DSCF0437.JPG
    464 KB · Views: 1,311
  • DSCF0436.JPG
    DSCF0436.JPG
    450.2 KB · Views: 1,276
  • DSCF0435.JPG
    DSCF0435.JPG
    475.8 KB · Views: 1,222
  • DSCF0434.JPG
    DSCF0434.JPG
    465 KB · Views: 1,380
  • DSCF0438.JPG
    DSCF0438.JPG
    476.8 KB · Views: 1,279
   / So you think converting a Pin-On to QA is Easy!
  • Thread Starter
#3  
Here is shown lots of grinding, weld up the holes and cutting scars, and lots of measuring
and more cutting of the center support, to allow the central bottom bar to slide under the
original center stiffener angle metal. This was finally ready to weld, and the top of the QA
unit is resting against some clamped on plates which will be replaced by a 3 inch x 3/8 X 4
foot top support metal bar. I dont have the metal, and will have to purchase that. There will
also be 3 inch x 3/8 supports welded to the bottom for stiffening while back dragging, I was
just too tired today to finish even the bottom supports.
It was very hot and humid today. Besides the wife wanted me to quit and eat supper with her.
So There it sets, not finished, but a lot further along than it was. 7 or 8 cutting wheels,
ran nearly out of gas on the little torch, so used the wheels on the second half, One 7 inch
grinding wheel, one 4 inch grinding wheel, lots of 7018 rods, and used 7014 for the scar and
hole filling. I will post back when it is all done. Thanks for looking.

James K0UA
 

Attachments

  • DSCF0442.JPG
    DSCF0442.JPG
    471.5 KB · Views: 1,222
  • DSCF0441.JPG
    DSCF0441.JPG
    486 KB · Views: 1,890
  • DSCF0440.JPG
    DSCF0440.JPG
    441 KB · Views: 1,059
  • DSCF0439.JPG
    DSCF0439.JPG
    466.2 KB · Views: 1,519
  • DSCF0443.JPG
    DSCF0443.JPG
    476.7 KB · Views: 1,231
  • DSCF0444.JPG
    DSCF0444.JPG
    482.2 KB · Views: 1,250
  • DSCF0445.JPG
    DSCF0445.JPG
    440.9 KB · Views: 1,016
  • DSCF0447.JPG
    DSCF0447.JPG
    206.1 KB · Views: 1,818
  • DSCF0448.JPG
    DSCF0448.JPG
    151.2 KB · Views: 1,912
   / So you think converting a Pin-On to QA is Easy! #4  
You have convinced me. I would rather spend the $700 for the new bucket and see what I could get for the old one on Craigslist or Ebay. :laughing:
 
   / So you think converting a Pin-On to QA is Easy! #5  
I didn't think it was quite as easy as others let on, but, you gotta remember that K0ua was using un undersized torch for the job. That makes a huge difference(no offense is intended with this post, ya use what ya got).

A larger torch may have helped, but I'll probably never know.............because this thread has pretty much convinced me to leave mine the way it is:laughing::laughing:
 
   / So you think converting a Pin-On to QA is Easy! #6  
James:

That is a heck of a lot of work you've been doing. I'll bet you're one tired camper at the end of each day.

If I may correct some of your terminology. What you refer to as a "Continuous rolled weld" is actually called a "Fillet weld." What you are calling a "Spot weld" is actually a "Plug weld." Spot and plug welds are somewhat similar; but a plug weld has a hole drilled in one of the metal pieces to be joined, while a spot weld does not. Spot welds are commonly used on sheet metal. However; breaking apart a plug weld and a spot weld involves drilling out the weld as you have done.
 
   / So you think converting a Pin-On to QA is Easy!
  • Thread Starter
#7  
You have convinced me. I would rather spend the $700 for the new bucket and see what I could get for the old one on Craigslist or Ebay. :laughing:

That is what I did, I paid the $600 for a new bucket, but they offered $100 for the old bucket, and for that I decided to just keep it. They didnt really want it at all, because they said they had 4 o5 of them on the back lot in the weeds. I was thinking for the $124 I paid for the QA plate, how hard could it be to cut off a bit of metal, and weld on the plate.? HA HA

James K0UA
 
   / So you think converting a Pin-On to QA is Easy! #8  
All I can can is (and I am gonna get flamed for it) I sure am glad JD includes a QA bucket as a standard feature on all of their CUT's....:laughing::laughing::laughing:

Nice job James:thumbsup:
 
   / So you think converting a Pin-On to QA is Easy!
  • Thread Starter
#9  
James:

That is a heck of a lot of work you've been doing. I'll bet you're one tired camper at the end of each day.

If I may correct some of your terminology. What you refer to as a "Continuous rolled weld" is actually called a "Fillet weld." What you are calling a "Spot weld" is actually a "Plug weld." Spot and plug welds are somewhat similar; but a plug weld has a hole drilled in one of the metal pieces to be joined, while a spot weld does not. Spot welds are commonly used on sheet metal. However; breaking apart a plug weld and a spot weld involves drilling out the weld as you have done.

Yes, pretty tired, " A heating and a beating, banging knocking grinding" The welding part was pretty easy. Just getting the metal off was difficult for me, Yes a bigger torch would have made it easier, to get the ears off, but getting the base metal part of the ears removed is still going to be a pain for anyone, I think. Thanks for educating me on the terminology of some of the weld types. I had heard of them but wasn't sure what to call everything. All I can say is the Kubota guys have things pretty well welded together, and it ain't gonna fall off by itself anytime soon.:laughing:

James K0UA
 
 
Top