Homemade quick attach

   / Homemade quick attach #101  
Unfortunately, I may have to wait until after the new year to find out about ordering the bushings. Patience is not my strong suit. Today, I got a little done by cutting two side plates to length and drilling pilot holes for what will eventually be the holes for the bushings. I'm very annoyed at my chop saw, which tilts out slightly at the last third of each cut, meaning that it's impossible to get a cut that's square along its entire length. I may use this as my justification for buying a bandsaw.

I was unreasonably happy to be able to tack weld the two side plates together and drill the pilot holes through both at the same time, ensuring that they lined up perfectly. Eventually, welding may become passe to me, but for now, it's a thrill every time I stick two pieces of metal together in some marginally useful way.

I'm pondering the right way to design the "U" shaped channel on the top of the bucket-side of the adapter. It seems like it would be easier to pick up the bucket if it flared a little. But I'm not sure whether I should just angle out one side of the channel a little bit, still leaving the half-round tubing at the bottom, or whether I should make the sides of the channel parallel for some distance and then flare. The image below illustrates what I'm talking about.
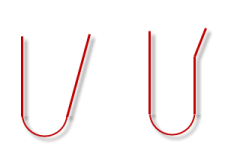
12-29-2012 10-41-18 PM.png

Or, the third option: flare not necessary at all and I'm over-thinking it.
 
   / Homemade quick attach #102  
Instinct tells me a flare will make loading easier, and the OCD side of my brain tells me a short section of straight "U" is going to be stronger and less liable to slop out than a one sided "V" like the image on the left. I tend to overbuild things, whether that's part of it or not I don't know. If you DO make the bottom a true "U" shape, as long as it extends up to slightly above the center line of the pin that should be enough.

Sean
 
   / Homemade quick attach #103  
I think a little flair is needed to make connecting up with the pins a bit easier. As long as the saddle for the pin to set in is the correct size I don't think it will really matter much.
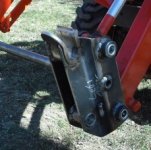
I plan on doing something lik this set is, I don't remember where I saved this picture from but it shows how he did it.


image-536095515.jpg
 
   / Homemade quick attach #104  
Go with the drawing on the right. You need some flare to help get it started into top pins, otherwise you will need to be in "perfect position" forward & back plus square with the attachment when driving into it. Keep the pin slot parrallel to allow for some variation in vertical measurement of pin center to center distance from 1 attachement versus another.
 
   / Homemade quick attach #105  
Go with the drawing on the right. You need some flare to help get it started into top pins, otherwise you will need to be in "perfect position" forward & back plus square with the attachment when driving into it. Keep the pin slot parrallel to allow for some variation in vertical measurement of pin center to center distance from 1 attachement versus another.

And THAT is why we talk about this stuff, to get ideas! Really good point, it reminded me that the last thing you want is to have the holes spaced too close together so the pin won't go in.. slightly too far apart is no problem..

Sean
 
   / Homemade quick attach
  • Thread Starter
#106  
If you're going to flare one side and keep it parrallel all the way down might as well flare the other side a little bit too if you can and make it easier on yourself later. I flared mine pretty good and after the fact am happy I did it that way as its different latching on the bucket 6 feet behind it with not great visibility and using the tractors hydraulics. Plus you cant really see that front flare too well, you kinda rely more on the rearward part of the ear as thats what you can see. What I also did was I took the front flare that engages the pin first, I tipped both of those in on each side so as to not have a sharp corner that would dig into my bucket ears and turn the bucket out of alignment. I maybe bent them 1/8 inch in each and custom made a filler plate to match. Hard to see in my photos.


Ps- Also keep in mind your depth of the pin throat, if too deep may interefere with your bucket.. What I mean is if you you make it too deep the tips of your adaptor will hit the back of the bucket before the pins really engage the throat of tha adaptor. Again, really depends on your bucket setup. My pins are 1.25 and the bucket ears were shallow so I didnt have a lot of clearance and couldnt make my adaptor throat too deep, especially the front half of the throat as when you hook up its half driving into and half curl/lifting up to get the hookup started. Its nice not to have to worry about binding the adaptor between the pin and back of the bucket. If that makes sense..
 
   / Homemade quick attach #107  
How about something like this?
QA hook modified.jpg

Extend the back of the U up higher (blue line) to give something to push on the pin when driving into it. That way if one side hits first it just pushes the bucket square with the other.
Taper the side plates at the front to allow better roll into the pin. And as Puckgrinder mentioned taper the leading corners of the flange to give easier alignment coming into it.
 
   / Homemade quick attach #108  
How about something like this?
<img src="http://www.tractorbynet.com/forums/attachment.php?attachmentid=295437"/>

Extend the back of the U up higher (blue line) to give something to push on the pin when driving into it. That way if one side hits first it just pushes the bucket square with the other.
Taper the side plates at the front to allow better roll into the pin. And as Puckgrinder mentioned taper the leading corners of the flange to give easier alignment coming into it.

I like that. That's pretty smart.
 
   / Homemade quick attach
  • Thread Starter
#109  
The back definatly should be higher, if you have staggared pins its even more important because the way you angle the attachment into the bucket ears will be a little easier to get right because you're never picking straight up on the pin, you more or less drive into the pin and just curling the bucket back should make the connection.
 
   / Homemade quick attach #110  
How about something like this?
View attachment 295437

Extend the back of the U up higher (blue line) to give something to push on the pin when driving into it. That way if one side hits first it just pushes the bucket square with the other.
Taper the side plates at the front to allow better roll into the pin. And as Puckgrinder mentioned taper the leading corners of the flange to give easier alignment coming into it.

That is exactly what the carter 3pt hitch "quickhitch" looks like

Welcome to CARTER AND SON'S TOOL AND DIE
 
 
Top