joshuabardwell
Elite Member
Got some more work done today.
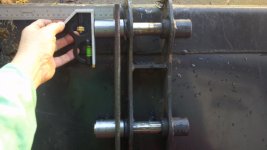
I used the existing bucket ears and pins as a jig to align the bushings on my side-plates. The small bushings are flush on the back side, but the larger bushings extend inside the ear about 1/4". I figure the safest thing to do is to re-create the bucket's construction as closely as possible. I used a speed square to transfer the dimension from the bucket to the side-plate. Now that I think about it, the fact that my side-plates are 3/8" instead of 1/4" may mean that the speed-square method will be off by 1/8", but I can work that out after the fact. The key dimension is the spacing between the inside ends of the bushings. By making the QA side-plates 1/8" further apart than the bucket's, I believe I can compensate for my mistake.
I carefully aligned everything, then put in two tacks on each bushing. I re-checked all measurements, then removed the side-plate from the bucket and finished welding up. The tacks were on the outside, so I did all the welding on the inside where it was clean, before I ground out the tacks and welded up the outside. The factory bucket only has welds on one side of the plate, but I figure it can't hurt to over-engineer in this case.
The welds were made with 1/8" E7018 at about 110-120 amps. I knew things were going well when my slag started popping off by itself, or after one light scratch with the hammer.
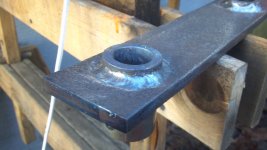
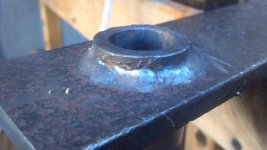
There is a lot of room for improvement, but I was actually pretty pleased with how they came out. Especially since I am welding on the round, which I have never done before. To make life easier for me, I laid the pieces down and welded in the flat position. It essentially became a round fillet. The holes that I drilled in the side-plates are 1 5/8", while the OD of the bushings is 1 1/2". This was necessary to give enough slop in the placement of the holes to allow exact alignment of the bushings with the bucket pins. Since the bushings were not centered in the holes, I had as much as 1/8" of gap to fill as I welded up. I ground the ends of some electrode stubs to about 1/16" thickness and stuck them into the gap before tacking, so that the gap around the bushing was as small as possible in each direction. With the large bushings, I got good results by holding the rod more towards the horizontal, to try to avoid shooting heat down through the gap. I suppose one risk of this method is that I may have insufficient penetration into the side-plate, but given that there was between 1/16" and 1/8" gap to accept the weld metal, I'm hopeful that helped things out. The welds look to me like they have okay penetration.
Another problem that I ran into was, after welding up the back side, there was some left-over slag in the gap that I had to get out before welding up the front side. I didn't think it would be a good idea to weld over it. I picked it out the best I could with the edge of a file, but there was certainly some left, and I think that is the most likely cause of the porosity that you can see in some areas of the welds.
On the front side of the small bushing, it was harder, because I wanted to push the heat towards the bushing to avoid burning out the gap, but at the same time, I had very little room to play with before I melted off the top corner of the bushing. To make this a bit easier, I switched down to 3/32" electrodes, and my welds suffered a bit because of it. For whatever reason, I weld worse with 3/32" than I do with 1/8". I had an easy time on the back because the two pieces were flush. So it was basically just a flat weld with a gap. I was careful to keep the puddle away from the inside edge of the bushing, because I didn't want mess up that nice, machined surface.
Here are the two finished side plates, inside and outside.
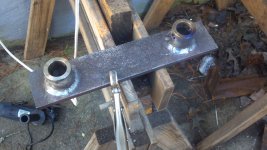
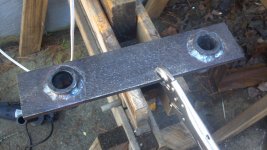
I am going to finish up one entire adapter before moving on to the second one, so that I find any problems before I've got too much work into the project. The next step will be to bring the tractor over to the work area and install the side plates onto the loader arm. What I plan to do is to put a section of flat stock across the front of the unit to basically create a U shape, then I will build the bucket-side part of the QA and weld the two together. I dunno... I may just get some thin strips of 1/4" flat and tack the side plates in position relative to each other before moving on. I'm still not 100% sure how I'm going to put the loader-side and bucket-side section of the adapter together. If anybody has any detailed photos of theirs that they would like to post, I'd appreciate it.

I used the existing bucket ears and pins as a jig to align the bushings on my side-plates. The small bushings are flush on the back side, but the larger bushings extend inside the ear about 1/4". I figure the safest thing to do is to re-create the bucket's construction as closely as possible. I used a speed square to transfer the dimension from the bucket to the side-plate. Now that I think about it, the fact that my side-plates are 3/8" instead of 1/4" may mean that the speed-square method will be off by 1/8", but I can work that out after the fact. The key dimension is the spacing between the inside ends of the bushings. By making the QA side-plates 1/8" further apart than the bucket's, I believe I can compensate for my mistake.
I carefully aligned everything, then put in two tacks on each bushing. I re-checked all measurements, then removed the side-plate from the bucket and finished welding up. The tacks were on the outside, so I did all the welding on the inside where it was clean, before I ground out the tacks and welded up the outside. The factory bucket only has welds on one side of the plate, but I figure it can't hurt to over-engineer in this case.
The welds were made with 1/8" E7018 at about 110-120 amps. I knew things were going well when my slag started popping off by itself, or after one light scratch with the hammer.


There is a lot of room for improvement, but I was actually pretty pleased with how they came out. Especially since I am welding on the round, which I have never done before. To make life easier for me, I laid the pieces down and welded in the flat position. It essentially became a round fillet. The holes that I drilled in the side-plates are 1 5/8", while the OD of the bushings is 1 1/2". This was necessary to give enough slop in the placement of the holes to allow exact alignment of the bushings with the bucket pins. Since the bushings were not centered in the holes, I had as much as 1/8" of gap to fill as I welded up. I ground the ends of some electrode stubs to about 1/16" thickness and stuck them into the gap before tacking, so that the gap around the bushing was as small as possible in each direction. With the large bushings, I got good results by holding the rod more towards the horizontal, to try to avoid shooting heat down through the gap. I suppose one risk of this method is that I may have insufficient penetration into the side-plate, but given that there was between 1/16" and 1/8" gap to accept the weld metal, I'm hopeful that helped things out. The welds look to me like they have okay penetration.
Another problem that I ran into was, after welding up the back side, there was some left-over slag in the gap that I had to get out before welding up the front side. I didn't think it would be a good idea to weld over it. I picked it out the best I could with the edge of a file, but there was certainly some left, and I think that is the most likely cause of the porosity that you can see in some areas of the welds.
On the front side of the small bushing, it was harder, because I wanted to push the heat towards the bushing to avoid burning out the gap, but at the same time, I had very little room to play with before I melted off the top corner of the bushing. To make this a bit easier, I switched down to 3/32" electrodes, and my welds suffered a bit because of it. For whatever reason, I weld worse with 3/32" than I do with 1/8". I had an easy time on the back because the two pieces were flush. So it was basically just a flat weld with a gap. I was careful to keep the puddle away from the inside edge of the bushing, because I didn't want mess up that nice, machined surface.
Here are the two finished side plates, inside and outside.


I am going to finish up one entire adapter before moving on to the second one, so that I find any problems before I've got too much work into the project. The next step will be to bring the tractor over to the work area and install the side plates onto the loader arm. What I plan to do is to put a section of flat stock across the front of the unit to basically create a U shape, then I will build the bucket-side part of the QA and weld the two together. I dunno... I may just get some thin strips of 1/4" flat and tack the side plates in position relative to each other before moving on. I'm still not 100% sure how I'm going to put the loader-side and bucket-side section of the adapter together. If anybody has any detailed photos of theirs that they would like to post, I'd appreciate it.
