Homemade quick attach

   / Homemade quick attach #141  
Rich. Thanks for posting pictures of your adaptors and such. Your receiver hitch adaptor gave me all kinds of ideas. I had the thought of building some sort of an attachment that could be welded on, cut on, butchered and altered to suit any given need as situations arose. But with your setup, I can leave it alone and simply make any adaptor to fit the attachment. Hm, it just so happens that I have an oddball reveiver hitch laying around somewhere, now if you will excuse me,,,,,,,,,,,,,,,,,,,,,,,,
steve

P.S., just looked at the pictures again. Any one else notice that Rich drilled out some large nuts and used them as bushings?
 
   / Homemade quick attach #142  
Nice catch Steve! I had not noticed that but what a great idea! dom tubing ppbbbht!
I also like your hitch Rich! looks good and functions as it should! Kubota didn't make a QH for my LA302l .....so I DID!!
 
   / Homemade quick attach #143  
I also like the hitch idea -- an completely missed the nuts. I've drilled out nuts in the past for other (similar) purposes but never thought of it for this.

Rich, what's that trimmer attachment?
 
   / Homemade quick attach #144  
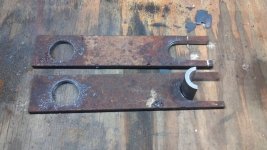
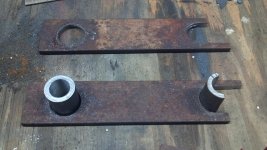
I got a little more work done. First, I took the DOM tubing to a local machine shop, where they reamed it out to the proper size to receive the 1" pin. It cost $25, which is about as much as a reamer would have cost me, but I decided it was worth the cost to have it done right, versus me hacking away at it. All told, the DOM tubing has been the single most expensive part of this endeavor: $12 for the tubing, another $15 for the shipping, and another $25 to have it reamed out. I guess the factory bushings were also about $50, come to think of it.
2013-02-06 14.47.52.jpg

I drilled the holes with a hole saw, then put the bandsaw in the vertical position and cut straight in to make the "cup" for the top. I have been drilling my holes 1/8" oversize to allow precise placement of the bushings, but for the top hole, I drilled it exactly to size, so that I could hit the 9-o'clock and 3-o'clock position exactly with the vertical parts of the "cup".

Cutting the DOM tubing in half lengthwise to make the bottom of the "cup" was difficult. I finally ended up just pushing it through the bandsaw in the vertical position. I did this before cutting it to length, to give me an extra few inches of tube to grip onto.
2013-02-06 15.19.45.jpg

Next, I cut the top of the side plate down. We had previously discussed leaving the back of the bracket longer than the front, to allow pushing on the implement to line up the loader arms with the implement. After thinking about how the bracket will be used, I am thinking that it may make more sense to leave the front of the bracket long, to allow for reaching out and picking up the implement, versus pushing into it. For a three-point hitch, which was the original example, it seems like having the back of the bracket long makes sense, because you can't "reach out" with a three-point. You are just going to push into the implement and then lift. But with loader arms, you can reach out and pick up, and it seems that would give better visibility, since the QA adapter would be going underneath the bucket pins.

Next step is to tack weld the bushings in place and then get some flat plate made up to finish the vertical walls of the "cup". But I can't run the grinder while the kid is taking a nap, so I can't weld at the moment. More to come!
 
   / Homemade quick attach #145  
I've got another question for y'all: what does the factory QA do about grease on the bucket-side? On the loader-side, I can use the factory pins that have zerks, and the loader arms and hydraulics have grease channels. But on the bucket side, none of that is true. And on the top, the pin isn't even fully enclosed. I'm not sure which would be more of a PITA: manually greasing the bucket-side pins, or cutting grease channels and installing zerks.
 
   / Homemade quick attach #146  
The pins on bucket side do not move so they don't really need much grease. You can smear some on the pins but they will just be a mess when you remove the bucket.
 
   / Homemade quick attach #147  
The pins on bucket side do not move so they don't really need much grease. You can smear some on the pins but they will just be a mess when you remove the bucket.

Oh, of course. It's only when the loader arms extend and retract that the pin angle changes, and only on the arm side. Thanks!
 
   / Homemade quick attach #148  
I've got another question. In the video example on Youtube, the guy picks up the bucket with the top pins and it falls into place against the QA bracket such that the holes line up and the bottom pins can be easily inserted. How is this accomplished? What does the bucket butt up against to line up the holes? It can't be that the bracket is flush with the back wall of the bucket. It seems like that would make it too hard to pick the bucket up. Is there maybe a spacer or something?

I can think of various ways of solving this problem, but I have a sense that there may be a much more clever solution that already exists.
 
   / Homemade quick attach #149  
I've got another question. In the video example on Youtube, the guy picks up the bucket with the top pins and it falls into place against the QA bracket such that the holes line up and the bottom pins can be easily inserted. How is this accomplished? What does the bucket butt up against to line up the holes? It can't be that the bracket is flush with the back wall of the bucket. It seems like that would make it too hard to pick the bucket up. Is there maybe a spacer or something?
I can think of various ways of solving this problem, but I have a sense that there may be a much more clever solution that already exists.
Usually the top hooks are J shaped to that you can pickup the bucket with them.

Aaron Z
 
   / Homemade quick attach #150  
Joshua, are you going to grind the plates to clean them up before welding? ...after you kid wakes up?
 
 
Top