Homemade quick attach

   / Homemade quick attach #151  
Usually the top hooks are J shaped to that you can pickup the bucket with them.

Aaron: sorry if I'm being obtuse, but I'm not sure how this answers my question. I can see how to design the top-front of the QA adapter so as to allow picking up the implement via the top pins. I'm not sure the best way to ensure that the implement's front-bottom holes line up with the matching holes on the QA when the bucket is picked up by the top pins. The bucket will fall backwards until it hits the bracket, I think. Maybe the right thing to do is to weld offsets onto the bucket so that when it hits the bracket, the holes line up.

Joshua, are you going to grind the plates to clean them up before welding? ...after you kid wakes up?

Yes, exactly. At least the areas that will be welded. It's surplus steel, so it's pretty rusty even after I've run over it with a wire wheel. I plan to try electrolytic rust removal on the two brackets before welding the rod in between them and then painting. That should be pretty cool!
 
   / Homemade quick attach
  • Thread Starter
#152  
I've got another question. In the video example on Youtube, the guy picks up the bucket with the top pins and it falls into place against the QA bracket such that the holes line up and the bottom pins can be easily inserted. How is this accomplished? What does the bucket butt up against to line up the holes? It can't be that the bracket is flush with the back wall of the bucket. It seems like that would make it too hard to pick the bucket up. Is there maybe a spacer or something?

I can think of various ways of solving this problem, but I have a sense that there may be a much more clever solution that already exists.


Thought about that too when building mine. I didnt worry about that so much as I have different attachments and welding a stopper for one may not work with another another attachment. I would get your QA all done first, and then attach your bucket with all pins in place, and then just weld a small 1/4 or 1/2 sliver of metal ( maybe an inch or two tall) where the bucket ear would contact it on the QA. For me it became a moot point as you'll see when you get yours done you'll likely have to move the attachment around slightly to get the lower pins to slide through. Its easy enough and you can mitigate any straining to move the attachment by simply curling the QA down so your attachment more or less is nearly swinging on the top pin. Just a little bit of trial and error thing. My pins slide in pretty nicely, each attachment hooks up slightly different in the sense they all are weight diffrently. The forks for instance i tend to curl down more than a bucket due to the weight hanging out so far.
 
   / Homemade quick attach #153  
As you said Joshua, longer side on the front of the U on the top pins is the way to go. No grease needed on the top pin, it never moves. Messy but I find it does help quite a bit on the bottom pin. A bigger help (which I have yet to do) is to have a loop on the bottom pin big enough to get your hand in to pull/push/twist as you install/remove. My factory ones are impossible to get a hold of when fully seated.

The factory QA has a stop built in to line the pins up for installation. It's not perfect and I usually lift the bucket elbow high that I can give it a bit of a push as needed to perfect the line up. I have to build up the ear on my forks so that they hit the stop but they are light enough that they are easy to push by hand to line up. I'll see what happens in spring when I build a grapple.
 
   / Homemade quick attach #154  
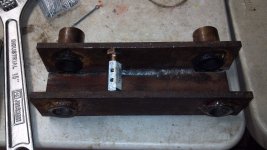
Well, folks, I have hit what, for me, is currently a showstopper. Here's the situation. I realized that, in order to get the bucket side of the adapter narrow enough to fit within the ears, I was going to have to put a plate across the front of the loader-side. If you look at the factory adapter, you'll see they just do a dog-leg bend to bring the bucket side in, but of course that's not an option for me. So I put a plate across the front, making the loader-side of the bracket into a U, and no matter how carefully I did it, the way the weld pulled on the joint when it cooled pulled the bushings out of alignment with each other. It's not very much out of alignment--if I get two big adjustable wrenches and pull hard, the pin just slips right through. But it's far enough that I don't consider it workable.

The way I see it, there are at least three approaches. 1) heat the joint with a torch and bend it. Problem: I don't have a torch. 2) Run a reamer through the bushings to open them up and put them back in alignment. Problem: I don't have a reamer and I'm concerned that the amount I would have to open them up to bring them back into alignment would make the pins too sloppy. 3) drive the pins in with a hammer and never take the QA adapter off the tractor again. Hmmm... tempting, but obviously unacceptable. I tried going hot and welding up the outside of the joint, to try to pull the pieces back into alignment, and it made a tiny bit of difference, but not enough.

Any thoughts? I wish I could just get a great long lever and bend the thing, but it's got enough flex that it always pops back the way it was. At the moment, I'm at a dead stop until I solve this.
 
   / Homemade quick attach
  • Thread Starter
#155  
I had the same issues. I had a torch though and was able to bend what i needed back into position, hence why I said way back when using a press brake would be the ideal way to do this as the heat distorts everything it seems. It took a little adjusting to get it where I wanted it.
 
   / Homemade quick attach #156  
So right now you have just the U for the tractor side without the bucket pieces? Set it with the ears of the U down on something very solid and hit it with a BFH in the center of the U and you'd be surprised how much you will be able to bend it out. Ideally use the round of a ball-peen hammer. Hit solid and hard and check after every couple swings for pin fitment. Once you get them to fit, don't do any further welding without pins installed and only weld a bit at a time.

Is the binding just between the pin and the 2 sides of the U or does it bind on the loader/cyl mount also? If it only binds on the QA adapter, it's really not that big of a deal, you'll likely never take is back off again anyway.
 
   / Homemade quick attach #157  
Joshua,

Maybe you explained it in your post and I didn't understand but I'll offer suggestions for both ways...

If the two top ends of the 'U' are too close... try to drive something just slightly wider in between and then lay the bracket on its side, on something solid (I have a short piece of railroad rail just for this purpose) and hit it hard with a BFH all the way along the welds. You'll be surprised how much it will open up.

If the tops of the 'U' are too far apart, squeeze with a c-clamp and pound with the BFH as described above.

You could also go back to the machine shop... they likely have a hydraulic press that could 'massage' it slightly.
 
   / Homemade quick attach #158  
Thanks, folks. I will give these suggestions a try and let y'all know how it goes.
 
   / Homemade quick attach #159  
Great looking work guys,this a very informative thread,keep the posts coming.
 
   / Homemade quick attach #160  
Have I mentioned how awesome you guys are? You're awesome! I keep having to remind myself that this is a learning project, and boy am I learning.

2013-02-08_20-30-56_86.jpg

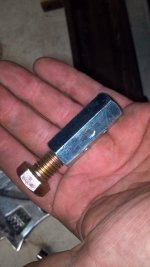
Per your suggestions, I rigged up a spreader by buying one of the couplers they make for all-thread and mating it with a bolt. I bought a grade 8 bolt because I wasn't sure how much pressure the threads would be under, and since I was just buying one, the price difference was negligible.

2013-02-08 20.30.40.jpg

I applied pressure to the side-plates until the pin slid in as smoothly as possible, then I turned the bolt another half-turn or so until the pin bound. I figured taking it slightly past the desired point would be helpful. One of the pins had to be expanded, and the other had to be compressed (I used a C-clamp). Then I beat on it with a 4-lb mallet. Shortly thereafter, the bushings were as aligned as they were going to be.

In retrospect, this could all have been avoided if I had drilled the holes, then built the adapter, then aligned and welded in the bushings. However, this would have prevented me from welding up the back side of the bushings, which is one reason I did it the way I did. I'm not sure which would be more desirable: easily aligning the bushings or having full-pen welds. Because the bushing holes were drilled oversized, not welding up the back side would leave an ugly gap. Only I would know it was there, but I'd know.

Anyway... onwards I go with this silly project.
 
 
Top