BatesBunch
Member
- Joined
- Feb 21, 2008
- Messages
- 45
- Location
- Picayune, MS
- Tractor
- Kubota B2320HSD; Prior/Sold Tractors: Yanmar YM1500D (Green), Yanmar YM3110D
Another option for a Front End Loader (FEL) Bucket Level Indicator...
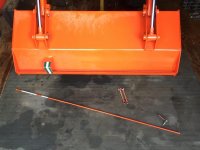
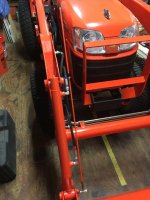
I saw multiple posts on TBN and around the internet for DIY FEL Bucket Level Indicators while looking for ideas for one to install on my Kubota B2320 w/LA304 FEL. I set off to town to get the 'parts' after I had decided on a variation of several different 'designs'. My initial design was going to be the typical steel rod, but that changed while I was shopping/configuring and I came up with an indicator that consists of very inexpensive parts and was a fairly quick & simple install. I decided to go with a fiberglass rod as it would be more forgiving than a steel rod, if bumped (and I liked that the orange rod was a close match to the Kubota Orange). Stainless steel hardware was used to ensure a clean and maintenance free installation.
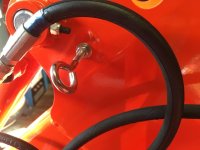
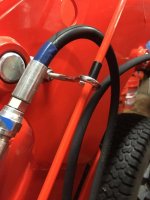
- An eye bolt was used for the rod 'guide' as the LA304 FEL already had a couple of factory holes near the bucket cylinder pins on the loader arms. A 3" eye bolt was chosen to ensure that there was enough clearance between the rod and the bucket cylinder hoses.
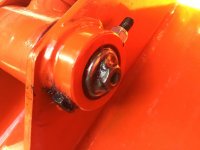
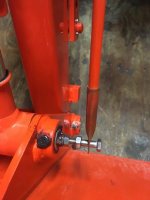
- Rather than drill & tap the cylinder pin at the bucket, a 1/4-20 nut was tack-welded (on 3 of 6 nut 'flats') to the center of the cylinder pin to create a mounting point for the rod 'pin'.
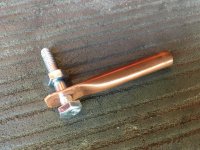
- A 1/4-20 x 1 1/2" bolt was used as the rod pin. A nut was 'bottomed' at the end of the threads, limiting the travel of the rod end to the bolt shoulder between the bolt head and nut. A second nut was used as a lock/jam nut against the welded nut to lock the pin in place.
- A piece of 3/8 copper tubing was used for the rod end as the fiberglass rod slipped snugly inside. 3/4" of the tubing was flattened to form a 'tab' and drilled with a 1/4" hole for the rod pin. The original plan was to use a 3/8" x 3/4" long steel spacer and tack-weld a 1/4 flat washer to one end to use as the rod sleeve/end. Another variation would be to make or modify a clevis end to slide onto the rod. Both are still options if the copper rod end doesn稚 hold up.
- Rod was trimmed to 2" above the eye bolt guide with the bucket in the fully-dumped position and the protective cap reinstalled.
- Electrical tape was used to mark the 'bucket level' location on the rod at the eye bolt guide.
Parts list (prices/total before sales tax):
48" Reflective Fiberglass Marker Rod; $1.99 @ Home Depot (HD); found with other driveway markers/mailboxes
1/4-20 x 1 1/2" Stainless Steel (SS) Bolt (Rod 'Pin'; $0.42 @ HD
1/4-20 SS Nuts, 3 ea; $0.26 ea @ HD
1/4-20 Std Nut (to weld onto the bucket cylinder pin & become the mount for the level indicator rod pin); no cost (had on hand)
1/4-20 x 3" SS Eye Bolt (Rod Guide) (comes with one SS nut); $1.49 @ Tractor Supply Co. (TSC)
1/4 SS Flat Washers, pack (only needed 2 ea for the eye bolt); $0.99 @ TSC
3/8" Copper Tubing, 3" length (to fabricate rod end); no cost (had on hand)
Total cost: $5.67
I appreciate the ideas that I have gleaned from in the past and hope that this idea may benefit others.
I saw multiple posts on TBN and around the internet for DIY FEL Bucket Level Indicators while looking for ideas for one to install on my Kubota B2320 w/LA304 FEL. I set off to town to get the 'parts' after I had decided on a variation of several different 'designs'. My initial design was going to be the typical steel rod, but that changed while I was shopping/configuring and I came up with an indicator that consists of very inexpensive parts and was a fairly quick & simple install. I decided to go with a fiberglass rod as it would be more forgiving than a steel rod, if bumped (and I liked that the orange rod was a close match to the Kubota Orange). Stainless steel hardware was used to ensure a clean and maintenance free installation.
- An eye bolt was used for the rod 'guide' as the LA304 FEL already had a couple of factory holes near the bucket cylinder pins on the loader arms. A 3" eye bolt was chosen to ensure that there was enough clearance between the rod and the bucket cylinder hoses.
- Rather than drill & tap the cylinder pin at the bucket, a 1/4-20 nut was tack-welded (on 3 of 6 nut 'flats') to the center of the cylinder pin to create a mounting point for the rod 'pin'.
- A 1/4-20 x 1 1/2" bolt was used as the rod pin. A nut was 'bottomed' at the end of the threads, limiting the travel of the rod end to the bolt shoulder between the bolt head and nut. A second nut was used as a lock/jam nut against the welded nut to lock the pin in place.
- A piece of 3/8 copper tubing was used for the rod end as the fiberglass rod slipped snugly inside. 3/4" of the tubing was flattened to form a 'tab' and drilled with a 1/4" hole for the rod pin. The original plan was to use a 3/8" x 3/4" long steel spacer and tack-weld a 1/4 flat washer to one end to use as the rod sleeve/end. Another variation would be to make or modify a clevis end to slide onto the rod. Both are still options if the copper rod end doesn稚 hold up.
- Rod was trimmed to 2" above the eye bolt guide with the bucket in the fully-dumped position and the protective cap reinstalled.
- Electrical tape was used to mark the 'bucket level' location on the rod at the eye bolt guide.
Parts list (prices/total before sales tax):
48" Reflective Fiberglass Marker Rod; $1.99 @ Home Depot (HD); found with other driveway markers/mailboxes
1/4-20 x 1 1/2" Stainless Steel (SS) Bolt (Rod 'Pin'; $0.42 @ HD
1/4-20 SS Nuts, 3 ea; $0.26 ea @ HD
1/4-20 Std Nut (to weld onto the bucket cylinder pin & become the mount for the level indicator rod pin); no cost (had on hand)
1/4-20 x 3" SS Eye Bolt (Rod Guide) (comes with one SS nut); $1.49 @ Tractor Supply Co. (TSC)
1/4 SS Flat Washers, pack (only needed 2 ea for the eye bolt); $0.99 @ TSC
3/8" Copper Tubing, 3" length (to fabricate rod end); no cost (had on hand)
Total cost: $5.67
I appreciate the ideas that I have gleaned from in the past and hope that this idea may benefit others.
")
