mars1952
Silver Member
- Joined
- Jan 12, 2007
- Messages
- 238
- Location
- Western North Carolina
- Tractor
- 1999 John Deere 4300 12/12 sync-reverse
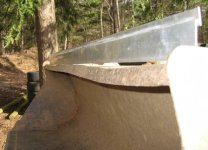
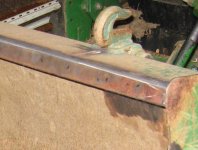
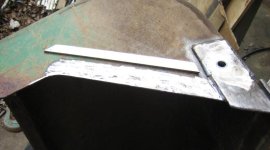
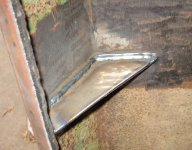
Hi Everyone: I would like to share the mods that I did to my FEL bucket on my JD 420 loader. The bucket had been bent and beat up even before I bought it. The previous owner was a rock mason. The sides and top were dinged pretty bad. I hammered out the dings a couple months ago and didn't take pictures. I used two sledge hammers, one as a backer and the other to hammer. The dings were mostly gone but the top of the bucket was wavy (see Bent Bucket.jpg). I straightened the bucket using a Hi-Low jack. I bent the bucket a little past straight and let it flex back (see straight bucket.jpg). Next I cut and cleaned up a piece of 1/4" scrap ([URL="http://www.tractorbynet.com/forums/attachments/customization/70081d1171215650-straightened-renforced-added-toothbar-front-bucket-scrap-prepared-welding.jpg"]Bucket and scrap prepared for welding[/URL].jpg) and tacked it to the top edge of the bucket. I had to clamp and tack every few inches and do alot of hammering but it is a lot straighter than it was (see scrap tacked on.jpg. Next I welded the piece on solid and filled the gap where the bucket was rounded on the top (see fill weld on top of scrap.jpg). Then I ground a rounded edge on the top of the scrap to make it look more like the factory rounded edge (see filled and blended top edge.jpg).
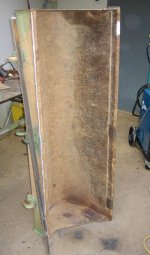
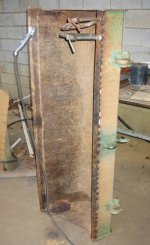
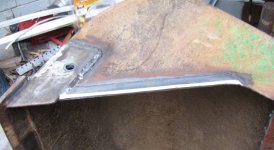
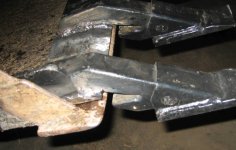
The sides of the bucket had been dinged up and I straightened them but I have a lot of rock work to do so I decided to reinforce the sides of the bucket. I cleaned up the sides and some scrap and welded and beveled them (see Side reinforcement prepared for welding and side welded and beveled.jpg)
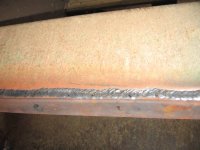
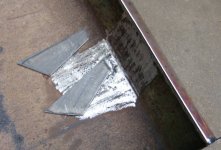
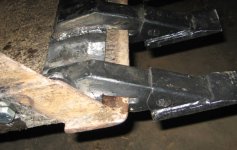
To further reinforce the top edge I put some gussets below the welded on grab hooks (see gussets cut and preped.jpg, and gusset welded.jpg).
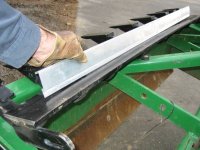
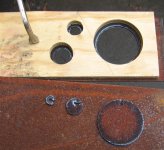
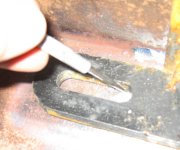
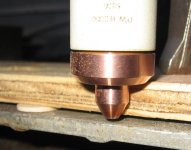
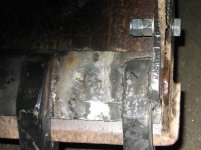
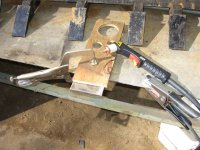
Actually I this whole project started when I tried to add a tooth bar. I started working on the tooth bar, got caught up in the reinforcing and then went back to the tooth bar. I bought a 6 ft tooth bar from a local dealer and shortened it. It was a lot a work and if I had to do it over again I would just have bought the parts and made my own tooth bar. Live and learn I guess. Anyway the bar was too long and since I don't like to waste anything and like things to be symmetrical I cut off both ends ground off two of the teeth and re welded them back on evenly spaced (see symmetrical tooth bar.jpg). After I had cut and welded the tooth bar I noticed the it had a bad bow to it (see bowed tooth bar.jpg). Some guys on this forum claim that they can stand on a 1/2" by 4" bar to bend it but my mere 230 lbs couldn't bend it so I used the tractor (see Straightening tooth bar.jpg). I stacked up blocks under the bar and ran over it with the tractor. I kept adding blocks and driving over it until it was almost perfect. Not being satisfied with almost perfect I ran over it one more time and bent it too far the other way. Oh well. I turned it over and bent it back but I couldn't get it a good as it was. I welded reinforcement plates for the tooth bar bolts and drilled a 5/8 hole. The wholes were off a little since I had used the bent tooth bar to mark them. I had to fill the holes with weld and I burned new holes with the Plasma cutter. I bought a Millermatic 251 mig welder and a Miller Spectrum 625 Plasma cutter halfway through this project. (see aluminum backing plate.jpg, plasma circle jig test.jpg, scribing the holes.jpg, scribed hole with pilot.jpg, and plasma jig hight.jpg)
The whole size was perfect in the 24 gauge test stock but was I burned through the 3/8 thick reinforced bucket the burn was tapered and I had to use a rat tail file to enlarge the hole.
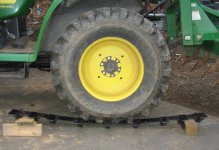
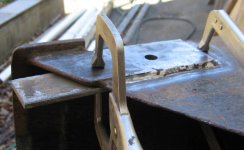
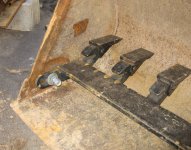
When I shorten the tooth bar I was careful to make it a loose fit. When I bolted it in I used washers between the bucket and the tooth bar to maintain the spacing. I used jam nuts to lock the nuts and protect the threads but the bolts are not completely tight. The loose fit and loose bolts allows the tooth bar to be moved forward and pivoted up and out of the way for back grading. (see tooth bar forward.jpg, toothbar seated.jpg, toothbar bolts.jpg and Tooth bar folded up 2.jpg)
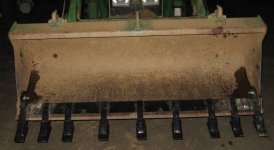
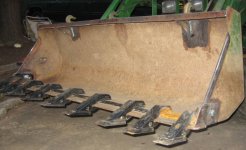
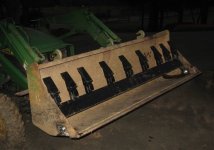
It is too cold to paint now. I think that I will send the bucket out to get blasted before I paint it. It will be a lot of work to clean it up. I plan to remove the center hooks to make room for a grapple. Well here it is ready for work and or paint. (see Bucket ready for cleanup2.jpg)
Marshall
The sides of the bucket had been dinged up and I straightened them but I have a lot of rock work to do so I decided to reinforce the sides of the bucket. I cleaned up the sides and some scrap and welded and beveled them (see Side reinforcement prepared for welding and side welded and beveled.jpg)
To further reinforce the top edge I put some gussets below the welded on grab hooks (see gussets cut and preped.jpg, and gusset welded.jpg).
Actually I this whole project started when I tried to add a tooth bar. I started working on the tooth bar, got caught up in the reinforcing and then went back to the tooth bar. I bought a 6 ft tooth bar from a local dealer and shortened it. It was a lot a work and if I had to do it over again I would just have bought the parts and made my own tooth bar. Live and learn I guess. Anyway the bar was too long and since I don't like to waste anything and like things to be symmetrical I cut off both ends ground off two of the teeth and re welded them back on evenly spaced (see symmetrical tooth bar.jpg). After I had cut and welded the tooth bar I noticed the it had a bad bow to it (see bowed tooth bar.jpg). Some guys on this forum claim that they can stand on a 1/2" by 4" bar to bend it but my mere 230 lbs couldn't bend it so I used the tractor (see Straightening tooth bar.jpg). I stacked up blocks under the bar and ran over it with the tractor. I kept adding blocks and driving over it until it was almost perfect. Not being satisfied with almost perfect I ran over it one more time and bent it too far the other way. Oh well. I turned it over and bent it back but I couldn't get it a good as it was. I welded reinforcement plates for the tooth bar bolts and drilled a 5/8 hole. The wholes were off a little since I had used the bent tooth bar to mark them. I had to fill the holes with weld and I burned new holes with the Plasma cutter. I bought a Millermatic 251 mig welder and a Miller Spectrum 625 Plasma cutter halfway through this project. (see aluminum backing plate.jpg, plasma circle jig test.jpg, scribing the holes.jpg, scribed hole with pilot.jpg, and plasma jig hight.jpg)
The whole size was perfect in the 24 gauge test stock but was I burned through the 3/8 thick reinforced bucket the burn was tapered and I had to use a rat tail file to enlarge the hole.
When I shorten the tooth bar I was careful to make it a loose fit. When I bolted it in I used washers between the bucket and the tooth bar to maintain the spacing. I used jam nuts to lock the nuts and protect the threads but the bolts are not completely tight. The loose fit and loose bolts allows the tooth bar to be moved forward and pivoted up and out of the way for back grading. (see tooth bar forward.jpg, toothbar seated.jpg, toothbar bolts.jpg and Tooth bar folded up 2.jpg)
It is too cold to paint now. I think that I will send the bucket out to get blasted before I paint it. It will be a lot of work to clean it up. I plan to remove the center hooks to make room for a grapple. Well here it is ready for work and or paint. (see Bucket ready for cleanup2.jpg)
Marshall
Attachments
-
 bent bucket.jpg57.3 KB · Views: 1,726
 -
 Bucket and scrap prepared for welding.jpg37.5 KB · Views: 1,402
 -
 scrap tacked on.jpg40 KB · Views: 1,013
 -
 fill weld on top of scrap.jpg54.2 KB · Views: 968
 -
 filled and blended top edge.jpg59.4 KB · Views: 854
 -
 Side reinforcement prepared for welding.jpg35.7 KB · Views: 932
 -
 side welded and beveled.jpg47.6 KB · Views: 751
 -
 gussets cut and preped.jpg59.6 KB · Views: 830
 -
 gusset welded.jpg70.1 KB · Views: 1,049
 -
 symmetrical tooth bar.jpg41.3 KB · Views: 1,194
 -
 bowed tooth bar.jpg62.1 KB · Views: 1,240
 -
 Straiting tooth bar.jpg58.9 KB · Views: 1,153
 -
 plasma circle jig test.jpg86.6 KB · Views: 1,691
 -
 scribing the holes.jpg51.5 KB · Views: 790
 -
 scribed hole with pilot.jpg61.5 KB · Views: 777
 -
 plasma jig hight.jpg51.5 KB · Views: 1,121
 -
 aluminum backing plate.jpg41 KB · Views: 1,097
 -
 tooth bar forward.jpg50.6 KB · Views: 1,110
 -
 toothbar seated.jpg56.3 KB · Views: 998
 -
 toothbar bolts.jpg69 KB · Views: 979
 -
 Bucket ready for cleanup2.jpg52.7 KB · Views: 1,638
Last edited:
")


![[URL="http://www.tractorbynet.com/forums/attachments/customization/70081d1171215650-straightened-renforced-added-toothbar-front-bucket-scrap-prepared-welding.jpg"]Bucket and scrap prepared for welding](http://www.tractorbynet.com/forums/attachments/customization/70081d1171215650-straightened-renforced-added-toothbar-front-bucket-scrap-prepared-welding.jpg)