Creating my Food Plot

   / Creating my Food Plot #11  
Hey Eddie,

Those are some great pics! That looks like some great fun. Did Harv have those pines sawed into boards or just take them to the pulpwood mill?

Here's a good planting guide that I stumbled across and have printed out. lotsa good information.

P2111 Wildlife Food Planting Guide -- For The Southeast
 
   / Creating my Food Plot
  • Thread Starter
#12  
Hey Dave,

Sorry it took so long to reply. I read through the link and really enjoyed it. Thank you.

Harvey hauled those logs for a friend of his. I told his friend that he could have all the trees that he wanted, I was clearing land and wanted to get rid of them any way I could. Not one of over two dozen loggers ever showed up, so he had quite a few trees to choose from. They hauled off quite a few, but I still ended up burning thousands of them.

I know he milled some of them into lumber, but don't know how many or how well they turned out.

Eddie
 
   / Creating my Food Plot
  • Thread Starter
#13  
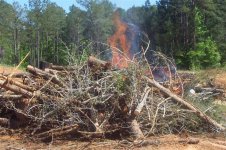
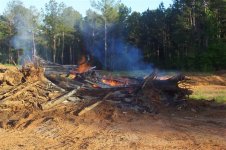
I've been struggling to get my burn pile to catch on fire and stay burning. I've started cutting the trees into shorter lengths and piling them on top of each other as tight as possible. This time, I guess it was ready to burn, as I lit it in one place and it just took off. It had rained two days earlier, so I wasn't worried about it getting too big. With the shorter logs and the tight packing of them with my backhoe, the fire never got very big. Most of the time it was just burning deep inside the pile.

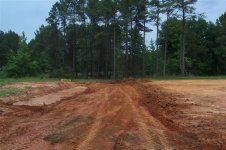
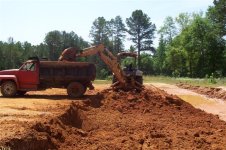
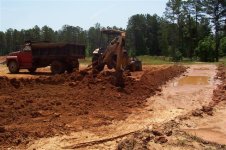
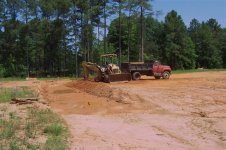
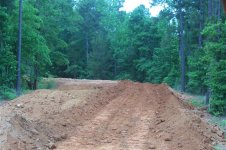
While it burned, I loaded dirt into my dumptruck and hauled it to an area that I'm building up. I need allot of dirt in that area since I'll be putting a sewage line in there and have to have 4 feet of dirt above the pipe. It also has to have the proper slope, so where it crosses a sort of valley, I have to build it up quite a bit. This is also a two lane road that makes a fairly sharp turn. It's probably the biggest road project on my land, but with enough dirt, it will work out very nicely. I just need allot more dirt!!!

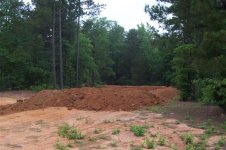
The food plot is taking shape. I have the bulk of the dirt piles gone and I'm starting to work on getting it graded to where I want it. That means another foot or two in some areas, while others are just right. In those areas that are just right, I took some soil samples and sent them off to by analysized. The results are on another thread that I started here. http://www.tractorbynet.com/forums/rural-living/119891-soil-analysis-help-appreciated.html

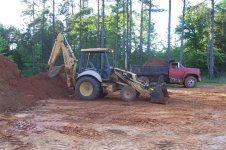
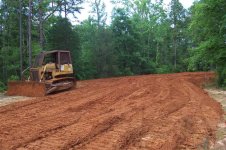
I've sort of developed a new way of moving the dirt. At first, I relied on the dozer to build up the piles, then the FEL to load them into the dump truck and haul them off to where I wanted it. I think I wasted allot of time and fuel by using the dozer for this. While it does a good job of moving dirt, it takes me so long to remove it that it compacts and I have to dig it out with the backho in order to get a full bucket every time with the FEL.

Now I dig the dirt with the bakhoe in quantities that I can handle in a few hours. Then I dig more with the backhoe and haul that off until I get to where I want to be. I'm still running the backhow the same number of hours, but I've eliminated the need for the dozer. For short digs, smoothing, grading and finish work, the dozer is perfect. But when moving dirt any distance, it's not practical at all. This is sort of a revelation for me and I've been suprised by the results.

On a side note, this has also proven to be true in clearing the land. Using the dozer creates a huge mess that takes forever to clean up. If I'm not burning where I'm clearing land with the dozer, like in my lake project, it's faster, cheaper and easier to just take down a few trees at a time and haul them to the burn pile.

And the really big news and something I'm very excited about is a product called Hammerite. It's a special type of paint for the bed of my dumptruck. The problem that I've been dealing with is the clay will stick to the bed and after a few loads, Ihave to clean it out with a shovel. This really sucks and is something that's been driving me crazy. Not just the labor part, but the time it takes to deal with this. Sometimes I can get 5 loads without having to shovel the bed clean, other times I can go a few more loads. This time of the year, the clay is holding allot of moisture. It sticks to everything.

My dump truck is used. It's a 1983 Ford F-600 that I'm pretty sure has been a dump truck since the day it was first bought. I also think the bed is original since the bottom is not flat, but countoured to every rib in the frame under it. It is also rusted and rather rough. I don't have a clue what a new bed woudl cost, but I'm pretty sure it's more then I want to spend on a $3,000 dump truck. I read about Hammerite on the heavey equipment forums and from those who have used it, thought it was worth a try.

I searched for it on google and found it pretty cheap at one place for $45 a gallon. I ordered it and it never showed up. After a month, I canceled that order and bought it from Jamestown Distributing. They sell allot of stuff for boats and docks. Their price was $71.46 for a gallon and $15.63 for shipping. It's not cheap!!!!

There are two finisshes, one is called a hammer finish, and I guess that's for wrought iron type stuff. The other is a smooth finish, which is what I bought. It's designed to go right on top of the rust. I just washed and scrubed the bed clean with water, then let it dry. I applied the paint with a roller, which is how the guy on the other site recomened applying it. It's miserable stuff to work with, very sticky and messy. I just poured some of the bed and rolled it out. At one point, I wasn't sure if a gallon would be enough, but in the end, I used about 3/4 of the gallon.

In its brochure, they say that when it drys, a crystal forms to creat a super hard, smooth finish. After running 50 loads through it over the weekend, I can say that there is no sign of wear. In the corners of the bed, I started to get some build up of clay, but just in the side corners and that was only the last ten loads. The clay just slid out really nice and easy. It was just amazing!!!!!

I'm wondering if it will work in my backhoe and loader buckets. The backhoe bucket is 2 feet wide and builds up with clay fairly quickly. If it's wet, it's just that much worse. If I get the time this week, I'm going to wash out that bucket and paint on the rest of the can in there. It can't hurt and it might make it easier to keep the bucket clean.

I've come to the conclusion that I'm way behind schedule. Too many weather delays, other projects, work and vacation have all gotten in the way of my dirt moving goals. I'm also moving allot of dirt and want to get it right and done with before planting anything. Eventually, this field will be a key part of my property and if done right, a real asset. It's just time, so I'll just keep at it until it's right.

Thanks,
Eddie
 

Attachments

  • Pasture 032 (Small).jpg
    Pasture 032 (Small).jpg
    93.1 KB · Views: 155
  • Pasture 037 (Small).jpg
    Pasture 037 (Small).jpg
    69.1 KB · Views: 185
  • Pasture 036 (Small).jpg
    Pasture 036 (Small).jpg
    74.5 KB · Views: 170
  • Pasture 040 (Small).jpg
    Pasture 040 (Small).jpg
    62.9 KB · Views: 218
   / Creating my Food Plot #14  
Holy mackerel Eddie, that is a lot of work you got done!
It must be great to have that dozer to do all that heavy pushing and that backhoe for everything else. How big is that clearing you're working on going to be and where did you bury all that dirt?
 
   / Creating my Food Plot #15  
What a shame Eddie.
I was working in Kentucky, month or so ago. The same guy I was working for is selling some of his wood.You should of seen the garbage trees they were buying, 4' long up to 6" in diameter 2 bucks. There was a guy there with his equipment ready to go after the bigger stuff when they were done.
 
   / Creating my Food Plot
  • Thread Starter
#16  
I'm still moving dirt. But I've finally found the fastest way to do it. I'm parking the dumptruck next to my backhoe, and then loading the dirt with the hoe bucket. It's allot smaller then the front loader bucket, but since I have to use the backhoe bucket to dig up the ground, the time lost by loading with the small bucket far exceeds the amount of time that it takes to dig it, dump it, and then come back later and use the front bucket to load the dirt into the dump truck.

When I'm done digging with the backhoe, I come back through with the front bucket and scoop up the loose material that I missed with the backhoe bucket. It's amazing how much more material I can move this way!!!!

I also got to the point where I ran out of room for more dirt, so I spread out what I'd dumped on my road. My road had alow area that I'm fillng in. I need it to be wide enough for two way traffic as well as pedestrian traffic. 30 feet at least. Then it has to rise the length of the road so that when I put a sewer line under it, I can maintain my grade and still have 4 ft of dirt above the sewer line.

The dirt piles hold all sorts of water when it rains, so the longer they sit, the harder they are to work. The dirt that I just dumped worked great. Perfect moisture content. The dirt that I dumped last week and earlier was misserable. It was as bad as being totally impossible to work, to just being too wet and not able to compact. Because of the moisture issues, I shaped the road with more angle to it then I wanted, but this will help shed water, so the clay will dry out faster. I still need another layer of dirt, or close to 600 yards.

Eddie
 

Attachments

  • Pasture 050 (Small).jpg
    Pasture 050 (Small).jpg
    58.6 KB · Views: 163
  • Pasture 048 (Small).jpg
    Pasture 048 (Small).jpg
    75.4 KB · Views: 160
  • Pasture 046 (Small).jpg
    Pasture 046 (Small).jpg
    71 KB · Views: 145
  • Pasture 043 (Small).jpg
    Pasture 043 (Small).jpg
    61.5 KB · Views: 163
  • Pasture 049 (Small).jpg
    Pasture 049 (Small).jpg
    58.4 KB · Views: 145
  • Pasture 051 (Small).jpg
    Pasture 051 (Small).jpg
    70.8 KB · Views: 148
  • Pasture 053 (Small).jpg
    Pasture 053 (Small).jpg
    73.9 KB · Views: 271
   / Creating my Food Plot #17  
Hey Eddie,
You don't have, say, 100 pine trees ya wanna get rid of ? I've been looking for some to try a small log house.

Your having to much fun..LOL Your thread, " Creating my food plot" is cool, Heck I just plow and plant mine, never thought about full scale demo, of course, I would have to have new toy's (heavy equipment ) which would probably get me kicked out of the house.
 
   / Creating my Food Plot
  • Thread Starter
#18  
Western,

As a matter of fact, I do. I've tried to sell them, but nobody showed up. I tried giving them away, but that guy only took a few and disapeared. I've burned thousands of them and will do the same when I'm done moving dirt.

Pines are the worse things in the world to burn. I have to cut them into ten to 15 foot lengths so the fire can get past the bark, and even then, it takes months for them to dry out enough to burn. If I have a really hot fire, I might be able to get some of the smaller ones to burn, but the bigger ones are just about fire proof!!!

If you are serious, send me a PM.

Eddie
 
   / Creating my Food Plot
  • Thread Starter
#20  
Part of the plan for the food plot included moving my corn feeder to this area. Prevously, it was out in the middle of a field that I could see from my home. We shot a few hogs from it and I'm sure would have continued to do so, but from the location of my new deer blind that I'll be building, it would have been a straight shot into my neighbors land and across his road that he travels all the time. I won't take any chances with a shot, and that will be a risky shot if something was feeding at that feeder while we're in the blind hunting.

The new location is just past the fartherst edge of where the food plot will be. It's it has trees and cover on the back of it and one side. I have my game cam on the side trees. The other side is open and the front will be clear to our hunting blind. My theory is the trees will give the animals more confidence to eat the corn during daylight hours.

Here's a few pics from this last week. The date and time stamps on the pictures are not accurate. The battery for this must be dying, since I can set it and it will do it's own thing almost instantly.

That hog is in the 300 pound range. We're not sure if it's got tusks or not, in a few pics, it looks like it, but in others, we're not sure. The other hogs are smaller and not too interesting to us. I watched 8 of them a few weeks ago feed withing 20 feet of me while I sat down on the edge of a road. They were all under 100 pounds, which is fine for eating, but not what I was looking for.

The racoons are just funny. We have pics where there is almost no corn on the ground, and then a few pics later, there is allot of corn on the ground with one or two racoons up at the feeder. They are either spinning it to nock off more corn, or just spilling the corn as they get it out of the feeder.

Another suprise was how close they get to the hogs. We didn't know they got along, or tolerated each other. There were 450 pics for the last week, so I was good and only posted the ones that we found to be the most interesting. Some weeks we only get a hundred, but 300 pics would be about normal for the week.

To add to the story, Steph and I went for a last light walk down to our lake. It was half an hour before dark, and we went by the game cam to get the chip with these pics on it. There was a small pile of corn on the ground at that time. Later, I took the kids for a night time four wheeler ride at 9:30pm. We went by the feeder and noticed that the corn was gone!!!!!

Eddie
 

Attachments

  • 26 July 2008 105 (Small) (Small).jpg
    26 July 2008 105 (Small) (Small).jpg
    42.4 KB · Views: 146
  • 26 July 2008 081 (Small) (Small).jpg
    26 July 2008 081 (Small) (Small).jpg
    43 KB · Views: 155
  • 26 July 2008 053 (Small) (Small).jpg
    26 July 2008 053 (Small) (Small).jpg
    42.6 KB · Views: 152
  • 26 July 2008 050 (Small) (Small).jpg
    26 July 2008 050 (Small) (Small).jpg
    42.3 KB · Views: 176
  • 26 July 2008 133 (Small) (Small).jpg
    26 July 2008 133 (Small) (Small).jpg
    51 KB · Views: 155
  • 26 July 2008 220 (Small) (Small).jpg
    26 July 2008 220 (Small) (Small).jpg
    39.3 KB · Views: 148
  • 26 July 2008 309 (Small) (Small).jpg
    26 July 2008 309 (Small) (Small).jpg
    42.1 KB · Views: 149
  • 26 July 2008 310 (Small) (Small).jpg
    26 July 2008 310 (Small) (Small).jpg
    37 KB · Views: 132
  • 26 July 2008 331 (Small) (Small).jpg
    26 July 2008 331 (Small) (Small).jpg
    36.9 KB · Views: 145
  • 26 July 2008 350 (Small) (Small).jpg
    26 July 2008 350 (Small) (Small).jpg
    49.9 KB · Views: 154
  • 26 July 2008 449 (Small) (Small).jpg
    26 July 2008 449 (Small) (Small).jpg
    43 KB · Views: 145
 
Top