Help with Stihl/Oregon Sharpening guide

   / Help with Stihl/Oregon Sharpening guide #1  

Scooby074

Super Member
Joined
Aug 4, 2006
Messages
6,364
Location
Nova Scotia
Tractor
BX 25, ZD 326
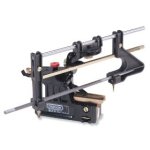
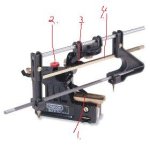
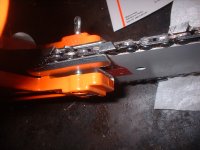
I just purchased a Stihl chainsaw sharpening guide to replace my worn out roller guide. Its a made in Italy model thats the same as a oregon 23736A.Im hoping it will give me more accurate, repeatable sharpening.

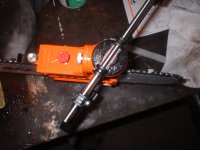
Im having a hard time getting consistent results using this sharpener. Im using a new file and have followed the directions as best as i can. Some teeth get a full cut with the file, while others just get hit near the "hook" area. So I obviously have setup issues.

If anyone has any tips on using this sharpener that i may have overlooked it would be greatly appreciated.

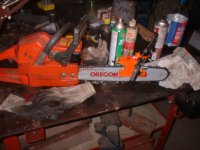
The bar is a Oregon promatch, chain is a Stihl RSC .325". Saw is a Husky 51.
 

Attachments

  • 41nhPxLvrBL._SL500_AA280_.jpg
    41nhPxLvrBL._SL500_AA280_.jpg
    11.7 KB · Views: 511
   / Help with Stihl/Oregon Sharpening guide #2  
Unless you're changing settings between teeth you should be cutting each tooth the same, that is they will be the same after filing. Are you just correcting previous inaccurate sharpenings? MikeD74T
 
   / Help with Stihl/Oregon Sharpening guide
  • Thread Starter
#3  
Well this is the first sharpening on a new chain that has only saw 3 tanks of gas. All the teeth look good and i havent hit any rocks as far as i can see.

The guide should be keeping my file in even contact with the whole underside of the chisel on all teeth, however its not. Im not changing any settings on the guide. A couple of teeth are only getting file contact in the gullet area. Im colouring the underside of the chisel with a sharpie to check file contact. I dont think a new Stihl chain would have a inaccurate grind from the factory, but stranger things have happened.
 
   / Help with Stihl/Oregon Sharpening guide #4  
You could try putting a piece of smooth rod in place of the file and use your guide as a measuring device on a couple other chains/saws to determing which is correct ?? I also would expect a new chain to be pretty good but have had bad chains before. I once bought 3 Oregon chains that had soft teeth on one side. Filed a lot of metal off the good side just to keep up with wear on the other side. I was cutting clean hardwood in the winter so dirt wasn't a factor, just got wood dull. MikeD74T
 
   / Help with Stihl/Oregon Sharpening guide #5  
I have that very same guide (if I haven't already given it to my father in law). I got so frustrated with that guide I just learned to sharpen by hand. I do still use one of the cheap file guides that has depth control and angles marked on it.
 
   / Help with Stihl/Oregon Sharpening guide #6  
I also have a very similar guide. It's been reposing in a box somewhere in the basement for the 20 years!:D

It was too complicated for my abilities!:eek:
 
   / Help with Stihl/Oregon Sharpening guide #7  
I have been using a file guide ery similar to that for years and they so a great job.

First of all, when you clamp it on the bar, make sure the part that clamps on the chain is right over the rivets and isn't to tight as to not let the chain spin and isn't so loose that the chain is sloppy. If it is clampe under the rivets it will cause the chain to pop up out of the grove. And make sure the rear screw that clamps on the bar is tight so the guide won't move around. Once mounted I usually spin the chain around a couple of times to make sure the chain stays where it should.

Second, Once you have it mounted correctly, set your angles (I use 30 and 10) and do all the teeth on one side before you switch to do the others.

Third, there is a little metal tab that will only allow you to spin the chain in one direction (unless you swing the guide up on the pivot). This tab is there for a stop reference. When you rotate your next cutter through to sharpen, always spin chain back until the rear of the cutter you are sharpening is touching this metal tab.

Fourth, Set the depth of the file. This is the little red knob on top. If you tighten it, it will raise the file out of the gullet, loosen it will lower the file. Set it to where you want it.

Fifth, Set the file stop. This is just a cap nut that contacts the centar bar of the guide. The one between the file, and the slide part. File one tooth till it's sharp, and then with the file touching that cutter, back out the cap nut until it touches the centar bar. This stops the file from engaging in the cutter beyond that point. Then sharpen all the teeth, on both sides, without chainging that. This assures that all the teeth are going to be exactally the same size.

Due to to depts setting and the file stop is why it is important to make the cutter touch the metal tab (in the third step) every time. If you dont, none of the settings matter because that is what you referenced it off of.
And make sure you do have the correct sized file 7/32 for 3/8 chain and 5/32 for .325 chain.

In the pic
1. Metal tab
2. Depth control
3.File stop cap nut
4.Center bar

Hope this helps. Anymore questons just ask
 

Attachments

  • chain guide.jpg
    chain guide.jpg
    11.5 KB · Views: 968
   / Help with Stihl/Oregon Sharpening guide
  • Thread Starter
#8  
LD1, thanks for the instructions.

In your step one, are you putting the bottom of the clamp on top of the rivets, or are you putting the top of the clamp metal even with the top of the rivet? Or does it even matter? See illustration.

Im using the same angles in your step 2.

Im following step 3

I have about 1/5 the file sticking above the chipper. in step 4

I have a question about step 5. The instructions say to set the stop so that the file is 90* to the chain clamps. How crucial is this? I eyeballed the 90*, could that be an issue?

Ill try to post some pics of my setup tonight.
 
   / Help with Stihl/Oregon Sharpening guide #9  
The thickness of the chain clamps is about the same thickness as the rivets, or at least on the oregon I have. Just center it up so the contact point of the clamp is in the center of the rivet. If you go above the rivet, the file will contact the the clamp on the low side of the file (due to the 10 degree tilt). If you contact below the rivet, the chain will want to ride up the clamp and come out of the bar. Which remindes me you want to make sure the chain is tight too.

In step 5, don't worry about the 90 degrees. Just make sure the rear of the cutter you are sharpening is back against the metal stop tab. The cap nut just lets your file stop at a given point so you don't file the tooth clear off and allows you to make all the teeth the same. As your cutter wears, your tooth isn't as long across the top but you still need to back the cutter till it touches the metal tab. So through out the life of the chain, that angle will change. Every time you sharpen it, you will need to tighten the cap nut to allow you to take more off the tooth, and thus the angle will change.

I also forgot to ask you if you are running chisel(square back) or chipper(round back) chain. Cause the chisel you want the 10 degree tilt. If you are using the chipper, most of them call for 0 degree tilt. The file straight across instead of a little uphill angle.
 
   / Help with Stihl/Oregon Sharpening guide
  • Thread Starter
#10  
THanks for the info.
Im pretty sure its a chisel chain.
After messing around with it this afternoon, i think i have it figured out. I basically started from square one and followed the instructions here. Its working great. Chain is as sharp as new. Once you get on to the gauge it works quite well. You other guys should dig your old ones out and give it a try.:D

I asked about the clamps because i noticed the file cutting into them. Next time i use it, ill centre the clamps on the rivets.

As the chain wears, should i keep the "tooth stop" (#1 in your pic) in the same place and adjust the acorn nut? Or leave the acorn nut and adjust the tooth stop?

Ill throw up a couple pics of my sharpening adventure:p
 

Attachments

  • DSCF0009.JPG
    DSCF0009.JPG
    315.3 KB · Views: 986
  • DSCF0010.JPG
    DSCF0010.JPG
    317.5 KB · Views: 909
  • DSCF0011.JPG
    DSCF0011.JPG
    324.2 KB · Views: 1,009
  • DSCF0012.JPG
    DSCF0012.JPG
    317.4 KB · Views: 827
 
Top