Building a stick frame house in the woods in 90 days

   / Building a stick frame house in the woods in 90 days #1,192  
I texted the builder around 7:50 this morning saying I had some concerns about the construction I wanted to discuss with him. He called me back before 8am and we will meet up around 2pm on site. I'll definitely give him an A for effort! I have a list of all my issues in a nice excel spreadsheet, and print outs of the various pictures you guys have posted, mostly fascia related. I'll give him a copy of the punch list and hopefully we'll get it knocked out over the next few days.

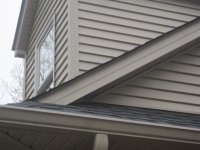
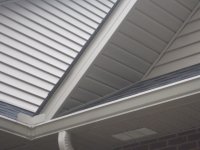
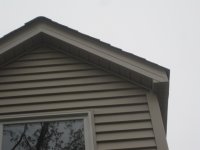
Also, with all this fascia talk, I decided to look at how it was done on my house (built in 1997), and low and behold, they did use the 1x2 when doing mine. Here are a few shots (It's time to get the power washer out again soon, lol).

So even after 16 years, it remains quite straight and flat, unlike the zoomed in versions of the original images of the trouble areas at mom's house.

I have all this printed out to show the builder this afternoon.
Pete,
I've read the facia comments on this thread and to tell you the truth couldn't follow much of the details people posted without accompanying pictures.

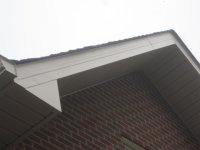
Here are some pictures of our facia. We do not have drip edges. We built and moved into our house 2+ years ago. I am happy with the job the siding people did. We don't have appear to have facia ripples issues. Have a look at the shape of our facia siding. There is a ridge along the center that may help prevent the ripples. There may be better ways to do it but the method our installers used has so far seemed to work well.

IMG_0457.JPG IMG_0458.JPG IMG_0459.JPG IMG_0460.JPG

Obed
 
Last edited:
   / Building a stick frame house in the woods in 90 days #1,193  
Pete,
I've read the facia comments on this thread and to tell you the truth couldn't follow much of the details people posted without accompanying pictures.

Here are some pictures of our facia. We do not have drip edges. We built and moved into our house 2+ years ago. I am happy with the job the siding people did. We don't have appear to have facia ripples issues. Have a look at the shape of our facia siding. There is a ridge along the center that may help prevent the ripples. There may be better ways to do it but the method our installers used has so far seemed to work well.


Obed

They used a tool called a Brake Buddy on your fascia. It puts those creases in it and makes it a lot stiffer. We use it on that style fascia as it eliminates the oil canning and makes a better finish. That little tool wasn't cheap but it is well worth the price. We use it when we wrap beams on porches as well as their terrible for oil canning. Most of our work is on older homes so nothing is ever straight and easy.
 
   / Building a stick frame house in the woods in 90 days #1,194  
Pete,
I've read the facia comments on this thread and to tell you the truth couldn't follow much of the details people posted without accompanying pictures.

Here are some pictures of our facia. We do not have drip edges. We built and moved into our house 2+ years ago. I am happy with the job the siding people did. We don't have appear to have facia ripples issues. Have a look at the shape of our facia siding. There is a ridge along the center that may help prevent the ripples. There may be better ways to do it but the method our installers used has so far seemed to work well.

Obed

Obed,
You certainly do have a drip edge formed on your facia. Go look again or zoom in for a closer shot.
You also have some warbling down where the fascia covers the end of the soffit box, but not bad.

Peters rake fascia all need replaced, not just over the garage.. Look at the one he pictured today over the dining room end.
They are just not made right and will never be right unless replaced. Builder pointed that out the very first time he came on.. The contractor jumped the gun and put the roofing on before the facia.
The fascia needs a T top bent on it at the least to be properly applied. The rake ends can still be fixed by making new fascia, either with or without
the 1 x 2 board, however Peter likes best. The shingles along the rakes can be lifted enough to put the top of the T drip under them and on top of the felt, nailing down to the roof.
They will either have to saw off the roof sheathing on the ends where it sticks out or use a 1 x 2 under it. On the garage where the sheathing is too short they can make the part of the T top wider where it slides under the shingles so it will be over the sheathing for nailing. If he wants the board added it will have to be wider to compensate for the missing stick out of sheathing so everything will be the same dimensions when done. That's an advantage of making the stuff in the field. You can fix the other screw ups by using a little more material.
They will have to leave the fascia where the spouting runs are alone and add some kind of leaf guard to possibly act as a drip edge. The drip edge there should have gone down under the rubber.

I and others warned of the cold weather application warbling before the fascia was ever put on. It is back a few pages and a good place to start if you want to get a clearer handle of what all this
fascia mess is about.
I and others knew it and warned of it, the contractor knew it; so the question is why did he let them do it on such a cold day?
Do to the way he applied it as a floppy Z with no attachment to the roof they could have just as well waited till now or later.
No on the job supervision has reared its ugly head. The guy that stops by and talks to Peter probably didn't even know the metal guys did it
the way they did. He still may not, unless Peter showed him the pictures and walked him around the house.

Ron
 
   / Building a stick frame house in the woods in 90 days #1,195  
In post #781, page 79, it looks like there is a concrete wall behind the PT plywood in the stairway. I would remove the plywood, clean up the concrete face and skim coat it.
 
   / Building a stick frame house in the woods in 90 days #1,196  
Pete, I love the angle from off the left rear corner of the house. With a view of the deck wrapping around after the rail is installed and the chimney after the rock, this is gonna be my favorite angle I think, especially with landscaping. The front view looks welcoming, but this view looks comfortable and relaxing.:)
 
   / Building a stick frame house in the woods in 90 days #1,197  
In post #781, page 79, it looks like there is a concrete wall behind the PT plywood in the stairway. I would remove the plywood, clean up the concrete face and skim coat it.

That's a possibility. The framing 2 x 4's would still have their edges exposed if the PT plywood was removed and the plywood likely goes down to the bottom of the trench so would have to be cut along the stair tread sides and risers. A little tricky with concrete behind it.
I would anticipate a lot of voids unless they used a vibrating snake when pouring the concrete when the plywood is removed.

Might consider just putting "green board" like used on bathroom walls, especially around tubs that have tile above them. It could be painted or a plastic sheet material that is single ply, color all the way through, could be glued on. Pebbled surface looks real nice and is really tuff. There are edge pieces and joiner pieces to put panels together with that are literally water tight. In commercial buildings, green board is applied to steel studs, and the plastic sheeting is glued on. They wash it down with hoses without any leakage behind it when properly applied.
Ron
 
   / Building a stick frame house in the woods in 90 days #1,198  
That's a possibility. The framing 2 x 4's would still have their edges exposed if the PT plywood was removed and the plywood likely goes down to the bottom of the trench so would have to be cut along the stair tread sides and risers. A little tricky with concrete behind it.
I would anticipate a lot of voids unless they used a vibrating snake when pouring the concrete when the plywood is removed.
Ron

Never heard of a concrete vibrator referred to with that term. Yes, Peter and I are all too familiar with that tool. We used one fairly extensively when building a massive (and I do mean massive) concrete support for his telescope. I am sure Peter has some pictures of it somewhere, but to say it is big is an understatement. I am pretty sure it is larger and more sound than most bridge supports you see out there.
-Stu
 
Last edited by a moderator:
   / Building a stick frame house in the woods in 90 days #1,199  
I am sure Peter has some pictures of it somewhere, but to say it is big is an understatement. I am pretty sure it is larger and more sound than most bridge supports you see out there.
-Stu

Stu,
I saw a picture of it in his generator rebuild project a while back.
How many feet does the base go below ground level?
Any idea how many cubic yards of concrete for the entire project?
Ron
 
   / Building a stick frame house in the woods in 90 days #1,200  
That's a possibility. The framing 2 x 4's would still have their edges exposed if the PT plywood was removed and the plywood likely goes down to the bottom of the trench so would have to be cut along the stair tread sides and risers. A little tricky with concrete behind it.
I would anticipate a lot of voids unless they used a vibrating snake when pouring the concrete when the plywood is removed.

Might consider just putting "green board" like used on bathroom walls, especially around tubs that have tile above them. It could be painted or a plastic sheet material that is single ply, color all the way through, could be glued on. Pebbled surface looks real nice and is really tuff. There are edge pieces and joiner pieces to put panels together with that are literally water tight. In commercial buildings, green board is applied to steel studs, and the plastic sheeting is glued on. They wash it down with hoses without any leakage behind it when properly applied.
Ron

Yep, the 2x4's would still be embedded in the concrete and it would be a pain to cut out the plywood, but doable. Not sure how much pain it's worth to get the wood away from the concrete at this point, or how much trouble to expect down the road if the wood is left in place.

Since wood takes moisture from concrete, maybe a vapor barrier, then cement or green board could be used to cover the plywood, then skim coat the board. That would provide a fairly stable moisture level at the finished surface which should help its longevity.
 
 
Top