Adding Power Beyond, 3-spool hydraulic valve, and T-n-T to a JD 2520

   / Adding Power Beyond, 3-spool hydraulic valve, and T-n-T to a JD 2520
  • Thread Starter
#21  
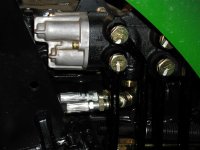
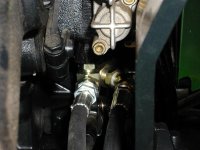
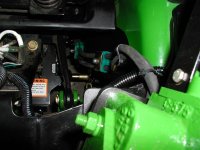
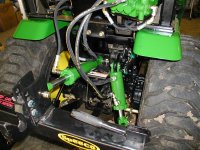
Then the block goes back into the tractor, between the transmission and DSCV, as it was originally. The cap screws get tightened, and the banjo bolt goes back in and torqued. That step being complete makes me feel less stress. Here is a side view and a rear view of the hoses routing out of there.
 

Attachments

  • P1010135 (Medium).JPG
    P1010135 (Medium).JPG
    62.5 KB · Views: 2,333
  • P1010136 (Medium).JPG
    P1010136 (Medium).JPG
    63.5 KB · Views: 2,132
   / Adding Power Beyond, 3-spool hydraulic valve, and T-n-T to a JD 2520
  • Thread Starter
#22  
And here is the view of the valve, from the rear end, hoses routed in and out on each side. That's as far as I could get last nite. Also, I started putting the fittings and couplers on top of the valve, its going to be a mess. Gotta get creative on this next part.
 

Attachments

  • P1010139 (Medium).JPG
    P1010139 (Medium).JPG
    78.8 KB · Views: 2,316
   / Adding Power Beyond, 3-spool hydraulic valve, and T-n-T to a JD 2520
  • Thread Starter
#23  
I relocated the seat belt storage clips. Originally they were both behind the seat, on the ROPS crossbar. My hyd valve sets right there on the one side, so I relocated that side. Then I liked the new position so well I relocated the other one too. To do this I took the handle off, and added the bracket and retorqued the nuts from below. The left hand side didnt work out as well, so there I had to slot the seat belt storage bracket slightly to allow it to mount flat under the handle properly. Pics...
 

Attachments

  • P1010112 (Medium).JPG
    P1010112 (Medium).JPG
    65.7 KB · Views: 2,059
  • P1010113 (Medium).JPG
    P1010113 (Medium).JPG
    54.2 KB · Views: 1,838
   / Adding Power Beyond, 3-spool hydraulic valve, and T-n-T to a JD 2520 #24  
That is beautiful work. Your planning shows up well.

Regarding the quick disconnects on the top of valve. Consider an elbow with an O-ring boss on the long leg and a female pipe thread on the short leg for the middle port. The elbow sticks up above the fittings on each side far enough to let you turn it parallel to a side fitting. Part no 6805LL as Discount Hydraulic Hose. Sometimes you can find a regular length, "long", and "extra long" so that the tops of the fittings will be at three different levels.
 
   / Adding Power Beyond, 3-spool hydraulic valve, and T-n-T to a JD 2520 #25  
Awesome job!

Monte
 
   / Adding Power Beyond, 3-spool hydraulic valve, and T-n-T to a JD 2520 #26  
Again, a great job.

Setting that aside, the thing I enjoy most about this thread and your project is watching / reading you enjoying yourself with the work at hand. I can see that you have exceptional skill-sets, patience, and attention span.

It's all I can do with my patience and attention, to hook up the FEL without losing sight of what it is for which I need to use it.


Thanks for sharing because aside from your time in the shop, it takes a lot of time here to post and inform.

:tiphat:
 
Last edited:
   / Adding Power Beyond, 3-spool hydraulic valve, and T-n-T to a JD 2520 #27  
As a 2520 owner I'm really enjoying this thread and anxious to see how well it works. Thanks for taking time to document and show pictures of your very nice work. Although I have no ability to even copy what you are doing, it will be a very good reference when I get around to adding a rear remote on my 2520. JC
 
   / Adding Power Beyond, 3-spool hydraulic valve, and T-n-T to a JD 2520
  • Thread Starter
#28  
Thanks ! for all the nice feedback guys. I do enjoy doing this stuff so telling you all about it and showing off the pictures just adds to the fun for me.

After a minor incident with one pinched O-ring causing hydraulic fluid leaking all over my floor, I am back on track. Suffice it to say, "If you think that an O-ring is going to stay in place during assembly without applying grease to hold it there, guess again". The large O-ring behind the "block" got pinched, so watch out for that.

The current solution for the congestion of couplers on top of the valve is to route the center spool (two couplers) to a remote panel area and mount the couplers there. This will work out just fine because that center spool was to be split to both the couplers in the back and two couplers mounted near the loader couplers on the side of the tractor. So here is what the top of the valve looks like. Notice that the center spool connections are just plugged for now.
 

Attachments

  • P1010141 (Medium).JPG
    P1010141 (Medium).JPG
    68 KB · Views: 2,301
   / Adding Power Beyond, 3-spool hydraulic valve, and T-n-T to a JD 2520
  • Thread Starter
#29  
And the supply and return lines that feed this aux valve are secured with a couple clamps. Here is a view looking downward past the valve, following the hoses.
 

Attachments

  • P1010154 (Medium).JPG
    P1010154 (Medium).JPG
    65.5 KB · Views: 2,041
   / Adding Power Beyond, 3-spool hydraulic valve, and T-n-T to a JD 2520
  • Thread Starter
#30  
and here is the rear view, with the top cylinder and sidelink cylinder all plumbed up, although I am still experimenting with hose length and fitting orientation to get the hoses to flow nicely when the three point moves.
 

Attachments

  • P1010143 (Medium).JPG
    P1010143 (Medium).JPG
    104.4 KB · Views: 2,202
 
Top