converting a 3-pt concrete mixer from PTO to hydraulic drive

   / converting a 3-pt concrete mixer from PTO to hydraulic drive #1  

dfkrug

Super Member
Joined
Feb 3, 2004
Messages
7,174
Location
Santa Cruz Mtns, CA
Tractor
05 Kioti CK30HST w/ Prairie Dog backhoe, XN08 mini-X
Over the next few days, I will be posting the process I went through to
convert my Mixer80 3-pt concrete mixer from PTO drive to hydraulic drive.
I am posting this in the Hydraulics forum because it illustrates what's
involved in the conversion of potentially ANY PTO-driven implement.

First question: why make this conversion? Several reasons:

> hydraulic drive is reversible. This is particularly valuable with post hole
diggers, but also gives advantages to mixers. If you can reverse the
direction of a mixer, you can use the rotation (in combo with the right kinds
of flutes) to unload the drum. This is how commercial readimix trucks work.

> hydraulic drive allows you to put implements requiring rotational power
on the front of your tractor. This is obviously better for a brush or snow
blower, but it also means you can dedicate the rear of your tractor to an
implement you do not want to remove. For me, it is my backhoe, which
is tedious to remove and provides ideal ballast.

> there are other more minor advantages like safety...no open spinning
driveshafts

***

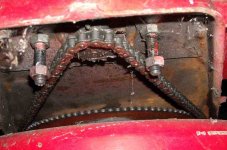
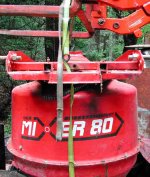
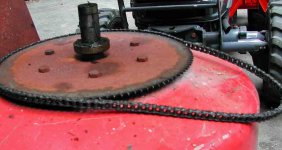
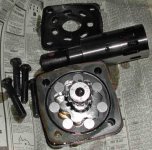
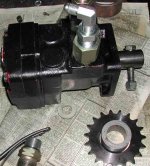
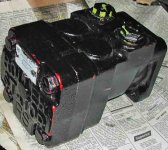
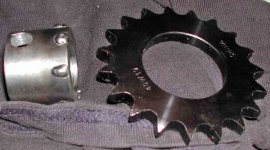
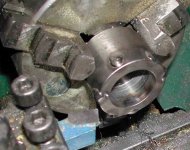
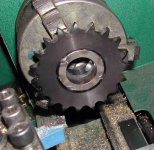
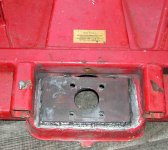
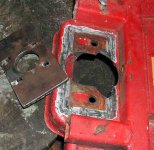
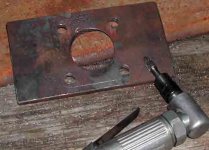
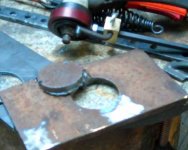
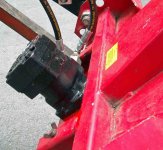
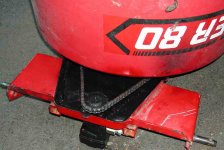
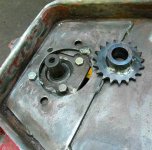
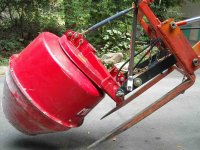
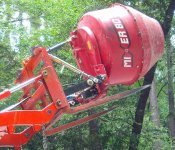
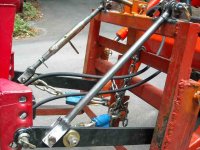
Anyway, the first 4 photos show my mixer as it is originally configured.
There is a tiny drive sprocket (2nd photo) and 40 guage chain, which drives
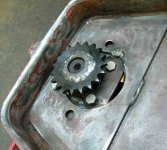
a gigantic sprocket with 114 teeth (4th photo). I used my FEL to pull this
thing apart. I have mixed scores of yards of concrete and stucco over the
past 10 years, and I always lube the chain with m/c aerosol chain lube.
Despite that, the drive spocket was pretty badly worn. :-(
 

Attachments

  • mxr_1.JPG
    mxr_1.JPG
    56.8 KB · Views: 1,498
  • mxr_2.JPG
    mxr_2.JPG
    53 KB · Views: 1,367
  • mxr_3.JPG
    mxr_3.JPG
    77.2 KB · Views: 1,330
  • mxr_4.JPG
    mxr_4.JPG
    46.4 KB · Views: 3,951
   / converting a 3-pt concrete mixer from PTO to hydraulic drive
  • Thread Starter
#2  
OK, now I need to get a hydraulic motor.

To choose a motor, you need to decide what volume and torque you need.
My operating conditions will be a final drum RPM of about 30 for the slowest
speed. At idle, my tractor will be putting out about 2GPM, and my torque
requirements should be quite low, well below any motor I see commonly
available. (This is primarily due to the multiplication of torque I get with
my chain drive.) I do not expect to need the full 2500 psi of my implement
pump.

So, I decided to buy a motor that was between 7 and 12 cubic inches/rev.
I could just go to SurplusCenter and pay $150, but I know there are hundreds
of new motors on eBay for far less. The problem with eBay listings is that
the seller usually has no idea what he has....displacement, torque, shaft
size, etc. So you try to find his motor in a manufacturer catalog, based on
a part #, or serial number. I figured that if I was patient, I would find a
new motor that met my needs for less than $100. I would then choose my
drive sprocket and shaft adapter based on what I could buy. After a few
months of looking I landed a 7 GPM White roller-stator motor for about $65,
and it had a straight 1" shaft (first photo). That allows me to use 1" DOM
tubing instead of buying spline adapters or woodruff key adapters. Cool!

I next bought a drive sprocket from SS...a very nice one that is twice as
thick as the worn out one the mixer came with. The hole in the sprocket is
about 1.75", so I will have do some creative welding (2nd photo).

Ever wonder what it looks like inside these motors? See the 3rd photo.
 

Attachments

  • mxr_6.JPG
    mxr_6.JPG
    61.8 KB · Views: 952
  • mxr_7.JPG
    mxr_7.JPG
    71.5 KB · Views: 1,015
  • mxr_5.JPG
    mxr_5.JPG
    53.7 KB · Views: 838
   / converting a 3-pt concrete mixer from PTO to hydraulic drive #3  
I studied doing that. I just can't play with the big kids on that (too much money). The valves , motor type valve vs cylinder valves, some kind of flow divider, hoses, fittings, and possibly a oil cooler. Then build mounts and accurate bolts hole pattern for the flanges. I'll be watching for the results. I'm not a critic, but just a guy that knows his limits on money and time and I do wish you luck. Are you going to mount the mixer unit on the front of the Tractor? I see you wrote you did not like removing the backhoe. I wound up rebuliding a old stationary type 6 cu ft unit to mount 3 pt on the back of my tractor with a home built PTO shaft and belt pulley reduction. I've not actually mixed cement with it yet, just some rocks and dirt mud to see if it wood spin and then dump okay and it looks like it might work, we'll see. bjr
 
   / converting a 3-pt concrete mixer from PTO to hydraulic drive
  • Thread Starter
#4  
The valves , motor type valve vs cylinder valves, some kind of flow divider, hoses, fittings, and possibly a oil cooler.

Well, BJR, I am jumping the gun, but here is my Bill of Materials:

> White Hydraulic Motor, 6.7 ci, 2000psi, $75 shipped
> drive sprocket, < $10
> two 15' hoses w/ JIC ends, 1/4", $65
> hydraulic adapters and QDs, $40
> 1/4" steel plate (scrap)
> 2" of 1" ID DOM tubing (about $1/inch in 12" quantities)
> #40 chain master links, $3
> misc bolts/nuts (stock)

I used my existing rear AUX spool valve on the tractor. You do not need
any special valve or diverter. My tractor is HST, so it has an oil cooler
already.

With respect to motor control valves, you don't really need those unless the
object you are turning with your motor had a lot of momentum. This will
cause a lot of back pressure when a conventional spool valve is suddenly
closed, as when hyd motors are used as vehicle drive motors. This is not an
issue for my mixer or for hyd post hole diggers.
 
   / converting a 3-pt concrete mixer from PTO to hydraulic drive
  • Thread Starter
#5  
Now I need to get my sprocket centered on my DOM tubing. This does
not have to be perfect, since this is a very low speed chain drive.

First, I welded some nubs onto the tubing (photo #1), then I cut them
down a bit on the lathe (#2) to achieve a snug fit on the sprocket (#3).
I had to open up the bore a few thousanths so it would fit on the 1.000"
shaft. Now I am ready for welding the sprocket on.
 

Attachments

  • mxr_8.JPG
    mxr_8.JPG
    47.5 KB · Views: 550
  • mxr_9.JPG
    mxr_9.JPG
    58 KB · Views: 588
  • mxr_10.JPG
    mxr_10.JPG
    70.4 KB · Views: 1,692
   / converting a 3-pt concrete mixer from PTO to hydraulic drive
  • Thread Starter
#6  
Before I weld up the sprocket, I need to make sure that it will be in the
same plane as the driven sprocket. So next, I will mount the motor.

I grabbed some 1/4" plate from the scrap pile (I have lots of scrap) and
cut out a central hole with my plasma cutter. My hole cutter guide allows
me to cut a hole that is almost exactly the right size, and it only takes
a minute or 2 (photo #1). I cleaned that up with the carbide air grinder
and drilled 4 mounting holes (#2).

Next, I had to prep the mixer for welding. That included trimming back some
of the steel to clear the motor bolts, as well as removing paint (#3). Those
free-hand cuts are ooogly.

Photo #4 is the result. Now I can mount the motor.
 

Attachments

  • mxr_14.JPG
    mxr_14.JPG
    56.3 KB · Views: 518
  • mxr_13.JPG
    mxr_13.JPG
    57.6 KB · Views: 531
  • mxr_12.JPG
    mxr_12.JPG
    34.9 KB · Views: 438
  • mxr_11.JPG
    mxr_11.JPG
    43.7 KB · Views: 529
   / converting a 3-pt concrete mixer from PTO to hydraulic drive
  • Thread Starter
#7  
Now the motor is mounted, and the sprocket is welded up (#1 and #2).

Everything is put back together with a slightly lengthened chain, and I
am good to go (#3, and #4).

I chose to use 15-ft long 1/4" hoses after determining that my fluid
velocity would be about 13fps for 2GPM flow rate. This is a little high,
and will cause some fluid heating, but it is acceptable. I do not run the
mixer for extended periods, or I would have gone with 3/8" hose. I am
fortunate that my Kioti tractor's OEM AUX valve is detented. Buying
pre-made hoses of this length saves tons of money over having them
custom made at a hydraulics shop.
 

Attachments

  • mxr_18.JPG
    mxr_18.JPG
    66.4 KB · Views: 559
  • mxr_17.JPG
    mxr_17.JPG
    50.1 KB · Views: 679
  • mxr_16.JPG
    mxr_16.JPG
    66.1 KB · Views: 426
  • mxr_15.JPG
    mxr_15.JPG
    70.7 KB · Views: 826
   / converting a 3-pt concrete mixer from PTO to hydraulic drive
  • Thread Starter
#8  
This is how I operate my mixer. I made a 3-pt hitch for my pallet fork
frame. I could also use this on the rear 3-pt hitch. I have just poured
some piers for a new carport structure I am making and it works well.

I chose to make a hitch for my fork frame because that is the implement
I most often use. I have tried my rock rake with it and it works great.
One could also adapt one of those 3-pt quick hitch adapters to the FEL
mounts.
 

Attachments

  • mxr_19.JPG
    mxr_19.JPG
    87.4 KB · Views: 3,226
  • mxr_20a.jpg
    mxr_20a.jpg
    101.6 KB · Views: 2,162
  • mxr_21.JPG
    mxr_21.JPG
    71.2 KB · Views: 1,043
  • mxr_22.JPG
    mxr_22.JPG
    66.7 KB · Views: 1,109
   / converting a 3-pt concrete mixer from PTO to hydraulic drive #9  
Looks good!! Well done. bjr
 
   / converting a 3-pt concrete mixer from PTO to hydraulic drive #10  
Nice job. Was there some reason you took the hyd motor apart?
 
 
Top