Installed Hydraulic Side Link

/ Installed Hydraulic Side Link #1  

Cocre

Gold Member
Joined
Aug 23, 2008
Messages
424
Location
Sandy Run, SC
Tractor
'06 John Deere 3320
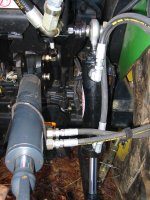
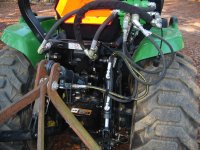
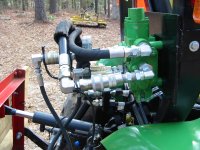
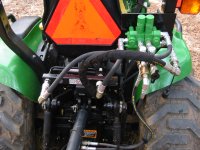
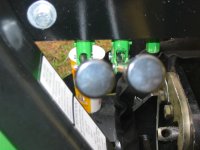
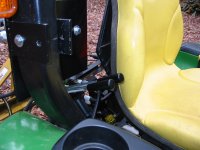
Completed the hydraulic side link last weekend, and I am very satisfied with the results. I purchased a clevis hydraulic cylinder from The Surplus Center (6 inches of travel), cut the ends off of it and welded on a swivel eye off of spare top link I had laying around, and then welded a homemade clevis to the rod end. I was fearful that the cylinder might contact the backhoe adapter plate at its extreme angels, but it misses by about an 1/8 of an inch (whew).
 

Attachments

  • 20100330 014.jpg
    20100330 014.jpg
    563.1 KB · Views: 1,326
  • 20100330 017.jpg
    20100330 017.jpg
    556.5 KB · Views: 2,033
  • 20100330 011.jpg
    20100330 011.jpg
    911.4 KB · Views: 1,255
  • 20100330 010.jpg
    20100330 010.jpg
    912.8 KB · Views: 645
/ Installed Hydraulic Side Link #2  
Nice job on the cylinder mod and the top and tilt combo will spoil you. I have the TnT on my L4400 and it make it much more versitile. How wide is the Box Blade on your JD?
 
/ Installed Hydraulic Side Link
  • Thread Starter
#4  
Nice job on the cylinder mod and the top and tilt combo will spoil you. I have the TnT on my L4400 and it make it much more versitile. How wide is the Box Blade on your JD?

Thanks. I have already put the tilt to good use on a drainage ditch. It just makes it so easy to contour perfectly.

The box blade is a 72". I bought it when I bought my 8N back in '82. The extra length on the JD 3320 helps with getting into the corners of stuff. It looks much wider than the tractor in the pictures, but it is really only a foot wider overall.
 
/ Installed Hydraulic Side Link #5  
Looks great :thumbsup:. The sidelink I just added is 4" stroke, it was interesting to see the difference in the amount of tilt you got with 6". I've got pix at the end of a post I did, you can search eepete and toplink to see it. The hose routing is always a challenge...

Pete
 
/ Installed Hydraulic Side Link #6  
I like your set up. I have a 3320 as well and need to do the same thing. Could you let me know what valve you used and do you have a picture of how you mounted it. I have the same power beyond kit as you and am wondering why you had to use the return line on the left side. I thought I would be able to just use the loop hose through an open center valve body.

Thanks
Dan D.
 
/ Installed Hydraulic Side Link
  • Thread Starter
#7  
I like your set up. I have a 3320 as well and need to do the same thing. Could you let me know what valve you used and do you have a picture of how you mounted it. I have the same power beyond kit as you and am wondering why you had to use the return line on the left side. I thought I would be able to just use the loop hose through an open center valve body.

Thanks
Dan D.

Most of the valve came off of eBay. It took a few of weeks for everything to show up, but eventually it did. I bought two Prince SVW1DD1 sectional control valves with detented float, and then found a SV115 inlet section, then an SVE11 open center outlet section, and finally a 660401002 bolt kit for a two spool valve. The only parts that were not new was the bolt kit, everything else was new in their boxes. Total cost was $121.35 for the valve which included shipping. This was way over half off of what Surplus Center was asking. I got the float option because that was what I found, and I do use it on the tilt part.

I welded the mounting bracket up myself and mounted it to the ROPS. It attaches with one bolt threw an existing hole in the ROPS. It fits real snug and only start the nylock nut by hand. It actually has two bolt holes in the bracket, but that turned out to be overkill. The valve mounts to it with the valve handles down and not only turned around to point the other way, but also upside down. I did have to saddle the fulcrum pieces just a bit to get max movement with the handles. That part actually turned out super great. I did not want the valve handles in the way of the rockshaft lever, and they work perfect. I made the bracket a bit big in case I want to add another section to the valve.

Prince does not recommend using the valve outlet to supply other devices downstream; they say the outlet should dump directly to the oil reservoir. Initially I set it up just like about everyone else (outlet supplies oil to the next valve downstream), but after reading Prince's warning I decided to spend the extra $50 and buy a power beyond plug and another hose and fittings, and route a line from it to supply the 3 pt hitch. The outlet off the valve now connects to the backhoe return that dumps directly back into the reservoir. This is the proper way, but many will tell you it simply does not matter. My tractor was just worthy of me spending the extra $50 on it.

I am pleased with the performance, but hydraulics are not cheap.
 

Attachments

  • IMG_4366.JPG
    IMG_4366.JPG
    438.3 KB · Views: 642
  • 20100109 042.jpg
    20100109 042.jpg
    606.9 KB · Views: 876
  • 20100109 044.jpg
    20100109 044.jpg
    518.4 KB · Views: 730
  • 20091031 002.jpg
    20091031 002.jpg
    356.6 KB · Views: 559
  • IMG_4357.JPG
    IMG_4357.JPG
    434.2 KB · Views: 655
/ Installed Hydraulic Side Link #8  
Cocre, I was wondering if your side links are adjusted for equal tilt for both left and right tilt?
 
/ Installed Hydraulic Side Link
  • Thread Starter
#9  
No, currently at its extremes it is set for the right side to lift an inch above the left arm, then lower five inches below the left arm. I can manually adjust the left arm to be longer or a shorter (I moved Deere's easy adjustable right link over to the left side) to move my six inches of travel around so as to get that equal left/right movement if needed, and that is probably what I will do. Using all the of travel to lower the right arm six inches from parallel with the left will tilt the box blade beyond any reasonable need, so splitting the difference should be about perfect.
 
/ Installed Hydraulic Side Link #10  
No, currently at its extremes it is set for the right side to lift an inch above the left arm, then lower five inches below the left arm. I can manually adjust the left arm to be longer or a shorter (I moved Deere's easy adjustable right link over to the left side) to move my six inches of travel around so as to get that equal left/right movement if needed, and that is probably what I will do. Using all the of travel to lower the right arm six inches from parallel with the left will tilt the box blade beyond any reasonable need, so splitting the difference should be about perfect.

I was just wondering, I have found that I have more than enough tilt in both directions when the hydraulic is centered at level position. Some guys prefer to have the maximum tilt and have theirs adjusted so that they are able to get that. I have not found that I have ever needed that much of an angle. But that may very well just be my situation and conditions that I have to work with.
 
/ Installed Hydraulic Side Link #11  
Cocre, Thanks for the details and pictures. I have used my box blade a lot the last few days and can see where this set up would make life a lot easier.

Thanks again
Dan D.
 
/ Installed Hydraulic Side Link #12  
No, currently at its extremes it is set for the right side to lift an inch above the left arm, then lower five inches below the left arm. I can manually adjust the left arm to be longer or a shorter (I moved Deere's easy adjustable right link over to the left side) to move my six inches of travel around so as to get that equal left/right movement if needed, and that is probably what I will do. Using all the of travel to lower the right arm six inches from parallel with the left will tilt the box blade beyond any reasonable need, so splitting the difference should be about perfect.

Instead of switching the adjustable link, was there a reason why you decided to hyd. power the right side, instead of the left??
 
/ Installed Hydraulic Side Link
  • Thread Starter
#13  
Instead of switching the adjustable link, was there a reason why you decided to hyd. power the right side, instead of the left??

Three reasons I guess.

1) That's the way many others seem to do it.
2) The control valve is on the right. Running hoses from it to over or under the toplink to get to the cylinder would have been even more of a challenge to prevent hose entanglement. I am always looking back at my implements, I generally always look over my right shoulder. Just easier because the lift control is also on the right.
3) Most of my use will be grading the driveway and cleaning out the ditches. I tend to drive on the right side of the road.

Whichever works for you is the way to go.

Switching the adjustable link on the JD 3320 was about a 30 second job.
 
/ Installed Hydraulic Side Link #14  
I know this thread is old but I would like to take advantage of my PowerBeyond hydraulics and set up a system like Cocre's (thank you for posting this!) for a tilt. I have been reading these threads all day and now realize I am more confused than ever. Can someone recommend a two or three valve setup that does not need to be assembled? I went to the suprlus center website thinking I head at least a small clue and realized pretty quickly I do not! I think I need a double acting spring centered with at least one having float, as well as power beyond rated for 9GPM or more?

Thank You - Dana
 
/ Installed Hydraulic Side Link #15  
I know this thread is old but I would like to take advantage of my PowerBeyond hydraulics and set up a system like Cocre's (thank you for posting this!) for a tilt. I have been reading these threads all day and now realize I am more confused than ever. Can someone recommend a two or three valve setup that does not need to be assembled? I went to the suprlus center website thinking I head at least a small clue and realized pretty quickly I do not! I think I need a double acting spring centered with at least one having float, as well as power beyond rated for 9GPM or more?

Thank You - Dana

Dana, if you need float on one spool, then your best option is the "stack" valves. The other unibody 2 and 3 spool'ers don't have float. Why are avoiding them?
 
/ Installed Hydraulic Side Link #16  
KennyD - I was looking at something like this "2 SPOOL 8 GPM PRINCE MB21GB5C1 DA VALVE W/FLOAT" - would this work? Is this considered a stacked valve? I just need to get something with at least 9gpm flow. I am trying to learn as I read but I am get caught up in the nomeclature. I was just shocked at how many options there are for these valves and was hoping I could start with the correct "body" and handles, figure out how to mount it (as the advice was given in another thread) and go from there.

I truly appreciate your patience...and willingness to help! - Dana
 
/ Installed Hydraulic Side Link #17  
Too small, you need at a minimum of the flow that your pump is rated for, or your going to get a lot of extra heat build up. Look farther down the list and you will see larger GPM valves that have what you want. I already made the mistake of only adding 2 spools,:( wish that I would have added 3. Don't make the same mistake.;)
 
/ Installed Hydraulic Side Link #18  
KennyD - I was looking at something like this "2 SPOOL 8 GPM PRINCE MB21GB5C1 DA VALVE W/FLOAT" - would this work? Is this considered a stacked valve? I just need to get something with at least 9gpm flow. I am trying to learn as I read but I am get caught up in the nomeclature. I was just shocked at how many options there are for these valves and was hoping I could start with the correct "body" and handles, figure out how to mount it (as the advice was given in another thread) and go from there.

I truly appreciate your patience...and willingness to help! - Dana

Yep...to small. No other ones have the float you say you want. Brings us right back to the stack valves if you need float. Oh, and why do you need float?

You may want to start a new thread also...
 
/ Installed Hydraulic Side Link #19  
Kennyd - I started a new thread. Thank You for your help! I truly appreciate it. I will be googling stacked valves!
 

Marketplace Items

2020 MACK GRANITE (A58214)
2020 MACK GRANITE...
500 BBL FRAC TANK (A58214)
500 BBL FRAC TANK...
16001 (A55853)
16001 (A55853)
2009 Jeep Grand Cherokee 4WD SUV (A59231)
2009 Jeep Grand...
2017 Toyota Camry Hybrid Sedan (A59231)
2017 Toyota Camry...
2013 Ford F-150 Crew Cab Pickup Truck (A59230)
2013 Ford F-150...
 
Top